mythankfultable.com

Feeding the Heart, Body, and Family

  • My Pics
  • My Story
  • The Puppies
  • Contact Us
Feeding the Heart, Body, and Family

cream cheese

Cream Cheese Sprinkle Valentine Cookies

February 13, 2021 by chrissy@mythankfultable.com

As I sit here writing with a very tired puppy at my feet, in the stillness that is a Friday evening, Valentine’s Day is around the corner. In many of the podcasts I listen to, the idea of being single during the “Pandemmy” (because seriously if we can’t give this thing a cute nickname…what is our mental health status…wait, what?) is perfectly acceptable.

I know there are those couples out there who rocked out quarantine and are stronger than ever. And, go you. That’s amazing.

And there are those of us who had some good old fashioned time to look inward as well as outward and say, yeah, let’s face some hard facts.

Let’s use this quiet time to look at some of the stuff. The stuff we stay busy to avoid.

Which leads to uncomfortable questions, quiet reflections, and harder decisions. Which results in being solo for celebration of all couples everywhere.

But, that being said, I think even those of us who are celebrating sans-valentine deserve something beautiful and sweet on the sweetest day. What says cute like a cookie covered in sprinkles? Am I right? I read somewhere, “Hey these feelings aren’t going to eat themselves.” I jest.

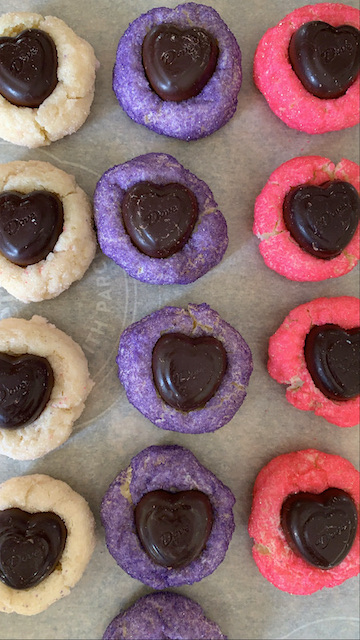
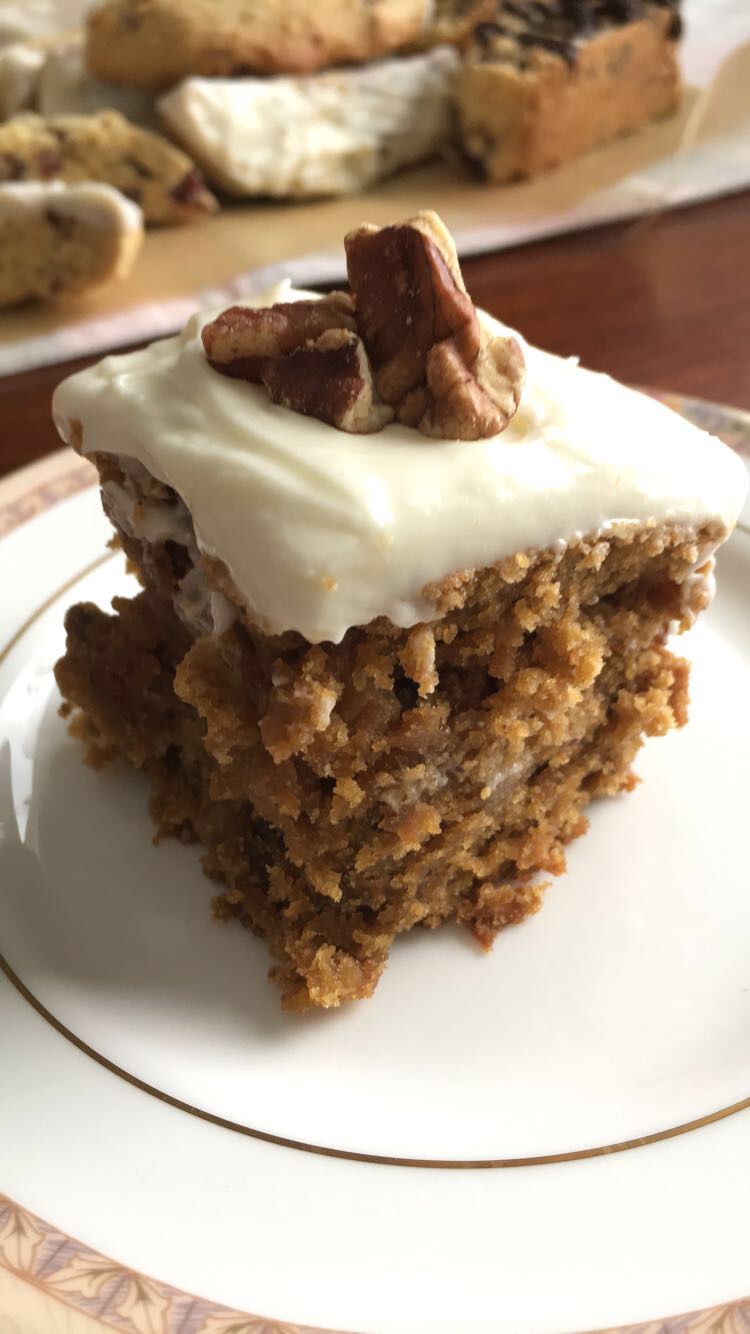
The original posting for these cookies is from Sally’s Baking Addiction. These cookies are light and fluffy, they almost melt in your mouth, with the sweet and tang of a cream cheese base, vanilla and almond extracts, and the crystal crunch of the sanding sugar coating. Now, you don’t need to roll them in sugar. They are sweet without it. But it’s Valentine’s Day. Let’s paint with all the colors of the wind here.

Mix the dough, roll and chill. Then while the oven is preheating, roll them in decorative sugar (I found the three pack of two pinks and purple at my local craft store in the baking aisle) and press slightly with a glass to flatten.

When the cookies are freshly baked and cooling, press a heart shaped chocolate in the middle and voila! Perfection. I used Dove dark chocolate hearts, but with the ingenuity of the candy makers of the world, you could really mix it up. These cookies would actually be perfect for any occasion, provided you find the right sprinkle colors for the event. (Red and Green, Blue and Silver, Yellow and Pink, like I said, colors of the wind).

I think that the gift of quiet/alone time is the ability to check out your life and determine if it is the one you want to be living. We build it, daily. We create it, and design it, and chose to live where and how we live, if we are lucky. I am so thankful that even though things aren’t perfect…and my life looks differently than it did a year ago, I still wake up me.

Maybe the best part of Valentine’s Day is the part where we realize that we are surrounded by people who love us. The family we are born into, the family we create, the family we choose, the people who hold us up along the way. People who see our light and honor it. Encourage it, and help it grow.

Those are the love lights we cling to.

Those are the people who get the cookies. 🙂

I hope you enjoy this recipe, and as always, thank you for coming to the table.

Love,

Chrissy

Click Below for Full Recipe

Print

Cream Cheese Sprinkle Valentine Cookies

Print Recipe

The original recipe for these cookies is from Sally’s Baking Addiction. I bake at a lower temperature, but otherwise I followed her directions and recipe. This recipe yields approximately 3 dozen cookies.

  • Author: chrissy@mythankfultable.com

Ingredients

Scale
  • 1 Cup Butter (2 Sticks)
  • 2 Ounces Cream Cheese (block)
  • 1 Cup White Sugar
  • 1 Large room temperature Egg
  • 2 Teaspoons Vanilla Extract
  • 1 Teaspoon Almond Extract
  • 1/2 Teaspoon Salt
  • 1 1/2 Teaspoons Baking Powder
  • 3 Cups Flour
  • Various sanding sugars/sprinkles
  • Approx 36 chocolate heart candies

Instructions

  1. Combine flour, baking powder, salt together in a separate bowl and set aside.
  2. In a mixer with a paddle attachment, combine butter and cream cheese on high speed until combined and smooth.
  3. Add sugar and beat until combined.
  4. Add in egg, extracts, and beat on higher speed until all incorporated.
  5. Scrape down sides of bowl, and slowly add dry ingredients at a lower speed.
  6. Chill dough (at this point I scoop and roll dough between my hands and chill- making the next step easier but you can chill the entire dough and scoop dough out afterwards) for at least one hour.
  7. Preheat oven to 325 degrees and prepare cookie sheets with either parchment or silicone baking sheets.
  8. Roll cookie dough balls in sanding sugar or sprinkles of your choice.
  9. Place cookies approximately 2″ apart on cookie sheets.
  10. Using a glass or measuring cup, press down slightly on dough balls to flatten.
  11. Bake cookies for approximately 12-15 minutes depending on your oven. 
  12. Allow cookies to cool for 5 minutes.
  13. Press unwrapped chocolate heart candy into the middle of each cookie.

Did you make this recipe?

Share a photo and tag us — we can’t wait to see what you’ve made!

Posted in: Cookies, My Story Tagged: chocolate heart, Cookies, cream cheese, pink, sprinkles, Valentine's, valentines day

On Raising Humans and Strawberry Jello Pretzel / Pretzel Jello Salad

March 21, 2020 by chrissy@mythankfultable.com

It’s funny, because when I started this blog post back in February, I have no idea what I planned to write. But here I sit, and the title still works, so we will go from there.

We find ourselves in a pandemic. I said to my daughter last night, “You get that you are living history right now?” Which, in truth is both interesting and really scary. She looked over at me and smiled. I’ll take it. In a time when we are spending a whole lot of time with our own children, smiles are good things.

As a Reading Teacher in a pretty good sized school, I get the privilege of seeing a lot of little faces. Many cannot pronounce my last name correctly, and that’s ok. I answer to a lot of things. I also get to do the announcements in the morning, and I am missing the jokes of the day I get handed to me on scraps of paper from the students. It’s all of the tiny moments that make up the school day. I really do have great stories. I often say, “If you didn’t work here, you wouldn’t believe it.” And my colleagues? I am one of the lucky ones. Our building is family. That’s a gift.

This week was the onset of “distance learning.” A week where teachers are gathering materials and supporting students online. A time where parents are with their children all day, and working on materials they may or may not understand. It’s all very different looking, and feeling. We are finding work spaces in our home spaces. We are thankful for the internet. We are trying to make it work. And it is challenging for many.

I’ll just say it, raising humans is hard and exhausting. Go back and reread that, because it is worth repeating. If you are a parent and you are depleted at the end of the day, and wondering…”Did I do everything I could?” breathe, you are normal.

We don’t always use our teacher voices when we talk to our own kids. We don’t always see their struggles like we would our students, because, well, they have us for parents…how hard can their lives be?

Now, my kids have always been my priority, and we are past the help with bathing, help with potty, help with bedtime rituals. They don’t really need me. I mean, they need me but not really. I think I did a good job raising them and then, I realize an area where I just missed the mark. Where I say to myself, “how did I miss that?” or “I could have handled that this way.” Hindsight is awesome, isn’t it?

When I knew I wanted to have children, I had three foundational rules as a mom. 1. I would say the following things and mean it. “I am sorry”, “I am proud of you”, and “You are loved.” 2. I would step back and give myself a few breaths before reacting. 3. I would cuddle and hug my kids if they let me. I was raised by non-huggers. I have worked to become a hugger, but I think I actually raised cacti. But hey, we try. I hope I have succeeded in these goals. My eerie calm when stuff goes down proves the step back part worked…but I still find pockets of sucky parenting if I analyze it enough.

So, that being said, one phrase I hate to hear is, “There is nothing to eat.”

Cue the evil eye.

Here is a recipe that will not get that comment. I’ve realize that “There’s nothing to eat” actually means, “I don’t see anything in the fridge I want to eat.” Different sentence. This is not one of those things. This is a birthday, Easter, and picnic/gathering staple. Is it dessert? Is it a side dish? Is it called Jello-Pretzel or Pretzel Jello salad? I don’t know. I just know if I make it the kids eat it.

This was first introduced by the amazing Nonni in PA, and I lost her recipe somewhere along the line and the internet found me another one. I think they are all pretty much the same in that it is a layer of salty pretzels, a layer of cream cheese cool whip goodness, and a layer of strawberries in Jello.

Don’t judge. Salty, sweet, creamy, crunchy. It’s good stuff.

I guess if I were going to parallel it to parenting, its got the whole spectrum, the ups and downs, the smooth and the rough. It’s not just one thing, ever. And, I am finding as my children become adults, the worries get bigger and harder. But that’s for another blog post.

Make this dish. You won’t be disappointed. I am not sure what our Easter will look like, but I can guarantee this will be on the table.

Oh, and you are doing a great job raising your kids, in case no one has told you today.

I hope you enjoy this recipe, and as always, thank you for coming to the table,

Chrissy

Print

Strawberry Jello Pretzel / Pretzel Jello Salad

Print Recipe

This is a layered side dish/dessert that consists of a salty crushed pretzel layer, a sweet cream cheese cool whip layer, and topped with a strawberry jello layer. If you can use fresh strawberries that’s amazing but frozen work just as well!

  • Author: chrissy@mythankfultable.com

Ingredients

Scale

Pretzel Layer

  • 2 Cups crushed pretzel rods
  • 3/4 Cup melted butter (I use salted)
  • 3 Tablespoons Sugar

Cream Cheese Layer:

  • 8 Ounce package of cream cheese
  • 8 Ounce container of frozen whipped topping (cool whip)
  • 3/4 Cup Sugar

Strawberry Layer:

  • 6 Ounce package Strawberry Gelatin 
  • 2 Cups Boiling Water
  • 20 Ounces Frozen Strawberries (or Fresh)

Instructions

  1. Preheat Oven to 400*
  2. Mix crushed pretzels, butter, and sugar together and press into a 9×13 pan. This should form a thin pretzel crust. 
  3. Bake for 7 minutes and set aside to cool.
  4. In a mixer, combine cool whip and cream cheese to a light fluffy texture. 
  5. Spread over cooled pretzel crust and refrigerate until chilled.
  6. Combine boiling water, Jello, and strawberries and combine. Cool slightly.
  7. Pour strawberry mixture over cream cheese layer and refrigerate.
  8. When the Jello Layer is set, cut and serve.

Did you make this recipe?

Share a photo and tag us — we can’t wait to see what you’ve made!

Posted in: My Story Tagged: cool whip, cream cheese, dessert, pretzels, Salad, strawberries

Cherry Crescent Moon Cookies and Finding the Joy

February 11, 2020 by chrissy@mythankfultable.com

Welcome 2020 a little bit late…I have been busy being a mom. Like, full on seeing the light at the end of the tunnel momming. Not that I haven’t always been a mom, or that things have ever been really quiet in our world.

With one child in college and the other a junior in high school, we are ending the days of carpooling and chauffeuring, of planning calendars for who needs to be where and when, and what does the future hold? Looking for colleges, choosing majors, making decisions for an uncharted path. But I find myself with the knowledge that unfortunately age has granted along with my laugh lines. It’s all about the journey, it’s all about finding the joy.

I have told my children in their endeavors to choose what is next, that you have to love what you do. Not every day, but most days. I have also told them that no one at nineteen maps out what the future holds. Almost no one in my life is living Plan A. It just isn’t a thing. We choose something and then life hands us something else, and we grow, and change, and become something better. So choose the path that gives you joy.

I am not sure that this is the advice of the wealthy. I am not sure that this is the advice you would give your children, but it is the advice I am giving mine. Now, that being said, there is a no-stagnating rule in my home. You are not allowed to just sit and do nothing. You will either go to school or work, or both. You will move forward in one capacity or another, but you will move. Choose wisely, but be flexible, life has a plan of handing you options. My father used to say, “Keep moving forward. As long as you keep moving forward, you’ll be ok.”

So, to this cookie; Which is a little bit about the journey, and a little bit about joy.

This is a cookie my Pennsylvania family makes. Now, that family could be an ex-family, but they aren’t. They could be a removed family as a result of divorce and sad circumstances. They aren’t…and that is by choice. By them as well as me. I am thankful for it. I say this because sometimes, in choosing joy, you choose to do the thing that other people don’t get or understand. Sometimes though, grace and love choose the better thing. The different path. It shapes you, if you let it…and then you find joy when you didn’t expect it. Oh, and a cookie.

This cookie is a soft, pillowy cream cheese dough filled with either cherry preserves or the good old pie filling, then drizzled with an almond glaze and sprinkled with sliced almonds.

They are delicious.

They are little pockets of joy.

They take a little extra time in that you have to make the dough and chill it. Then you have to roll it out, cut into circles, spoon a little cherry filling, then press together. You can use a fork to seal the edges or pinch with your fingers…then there is the post baking decorating that is extra…but oh so worth it. Cherry and almonds and soft dough, oh my.

And, this momma is trying to find her way back to the thing that brings her joy, which is writing. The cooking and baking has continued, but the writing has been stuffed back in the corner of my brain with the cobwebs, and it’s taken me a month to do what a writing professor once said, “Put your Butt in the Chair” and write (Thank you Jane Yolen). I still plan on momming full time/over time, but somewhere, I am hoping to catch up on the blogging and post more. That is the 2020 creative intention, anyway.

With Valentine’s Day on the horizon and cool weather still in the forecast…I highly recommend these tasty little cookies for your loved one. You will not be disappointed. I’d be remiss if I didn’t give you all the Norma Jane warning…”Watch out, the cherries may have pits!”

Find the joy my darlings.

I hope you enjoy this recipe and as always, thank you for coming to the table.

Chrissy

Print

Cherry Crescent Moon Cookies

Print Recipe

Cherry filled and drizzled with almond glaze, these light cream cheese pastry cookies are the perfect combination of sweet and tart.

  • Author: chrissy@mythankfultable.com

Ingredients

Scale


  • 1 cup butter, softened
  • 1 8 ounce cream cheese, softened
  • 1 teaspoon almond extract
  • 2 cups all-purpose flour
  • ½ cup cherry preserves
  • 2 egg whites
  • ¾ cup powdered sugar
  • ¼ teaspoon almond extract
  • 1 – 2 tablespoon water
  • ¼ cup sliced almonds

Instructions


1. In a large mixing bowl beat the butter and cream cheese with an electric mixer on medium to high speed for 30 seconds. Beat in the 1 teaspoon almond extract until combined. Beat in the flour until dough comes together. Divide dough in half. Cover and chill dough about 1 1/2 hours or until easy to handle. 

2. Preheat oven to 375°F. Line cookie sheets with parchment paper; set aside. On a lightly floured surface roll half the dough at a time to 1/8 inch thick. Using a scalloped-edge 3-inch round cookie cutter, cut out dough. Place rounds 1 inch apart on prepared cookie sheets. 

3.  Spoon 1/2 teaspoon cherry preserves onto one side of each round; spread to 1/4 inch from the edge. Fold dough rounds in half, enclosing preserves; press edges with the tines of a fork to seal. Whisk egg whites until frothy; brush cookies lightly with egg whites. Bake for 12 to 15 minutes or until cookies are light brown. Transfer cookies to a wire rack and let cool. 

4. In a small bowl stir together powdered sugar, the 1/4 teaspoon almond extract, and enough of the water to make an icing of drizzling consistency. Drizzle cookies with icing. Sprinkle with almonds. Let stand until icing is set. 

Did you make this recipe?

Share a photo and tag us — we can’t wait to see what you’ve made!

Posted in: My Story Tagged: Almond, cherry, Cookie, cream cheese, dessert, Holiday

Easy Lemon Cream Cheese Bars

April 14, 2019 by chrissy@mythankfultable.com
Lemon Cream Cheese Bars

Lemon, you belong in my life. Easy lemon recipe? Game on. This recipe could pass for either a breakfast treat or a dessert, depending on the time of day you choose to serve it…if that even matters. Basically it is a light, cream cheese batter zingy with lemon zest and juice, with a flaky pre-made crescent dough top and bottom. As in, the hardest part of this recipe is the pat pat pat of stretching out the dough you popped out of a can, and blending the cream cheese part.

While your cream cheese filling is in the mixer, press your crescent roll dough in the bottom of a parchment lined pan (you can skip the parchment but I like to be able to slice/serve and it makes it so much easier).

Smooth the cream cheese mixture over the dough, then cover with another layer of crescent dough.

I wasn’t super careful about the making sure the top was sealed together, because you end up brushing the dough with butter and sprinkling with sugar and additional lemon zest, which…covers the mistakes.

This simple, light, lemony dessert is the perfect addition to any spring table, bringing a sweet, tangy, creamy, pastry combination to your meal.

I hope you enjoy this recipe, and as always, thank you for coming to the table!

Chrissy

Print

Easy Lemon Cream Cheese Bars

Lemon Cream Cheese Bars
Print Recipe

These delicious Lemon Cream Cheese Bars combine the sweet cream cheese lemon layer sandwiched in between crescent dough. Very much like a danish, this easy recipe  is light and tangy and sweet.

  • Author: chrissy@mythankfultable.com

Ingredients

Scale
  • 2 containers of refrigerated Crescent Roll Dough (8 ounces)
  • 2 packages of Cream Cheese (8 ounces)
  • 2 Lemons, Zested and juiced (I used more lemon zest because I like it)
  • 1/2 Cup White Sugar
  • 2 Tablespoons Melted Butter
  • 3 Additional Tablespoons White Sugar

Instructions

  1. Preheat oven to 350*
  2. Line the bottom of a 9×13 baking dish with parchment paper and spray with cooking spray.
  3. Take one container of crescent roll dough and press into pan (try to keep it as one whole piece-rectangle)
  4. Mix cream cheese, sugar, zest, and juice together until smooth and creamy.
  5. Spread cream cheese mixture evenly over the bottom layer of crescent roll.
  6. Unroll the second container of crescent roll dough and carefully stretch over the lemon cream cheese layer.
  7. Brush melted butter on top of crescent dough top.
  8. Mix remaining sugar (3 tablespoons) and additional lemon zest together and sprinkle on top of the butter.
  9. Bake for approximately 30 minutes, until the top is golden brown and the sugar/butter mixture is crackly.
  10. Allow to cool for at least 20 minutes. Chill in the refrigerator until ready to cut into bars.
  11. When cool, use the parchment paper to lift the bars out the pan, and transfer to cutting board.
  12. Cut into squares and serve.

Did you make this recipe?

Share a photo and tag us — we can’t wait to see what you’ve made!

Posted in: Dessert, My Story, Recipes Tagged: breakfast, cream cheese, Danish, dessert, lemon, Lemon Cream Cheese Bar

Carrot Cake Blondies and the Easy Way Out

March 19, 2018 by chrissy@mythankfultable.com
Carrot Cake Blondies

Carrot Cake Blondies

Carrot Cake Blondies

I am ever surrounded by strong, determined, multi-tasking women. We work at home, we work at our jobs, we work at the gym, we work at our families, and finally, at the end of the day, we work to make ourselves finally relax and unwind. Yes, for some of us, down time is actually hard.

I have a friend in Pennsylvania who’s younger brother has this amazing ability to nap. Anywhere, anytime. My son can sleep in for hours beyond my internal alarm clock. I vaguely remember my mom waking me up with the vacuum cleaner at some point in my high school years, because even though it was summer and I didn’t have to work, no one should be in bed after 9 am.Carrot Cake Blondies

I am envious of those people. The sleepers. The ones who can sit on a couch with the intention of resting. In a weird creepy but un-creepy way, I want to snuggle next to them and learn their magic. The magic of the sleep. There is nothing like a warm sunbeam and soft breathing and rest. It is truly one of my ultimate goals.

That being said, with all of the working and the being strong and the multi-tasking, sometimes we need to just take the easy way out. For example. We reheat the leftovers or eat cereal for supper. We sweep but don’t wash the floor. We pull the sheets up but don’t necessarily smooth everything out underneath when we make the bed. We buy the pre-shredded carrots or potatoes for recipes. And it is all OK.

Carrot Cake BlondiesWhile this recipe isn’t necessarily easy (as in box mix easy) it is easy when compared to making a carrot cake. So I say yay. And no one will find it lacking, I promise. I PROMISE.

Now the world is divided into Carrot Cake lovers and haters. You choose your side. While I don’t want it more than say my banana cake, I do love a slice of carrot cake every now and then. As spring promises to be around the corner (sort of…who are we kidding there is still snow on the ground) Carrot Cake seems like the perfect Easter-y brunch-y dessert.

And then, this baby is covered in a thick, cream cheese frosting, so you can’t say no.  Cream cheese frosting is like the mortar that holds all of life together. You can literally spread it on a piece of raw celery and you will be happy.  Cream cheese frosting is the pinnacle of all desserts. OK, I’m over reacting a bit. No, I am not.

This is a one bowl mix it all in, bake in under an hour dessert.

I did grate the carrots myself, because I like a fine grate and the pre-shredded carrots are too big for me. But that is me. I packed the cup measurement, because carrots mean moisture and that is never a bad thing in a blondie.

The recipe calls for chopped pecans, and all of the spices you expect in carrot cake. It delivers. Oh so moist. Oh so flavorful. Oh so almost healthy if you forget the sugar, butter, and cream cheese frosting. Make it anyway.

Carrot Cake BlondiesI will say the original recipe (bakerbynature.com) which is from an amazing website I love called for a 9X9″ pan. My pan was smaller 8X8, and my dessert ended up being higher in the pan and therefore I sliced them smaller. I will be questing for a larger pan so I can make these again.

After the dessert cools, you slather up that frosting and go to town. I topped my squares with a half pecan for the pretty factor, but it doesn’t need to be pretty, it is delicious. I will always choose delicious over pretty, and this blog is about shortcuts, so save the decorations for when you have more time.

I may never be a great napper, I will always be a multi-tasker, but I will also choose the easy way out on occasion. I am only one woman after all. We deserve the good desserts too, even if they don’t have layers and piped baby carrots out of fondant on it.

I hope you enjoy this recipe, and as always, thank you for coming to the table!

Chrissy

Click below for a printable recipe.

Print

Carrot Cake Blondies and the Easy Way Out

Carrot Cake Blondies
Print Recipe

Adapted original recipe from www.bakerbynature.com These rich, decadent carrot cake blondies have all of the magic of carrot cake without all of the hard work. Rich, cream cheese frosting tops the magic and makes this one amazing dessert.

  • Author: chrissy@mythankfultable.com

Ingredients

Scale
  •  1 Cup Melted Butter (8 ounces)
  • 1 1/2 Cup Dark Brown Sugar
  • 2 Teaspoons Vanilla Extract
  • 1 Large Egg and 1 Large Egg Yolk
  • 1 Packed Cup of finely grated carrot
  • 1 1/2 Cups of Flour plus 2 Tablespoons
  • 1 Teaspoon Ground Ginger
  • 1 Teaspoon Ground Cinnamon
  • 1/2 Teaspoon Salt
  • 3/4 Cup Chopped Pecans

Cream Cheese Frosting:

  • 8 Ounces (One block) of Cream Cheese, softened
  • 2 Teaspoons Vanilla Extract
  • 2 Cups Confectioner’s Sugar


Instructions

  1. Preheat oven to 350*
  2. Line a 9×9″ baking pan with parchment paper (my pan was 8×8″).
  3. In a mixer with a paddle attachment, combine melted butter, brown sugar, and vanilla until combined and smooth.
  4. Add in eggs and grated carrot. Combine.
  5. Add spices and dry ingredients.
  6. Fold in chopped pecans.
  7. Pour batter into parchment lined pan, and smooth.
  8. Bake for 32-35 minutes, or until the center is set (and tester comes out clean).
  9. Cool completely in pan before removing in frosting.
  10. To make frosting, combine cream cheese, vanilla, and powdered sugar until combined.
  11. Cut into squares and serve.

Did you make this recipe?

Share a photo and tag us — we can't wait to see what you've made!

Posted in: Dessert, My Story, Recipes Tagged: Blondies, Carrot, carrot cake, Carrot Cake Blondies, cream cheese, cream cheese frosting, dessert

Overnight Blueberry Cream Cheese French Toast

February 1, 2018 by chrissy@mythankfultable.com
Overnight Blueberry Cream Cheese French Toast

Overnight Blueberry Cream Cheese French Toast

Overnight Blueberry Cream Cheese French Toast

Ever since my children were little, this overnight casserole has been our Christmas morning breakfast.

For years, we were able to celebrate Christmas as a family even though we were divorced. I know I am not the only person in the world to do this, and quite frankly, it isn’t always the best possible solution to a divorced family situation, but we made it work for years. Every family is unique in navigating the holidays and I was fortunate to be able to make Christmas special for our kids despite the fact that our lives looked differently.

Overnight Blueberry Cream Cheese French Toast
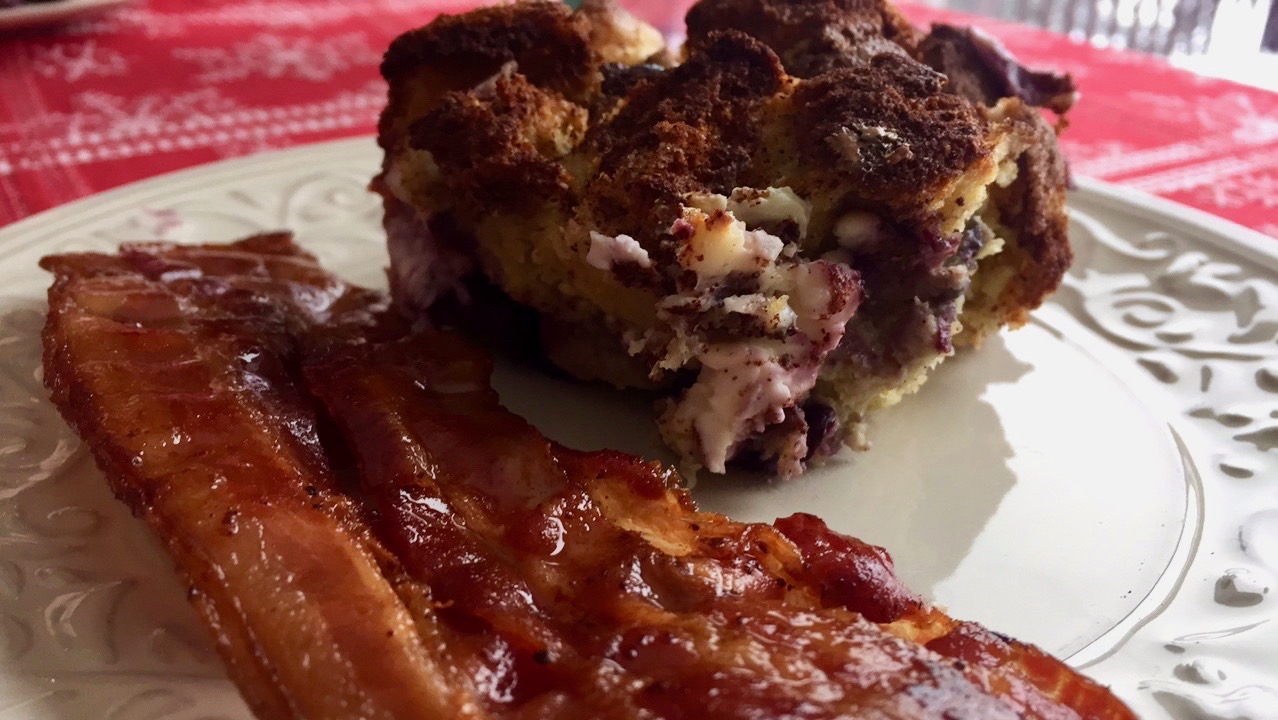
This casserole was as much a part of our Christmases as was a special luncheon, finding the pickle (German tradition),my mother-in-law putting on her Christmas socks to signal the present opening could begin, and the general celebratory traditions that happen in a family during a holiday.

It wasn’t until my father was diagnosed with cancer that I determined I would be spending Christmas with my parents instead of Pennsylvania, meaning the day would be spent without my children that year. It was a difficult choice, but one I was glad I made. It ended up being my dad’s last Christmas.

After that, I guess we celebrated Christmas like other divorced people, or as Ricky Bobby’s kids say in Talladega Nights, “Two Christmases!”Overnight Blueberry Cream Cheese French Toast

When the children and I finally moved into our own place,  I wondered if they would still want this for breakfast, since it would be our first Christmas in our own home.

Again, this year being the first Christmas that had no Pennsylvania in the agenda for the week, I wondered if we wanted to try something new.

But, I guess if it ain’t broke, don’t fix it. This is Christmas for us.

Overnight Blueberry Cream Cheese French ToastI make this casserole one day a year. Once. Probably because we all eat our own thing for breakfast and for the most part, it doesn’t ever include maple syrup or cinnamon and sugar and cream cheese.  But hey, this once a year treat is over the top indulgent and worth every bite.

You basically dry out the bread of your choice. I use Italian bread from the bakery. Not the denser star bread, just a regular loaf. I use two. Trim off the crust, cube, and set out to dry. I do the cutting first because if you have ever tried to saw into a stale loaf of Italian bread be ready to wipe down every surface to clean up the crumbs. No thanks.Overnight Blueberry Cream Cheese French Toast

The pan is prepared with a layer of butter and cinnamon sugar coat, then it is time to assemble.

Bread, blueberries and cream cheese, more cinnamon sugar, then the last layer of bread.

The custard mix can be made with milk instead of cream, and it doesn’t need bourbon, but hey, this is a breakfast fit for a birthday party. Slowly pour your custard over the bread to make sure everything gets good and soaked, Final dusting of cinnamon and sugar and you are done. Cover and refrigerate overnight.

Overnight Blueberry Cream Cheese French ToastSo I am not going to lie, this Christmas was a little heavy. We have suffered a major loss, and having navigated this kind of thing with losing my own dad a few years ago, the weight of the worry “Are the kids going to be ok?” and “Is everybody having a good Christmas?” along with my making sure my momma enjoyed the day and everyone was ok, I didn’t want to spend my day in the kitchen. I had enough to deal with.

I made this AND pre-cooked my bacon the day before. SO, less mess, less cooking for me.

Overnight Blueberry Cream Cheese French Toast

Overnight Blueberry Cream Cheese French Toast

The next morning, take the casserole out of the refrigerator and let sit on the counter for 30 minutes. Bake covered, then uncovered, then let sit for a few before serving.

So here is the tricky part for you parental units doing the cooking. Do the math. You need to have this baby out of the fridge a good 90 minutes before you want to eat it.

Now, for me, the non-sleeper, this is easy. For you with small children who have internal timers of their own, you have to figure it out. However, you can make this any morning you want, so just plan ahead.

This recipe makes a full 9×13 pan. It can serve as many or as few people you want, depending on portion size. It also stays pretty warm for a while, so if you say have a serving, walk away, and decide you want more…it’s there if you want it. While this is baking your house will smell of cinnamon and all that is French toasty-ness. It puffs up golden brown and holy moly is it delicious. Crunchy top, soft puffy middle, melty cream cheese and blueberry. We don’t even need to add syrup…but you will, because it is, after all, French toast.

In a world where so much seems to change and seem unstable, I guess it’s a good thing some things, like this overnight French toast, can be counted on. I am thankful for the table, the loved ones around it, and the food upon it.

I hope you enjoy this recipe, and as always, thank you for coming to the table!

Chrissy

Click below for a printable recipe!

Print

Overnight Blueberry Cream Cheese French Toast

Overnight Blueberry Cream Cheese French Toast
Print Recipe

Delicious overnight blueberry cream cheese French toast with a cinnamon sugar mix. Easy to combine and bake the next morning!

  • Author: chrissy@mythankfultable.com

Ingredients

Scale
  • 2 Loaves of Italian Bread, Cubed and Dried
  • 12–16 Large Eggs
  • 2 Cups of Heavy Cream
  • 2 8 Ounce Packages of Cream Cheese, Cubed into 3/4 Inch Cubes
  • 1/4 Cup Maple Syrup
  • 1/4 Cup Bourbon
  • 1 Tablespoon Vanilla Extract
  • 2 Cups Fresh or Frozen Blueberries
  • Additional Sugar and Cinnamon to sprinkle in baking dish, etc.

Instructions

  1. Prepare a 13 x 9″ baking pan with butter and sprinkle with cinnamon and sugar mix.
  2. Place half of the cubed bread into the bottom of the pan.
  3. Sprinkle blueberries and cream cheese evenly over the bread cubes.
  4. Sprinkle Cinnamon and Sugar mix over the cream cheese and blueberries.
  5. Cover with remaining bread cubes.
  6. In a large bowl, combine eggs and heavy cream, mixing with a fork or whisk until well combined.
  7. Mix in maple syrup, bourbon, and vanilla extract.
  8. Gently pour egg mixture over bread mixture, making sure to cover and coat all of the bread mixture.
  9. Sprinkle sugar and cinnamon mixture over top of the French toast and cover with plastic wrap.
  10. Refrigerate overnight.
  11. In the morning, remove overnight French toast and let sit out for 30 minutes.
  12. Preheat oven to 375*
  13. Remove plastic wrap, cover with foil and bake for 30 minutes.
  14. Bake for an additional 25-30 minutes uncovered, until a knife inserted into French toast comes out clean.
  15. French toast will puff up and turn golden brown. It will also smell amazing.
  16. Allow French toast to set for ten additional minutes before serving.

Did you make this recipe?

Share a photo and tag us — we can't wait to see what you've made!

Posted in: breakfast, My Story, Recipes Tagged: Blueberries, breakfast, cream cheese, Overnight Blueberry French Toast, Overnight French Toast

Cream Cheese Frosted Carrot Cake Cookies

September 22, 2017 by chrissy@mythankfultable.com

Cream Cheese Frosted Carrot Cake Cookies

Oh my. This has been a week…(read: THIS HAS BEEN A WEEK!!!) and this blog is better than therapy. Sometimes, it’s just better to stand in my kitchen and watch the cream cheese frosting form as soft clouds of confectioner’s sugar and vanilla come together to make the perfect topping for the perfect cookie.

Actually, these cookies are not like a cookie at all. If I could compare them to a muffin top (the good kind) or a mini cake, it would be more accurate. Soft, cakey, and packed with spice and carrot  without the density of a carrot cake.

Whipped Cream Cheese Frosting

Oh, and did I mention the frosting?

For all things vegetable, I am a huge fan of the fine grater. Little shreds of orange goodness start off this batter. I used two different types of flour, and I think that contributes to the lightness of the cookie. I also watched them carefully as they baked, and baked them in a 325* oven, to get that cooked but not browned on the bottom look. It’s my cookie snobbery rearing it’s ugly but delicious head again.

I refrigerated the dough, and scooped the chilled dough with my baby ice cream scooper for size consistency. Let the cookies cool completely before frosting. I found with this recipe there was extra frosting left over, which I will find use for, for sure. (No, eating spoonfuls of cream cheese frosting while standing in front of the fridge is not a good use).

Carrot Cake Cookies

Now in my world, I have a mom who, while she likes a little frosting, is not a big frosting eater. Win for me. She scoops hers off…and hey, it has to go somewhere. Note to self: sit next to momma at birthday parties.

Carrot Cake Cookie

While I am holding off on apple and pumpkin recipes for just a little bit longer, it is the first day of Autumn, officially. Even though I found my first fallen leaf yesterday in my yard, I feel like pumpkin reigns supreme until the end of November.

That’s a lot of pumpkin.

I love pumpkin, don’t get me wrong, and you will see a lot of it here on the blog soon. True confession? I still haven’t put my summer clothes away yet, so pumpkin has to wait. At least until this weekend.

Carrot Cake Cookies

Carrot cake, on the other hand, has one foot in each season. It bridges the gap. And then, it fills in the gap with cream cheese frosting.

These cookies are small but indulgent, rich but not sickly sweet. I sold them at the bake sale four to a plate, and it was the perfect snack while watching Field Hockey players play in the rain. It also went really nicely with a cup of coffee.

I am currently in a relationship with my calorie counter app, so if I am going to put a cookie in my body, it needs to be worth it. These are.

I also heard as a small child carrots are good for your eyes…so it’s a win?

Anything wearing a cream cheese layer makes the week, even a week like this, better.

Cream Cheese Frosted Carrot Cake Cookie

I hope you enjoy this recipe, and as always, thank you for coming to the table!

Chrissy

Click below for printable recipe

Print

Cream Cheese Frosted Carrot Cake Cookies

Print Recipe

Little pillows of carrot cake covered in cream cheese frosting. Oh yes, you will want more than one!

  • Author: chrissy@mythankfultable.com

Ingredients

Scale

Cream Cheese Frosting

  • One package of cream cheese (usually 8 ounces)
  • 1/2 Cup Butter
  • 3 1/2–4 Cups of Confectioner’s Sugar (Add more for thickness)
  • 1 Tablespoon Vanilla (If you can find the clear vanilla-it won’t tint your frosting…but the real vanilla has a bean in it and it will be worth the trade off color vs. flavor)

Carrot Cake Cookies

  • 1 Cup (2 Sticks) Butter
  • 3/4 C White Granulated Sugar
  • 3/4 C Light Brown Sugar
  • 2 Eggs
  • 1 1/2 Teaspoon Vanilla
  • 1 1/2 C AP Flour
  • 1 1/2 Cake Flour
  • 4 Teaspoons Cinnamon
  • 1 Teaspoon Baking Soda
  • 1 Teaspoon Baking Powder
  • 1/2 Teaspoon Salt
  • 2 Cups Finely Grated Raw Carrots

Instructions

For Frosting:

  1. In mixer, combine cream cheese and butter until smooth, combined, and fluffy
  2. Add confectioner’s sugar.
  3. drizzle vanilla in.
  4. If necessary, add more confectioner’s sugar for thickness until desired consistency.

For Cookies:

  1. Grate Carrots and set aside.
  2. In mixer, cream together the butter with the two sugars until light in texture.
  3. Add eggs and vanilla
  4. Combine dry ingredients (flours, cinnamon, baking soda, baking powder, salt).
  5. Add dry mixture into wet ingredients slowly.
  6. Add finely grated carrots. Mix batter thoroughly.
  7. Refrigerate dough for a few hours or overnight.
  8. Scoop dough with small ice cream scoop or teaspoon and place on parchment lined baking sheets.
  9. Bake at 325* for 12-14 minutes.
  10. Allow cookies to cool completely.
  11. Frost with Cream Cheese Frosting.

Did you make this recipe?

Share a photo and tag us — we can't wait to see what you've made!


Posted in: Cookies, Recipes Tagged: carrot cake, carrot cake cookies, cream cheese, cream cheese frosted carrot cake cookies, cream cheese frosting, frosted cookies

White Chicken Chili

September 16, 2017 by chrissy@mythankfultable.com

Autumn is around the corner and it’s time to break out the soup and chili recipes!

Poached Chicken Breasts

I tend to put chili in the recipe rotation once every three or four weeks, and serve it with a nice green salad and some fresh cornbread or soft rolls. White Chicken Chili is simple and quick, and hearty as well. You can up the ante and add shredded cheddar or more spices, but this basic recipe is easy to do, especially when the weather turns colder and a bowl of comfort is welcome at the table.

For this recipe, I poached thinly sliced chicken breasts in chicken broth. Poaching sounds like a next level cooking term, but essentially, its simmering the meat in broth at a low temperature until it’s cooked through. The end result is a tender, moist chicken that is easy to shred. I think, in a pinch, you could use rotisserie chicken, but it is actually easier to poach and throw the breasts into a Kitchen Aid mixer to shred than it would be to stand there and take the chicken off the bone, and less greasy as well. However, some people love the use of extra Rotisserie chicken, and if it is on sale and you don’t mind the extra step, go for it!

Shredded Chicken Breasts

I poached the chicken, put it in the Kitchen Aid with the paddle attachment, and mixed it on low until the chicken had a fine shred. Again this is to your taste, so if you prefer bigger chunks, or larger shreds of chicken, go in that direction. I also saved the poaching liquid, and used that in the chili itself, as it is essentially broth that cooked the chicken, it is filled with flavor.

I have recently learned that my son doesn’t like the chunks of chili, be it tomatoes or onions, so this recipe is thick and hearty without seeing big chunks of anything. Now myself, I am a chunky person (I laugh to myself here. So much for self esteem). In more ways than one. Soup, cookies, muffins, chunks are good. So, this chili needed to deliver big flavor without big chunks.

in a stockpot, saute finely diced onion (you can add celery and carrot, I didn’t) until tender. Add the poaching liquid, three cans of drained, rinsed white beans, the chicken, and your spices.

Now for me, chili needs heat. I kept this mild and added hot sauce procured from my local farmers market that is a combination of smoked apple and heat. I did put in a dash of hot sauce into the chili to give it the extra pizazz. You can add green chili peppers that are canned, fresh jalapeño or ghost peppers if you like it hot.

Oh I almost forgot…what makes this chili creamy and delicious? A block of cream cheese! Cubed and stirred into the mix while it is on the stove, after heating thoroughly, the cream cheese dissolves and adds not only to the texture, but also to the flavor.

Let the chili cook on the stove until ingredients are combined, and serve. I love to add cheddar cheese, sour cream and hot sauce to mine. I would add cheddar cheese to the whole batch, actually.  Boom and Wow.

Serve with your favorite cornbread http://mythankfultab

White Chicken Chili

le.com/2017/09/14/cheesy-skillet-cornbread/

and enjoy!

I hope you enjoy this recipe, and as always, thank you for coming to the table!

Chrissy

Click below for a printable recipe!

Print

White Chicken Chili

Print Recipe
  1. 2 Pounds thinly sliced Chicken Breast
  2. 64 oz Chicken Stock
  3. 1 Tbsp Olive oil
  4. 1 Onion, finely diced
  5. 1 block of Cream Cheese, cubed
  6. 1-2 Cups Shredded Cheddar Cheese (If you wish/optional)
  7. 3 Cans White Cannelini Beans, drained and rinsed
  8. hot sauce, spices, canned green chilies, salt, pepper, to taste


  • Author: chrissy@mythankfultable.com

Ingredients

Scale
  1. Gently poach chicken breasts in 1/2 of stock. (I usually use two containers of chicken stock, one to poach and one to add to chili later on). Poach until chicken is tender and cooked through. Drain and reserve poaching liquid.
  2. Shred chicken either in mixer or by hand until chunks and shreds are as desired. Set aside.
  3. Finely dice onion (you can also add carrots and celery but for this recipe I did not).
  4. Saute onion in olive oil in stockpot until translucent.
  5. Add three cans of drained white beans, chicken, poaching liquid, and additional stock.
  6. Add one package of cream cheese, cubed to chili and stir until mixed in.
  7. Add spices, chile peppers, hot sauce, and heat through.
  8. If desired, add cheddar cheese and continue to heat until melted.
  9. Serve with sour cream, additional cheddar shredded, and hot sauce.

Did you make this recipe?

Share a photo and tag us — we can't wait to see what you've made!

Posted in: Recipes, soup Tagged: chicken chili, chili, comfort food, cream cheese, one pot, soup, white beans, white chicken chili

Recipe Search

Recent Posts

  • Fluffernutter Cookies…You Heard Me April 12, 2024
  • On Nests July 30, 2023
  • Lemon Rosemary Shortbread Cookies April 24, 2022
  • Praline Sweet Potato Pie March 22, 2022
  • Italian Ricotta Cake March 13, 2022

Recent Comments

  • Cathy Carroll on To My Daughter On Her 18th Birthday
  • Maureen / Mimi on To My Daughter On Her 18th Birthday
  • Kathy G on To My Daughter On Her 18th Birthday
  • chrissy@mythankfultable.com on Cherry Crescent Moon Cookies and Finding the Joy
  • chrissy@mythankfultable.com on Cherry Crescent Moon Cookies and Finding the Joy

Archives

Categories

  • appetizer
  • bread
  • breakfast
  • Cookies
  • crockpot
  • crockpot
  • Dessert
  • Fruit
  • My Story
  • One Pan
  • Recipes
  • side dish
  • Side Dishes
  • soup
  • Vegan

Copyright © 2025 mythankfultable.com.

Lifestyle WordPress Theme by themehit.com