mythankfultable.com

Feeding the Heart, Body, and Family

  • My Pics
  • My Story
  • The Puppies
  • Contact Us
Feeding the Heart, Body, and Family

Dessert

Sorry Not Sorry Bars

October 7, 2017 by chrissy@mythankfultable.com
Blondies with crushed Oreos and M&M Candies

Sorry Not Sorry Bars

I have fallen in love with the game of Field Hockey.

Mostly because my daughter has fallen in love with the game of Field Hockey.

I’ve gotten to be a sideline watcher mom, an almost coach mom, a real coach mom (who assisted with the ice packs and hydration and drills- not any real hard core stuff) and now, I am back to watching…and cutting ribbons, supporting boosters, and PACKING THE SNACK BOX.

My inner mom waged war with this idea. A post game snack should be rich in vitamins and nutrients. I KNOW those young bodies need not Oreos and M&Ms. I do. They wear small sizes and burn a lot of calories and CAN eat this treat, but SHOULD they? No.

Crushed Oreos

Crushed Oreos

Peer pressure can be cruel. I fell into the trap to be the cool mom who made the treats that fall on the less than healthy scale. I ply myself with ideas like, they ate these after the game and it was late, and they were bonding over sugar. They ran hard, won the game, and the calories won’t affect them like they would my old self.

Oh well. Sorry, not sorry.

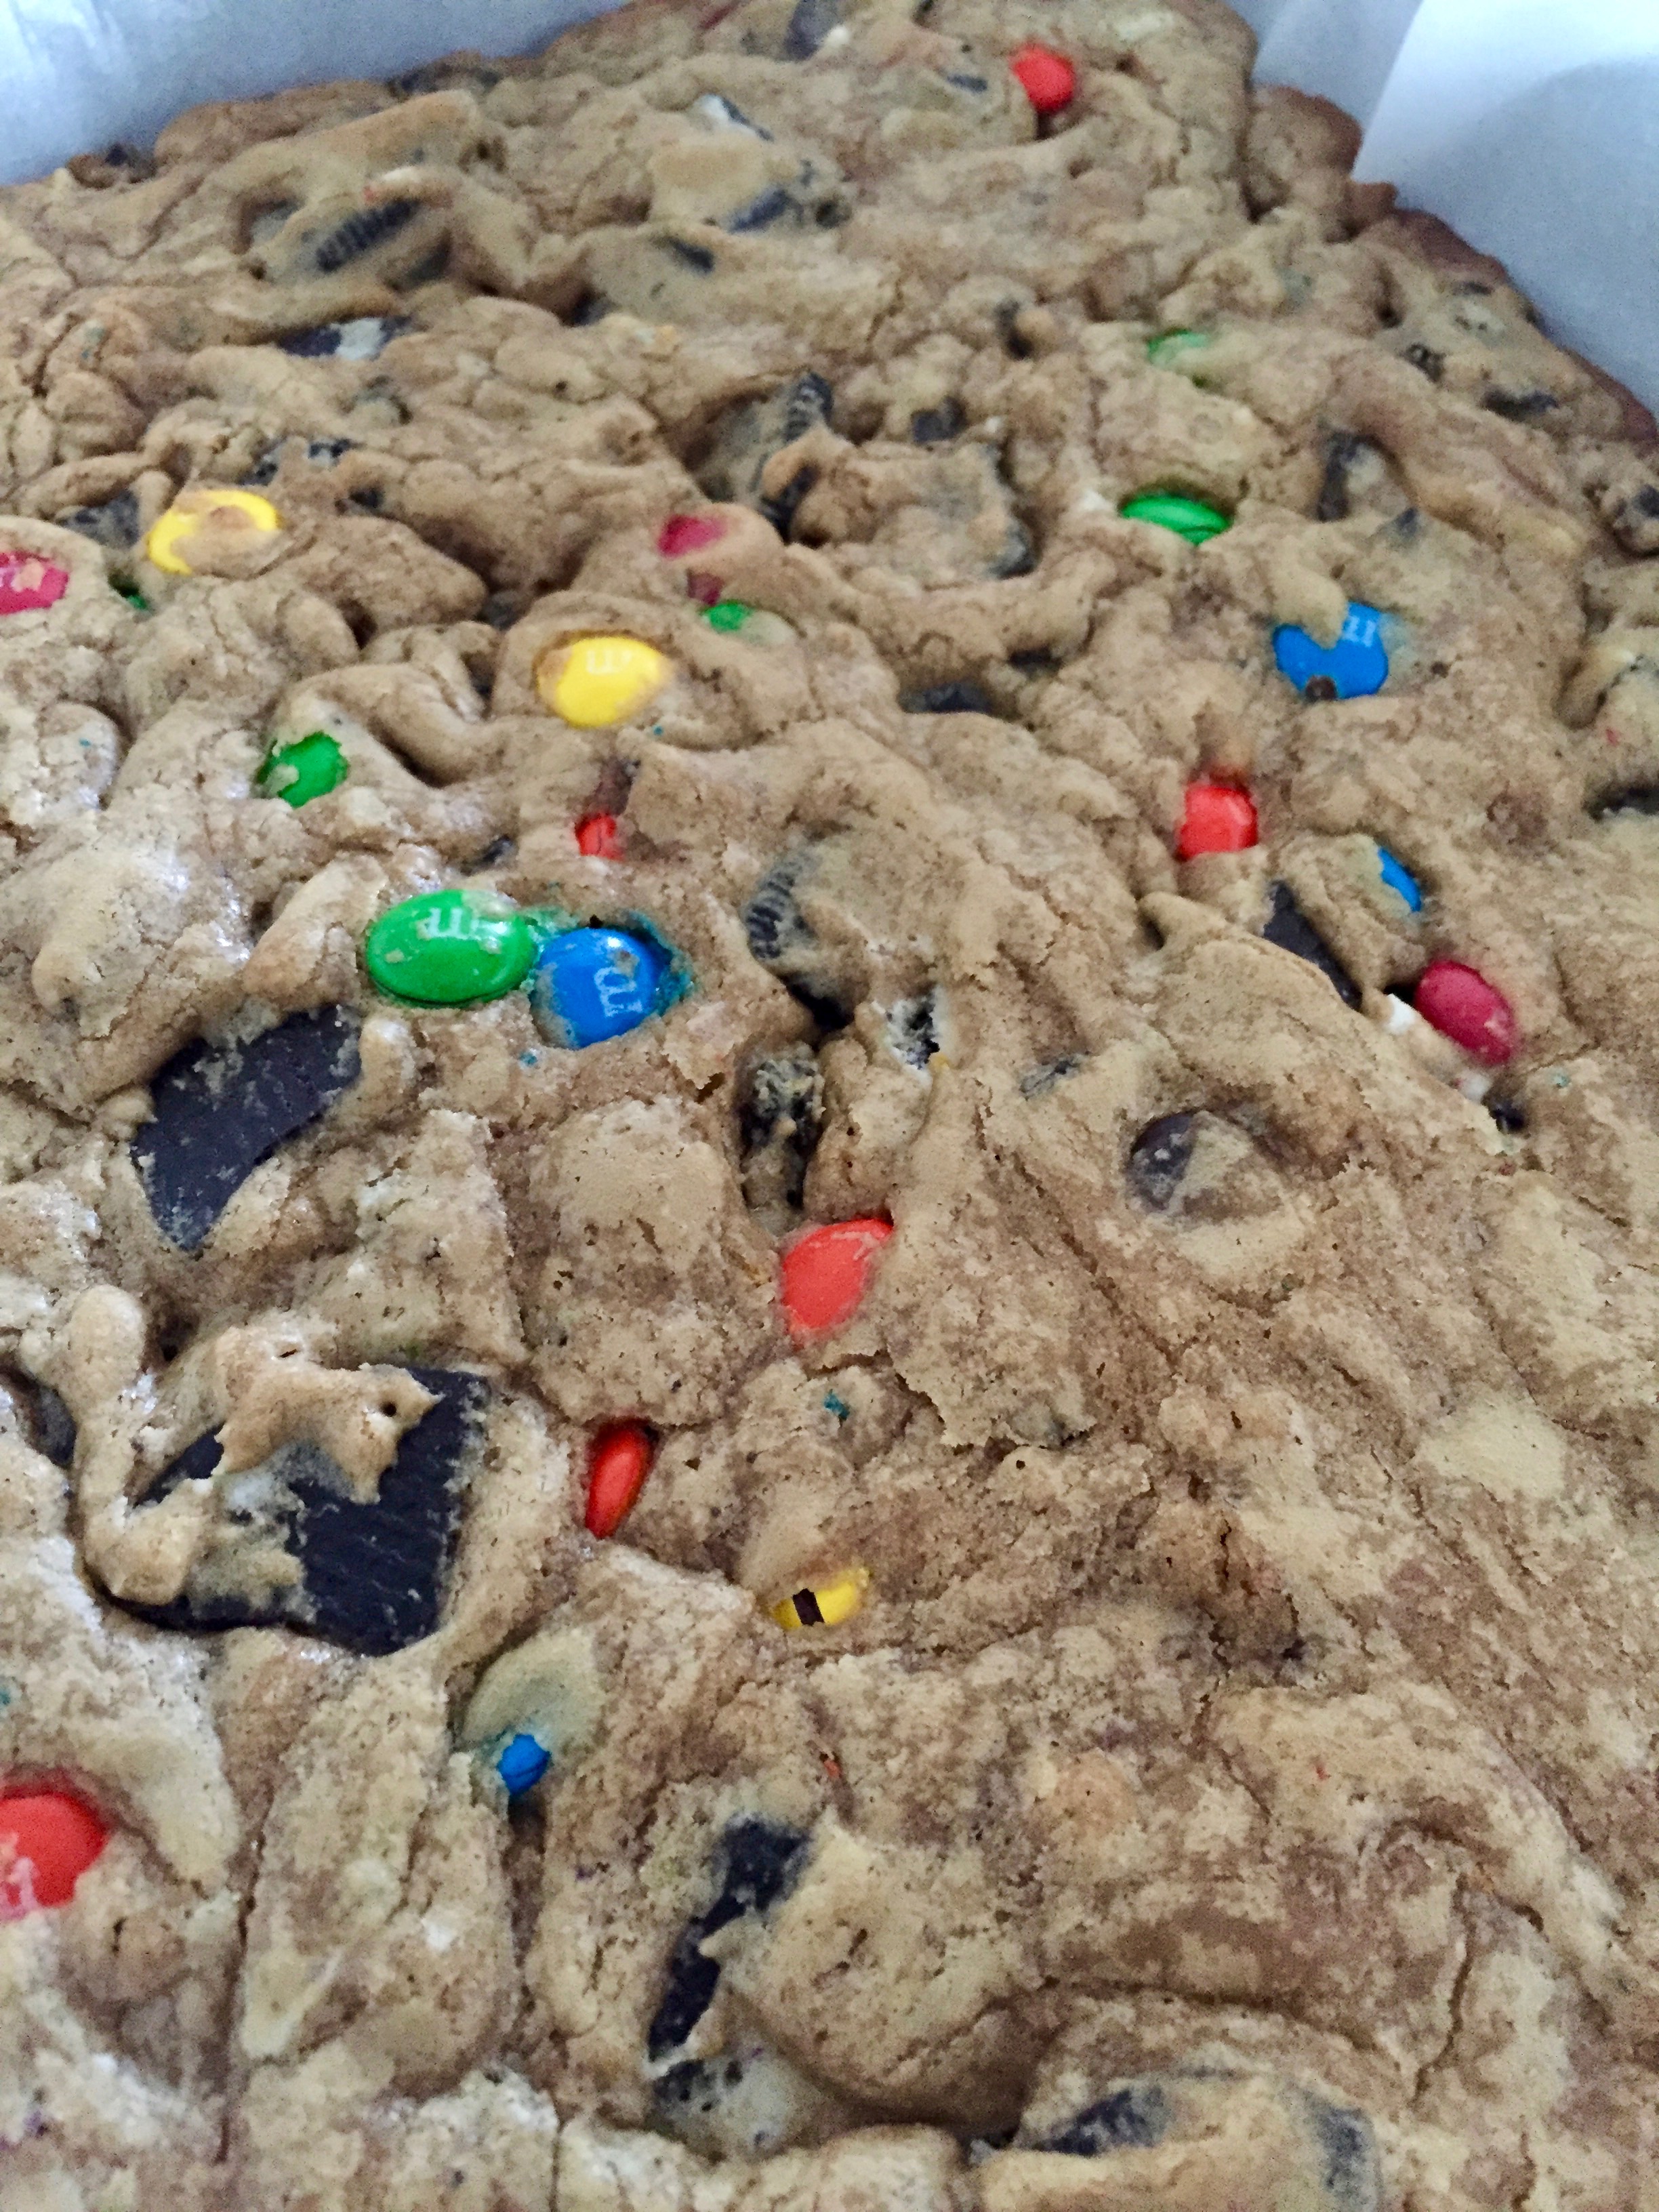
These are a basic blondie with a whole lot of extra thrown in. Crushed Oreos and M&M’s made my cut, only because I couldn’t find a chocolate covered pretzel I liked and I didn’t want to over kill this recipe- but really, you can throw the kitchen sink in here. Whatever floats your boat. I used regular M&M’s but the last time I checked there were at least ten different flavors (Hello Caramel?? Can’t have within reach of my arms) so you could really have at it.

It is NOT a healthy snack. It isn’t even close. So if you make it, go all in. I saw this original recipe on www.averiecooks.com, and made the batch larger to feed my team. The Snack Box is a serious endeavor. I wanted extra. We don’t skimp at our house when it comes to servings. It’s an Italian thing. Or, maybe it’s a foodie thing.

Sorry Not Sorry Bars

This batter mixes up quickly, and bakes quickly as well. There isn’t baking soda or powder in the recipe, and it makes up two rectangular pans, making twenty four good sized squares. Perfect for a team or for a dessert tray at a function.

In any event, the team determined it was a great snack, and the box came back empty, so I consider that a good sign. I’ll take it. I may not be shouting instructions from the sidelines, but I can get my love in through the baked goods I supply. We all have our strengths.

I hope you enjoy this recipe, and as always, thank you for coming to the table!

Click below for a printable recipe!

Print

Sorry Not Sorry Bars

Blondies with crushed Oreos and M&M Candies
Print Recipe

Rich buttery blondie bar filled with Oreos and M&M’s Recipe originally found on www.averiecooks.com

This batch will fill two large rectangular pans- yielding 24 good sized bars. Perfect for the team!

  • Author: chrissy@mythankfultable.com

Ingredients

Scale
  • 1 and 1/2 C Melted Butter (Three Sticks)
  • 3 Cups packed Dark Brown Sugar
  • 3 Eggs
  • 3 Tablespoons Vanilla
  • 1 Package Oreos of Choice – crushed into bite size pieces
  • 1 Share Size Bag (2 Cups) M&M’s of Choice…so many to choose!
  • 3 Cups Flour

You can add any assortment of add-ins at this point. Think Go-Big-Or-Go-Home


Instructions

  1. Pre-Heat oven to 350*
  2. Line and spray/grease two 9×11 Pans with parchment paper.
  3. Melt Butter and combine in a mixer with Dark Brown Sugar until smooth and incorporated.
  4. Add Vanilla, Eggs, and combine.
  5. Add flour slowly to incorporate.
  6. Fold in all the other goodies (M&M’s, Oreos, Chocolate covered Pretzels, etc)
  7. Divide batter between two pans, smoothing out to edges gently.
  8. Bake for 20-25 minutes. These cook up quickly so keep an eye on them!
  9. Allow to cool completely before cutting.

Did you make this recipe?

Share a photo and tag us — we can't wait to see what you've made!


Posted in: Cookies, Dessert, Recipes Tagged: Bar Cookie, Blonde Brownies, Blondies, dessert, M&M's, Mix Ins, Oreos, Team Snack Box Recipes

Apple Blueberry Crisp

October 5, 2017 by chrissy@mythankfultable.com

If Autumn had a smell, it would be a combination of apples and cinnamon. While I save my pumpkin spice love for dessert and coffee, If I had to make a candle of the greatest hits of fall smells, cinnamon wins the prize.

Apple Blueberry Crisp

We are still in the crossroads between summer and fall, with put-your-socks-on-it’s cold mornings, warm sunny afternoons, and “Did you bring your sweatshirt to the game?” evenings.

Yards display a combination of plants ready to pull up, and the marigolds which are nothing short of spectacular color wise. (Though, a marigold will never be a candle of choice in my world. No thank you.)

I am hankering to pick apples this weekend, weather permitting, and yet, I still have blueberries in the freezer. What’s a girl to do?

Last weekend we made stroganoff (recipe to come soon) and in the cool night air after supper, my kids said, “Too bad you didn’t make apple crisp. It’s a good night for it.” Sigh. Missed opportunity, but hey, I made stroganoff. so, there ya go.

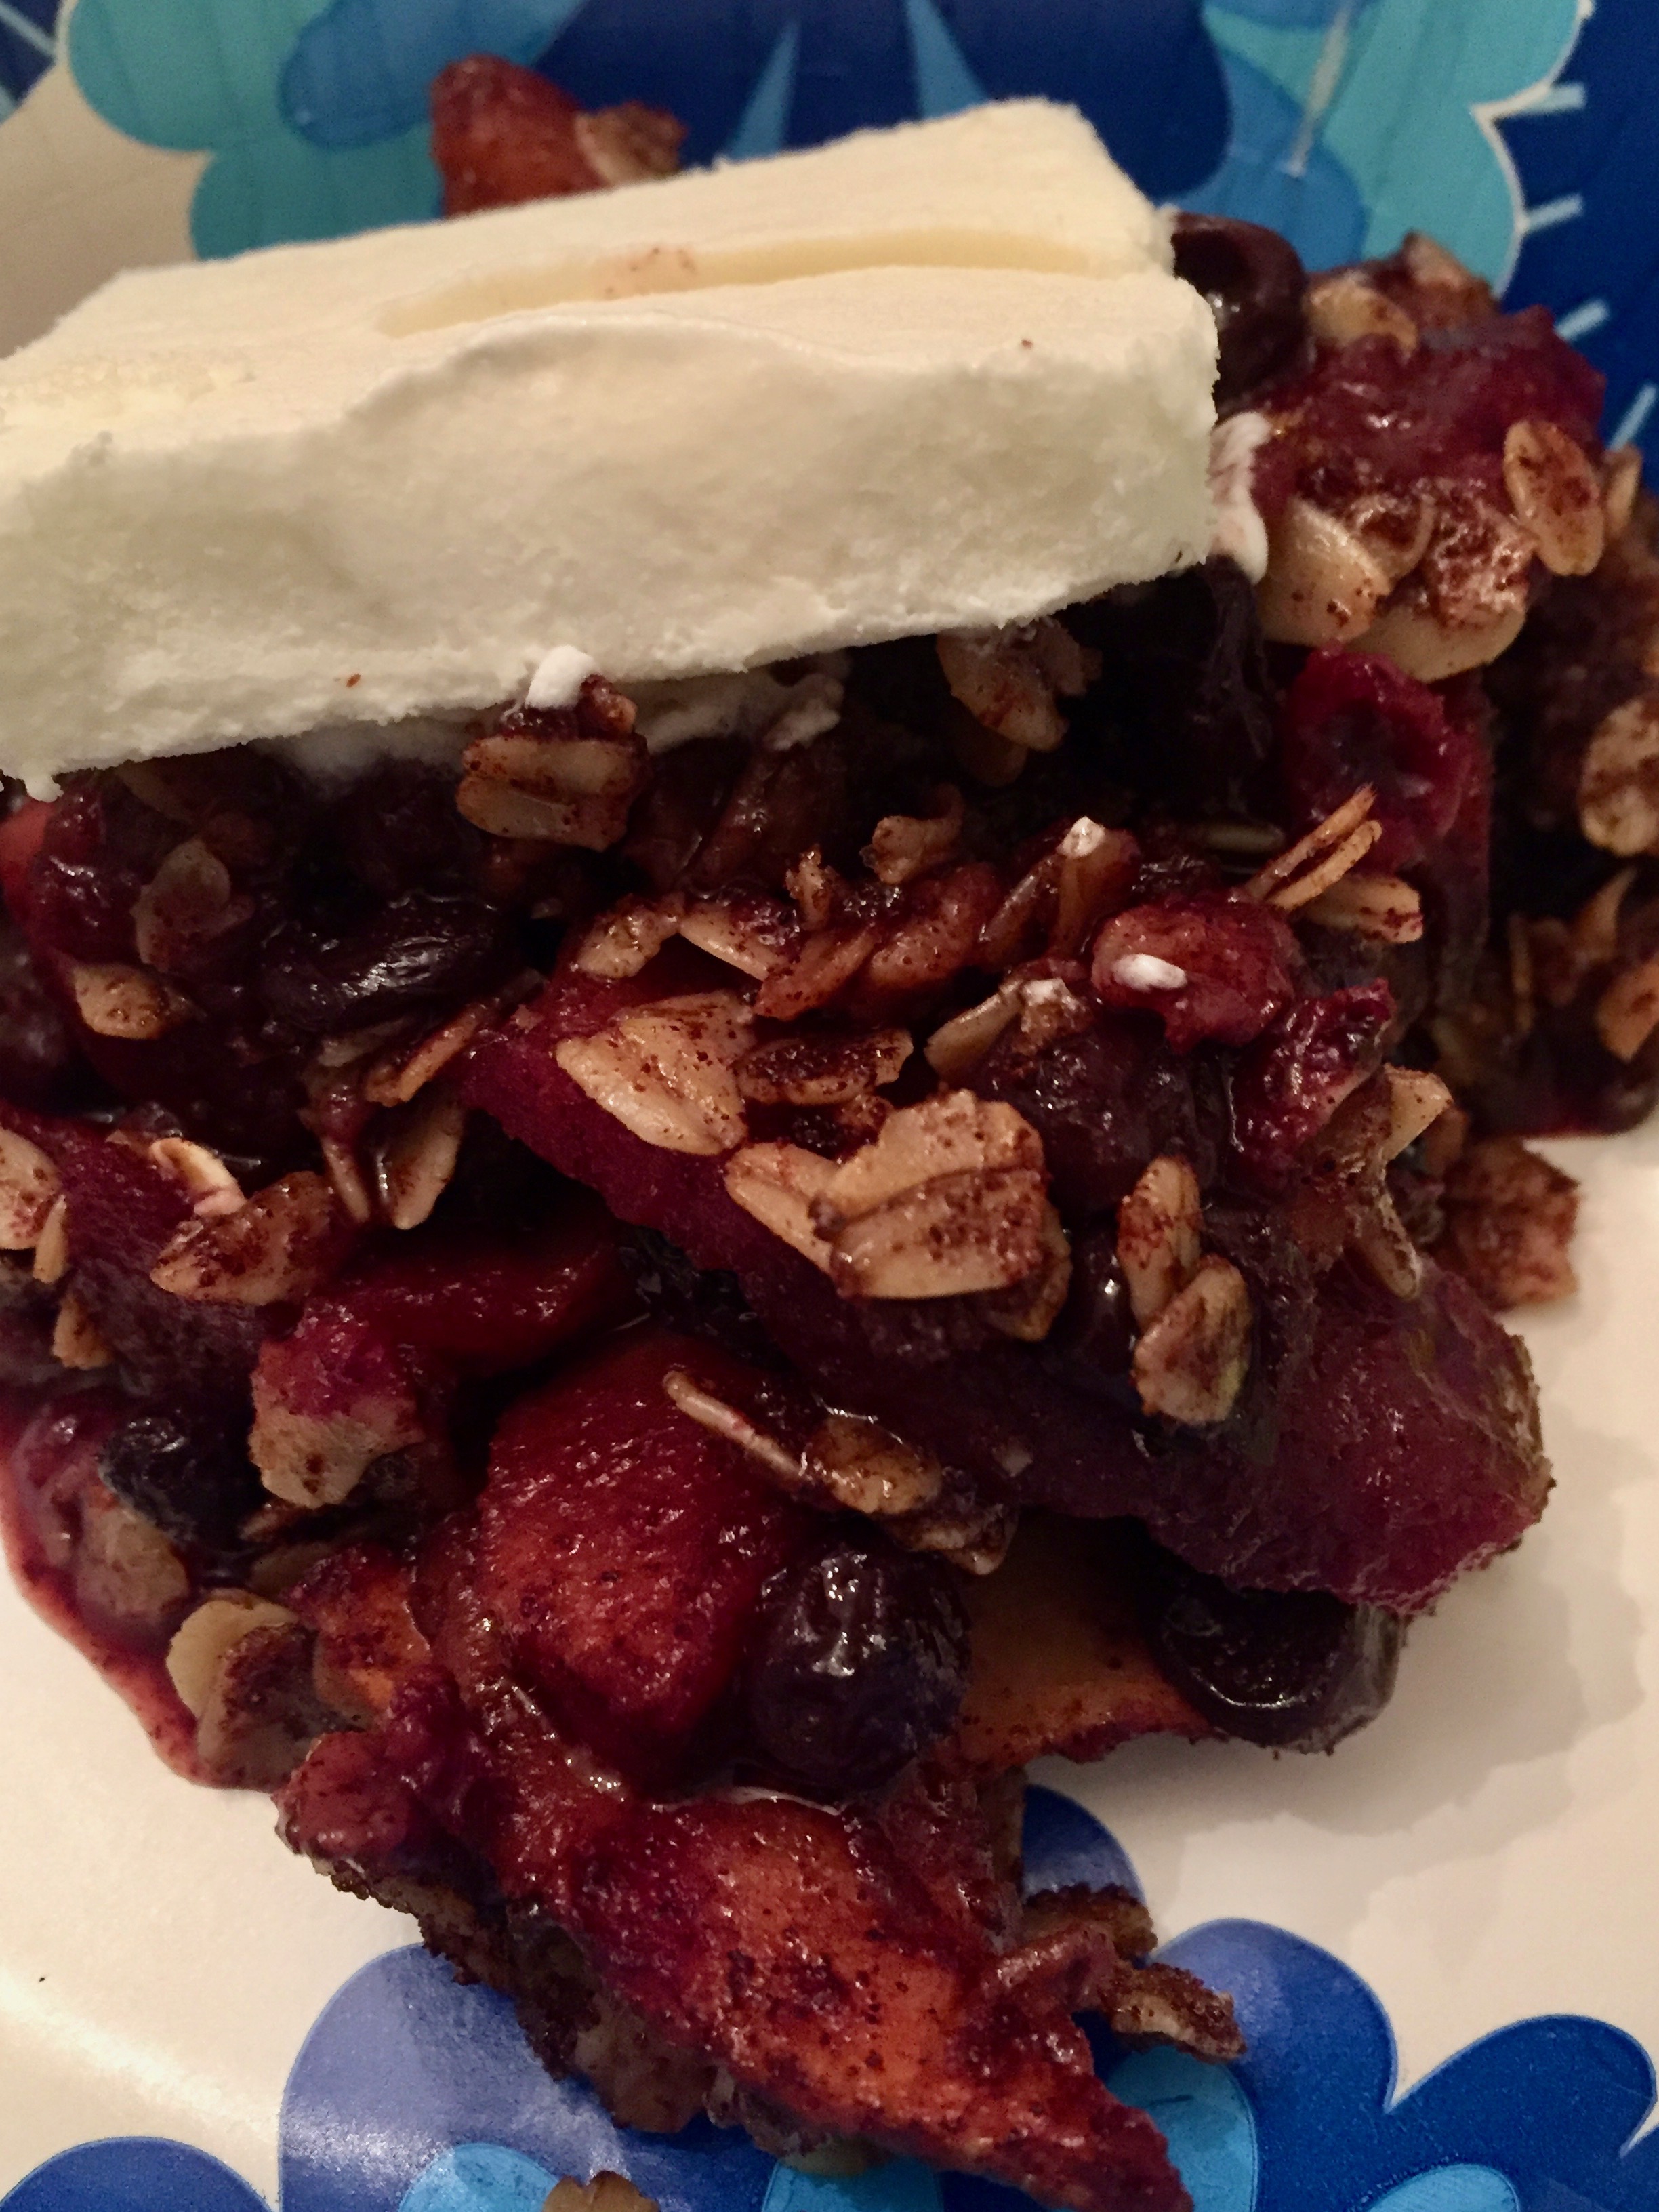
Which brings me to this recipe. I have never used Gluten Free Oats, I found these at Trader Joe’s actually for another recipe (coming soon). I wanted to play with them, and here was my opportunity to make that apple crisp. But, with blueberries. I love blueberries, and after being at the Fair, where Apple Crisp is sold in the Vermont Building and Blueberry Pie in the Maine building, it made sense. Let’s mix those two flavors and put an oat crisp topping on it!

A mixture of apples, blueberries, cinnamon and sugar nestled in a ceramic baking dish that has been buttered, cinnamon and sugared, then baked for 25 minutes in the oven, without the topping.

If I were a Rhianna song, I would say my dessert is Nakey-nakey-nakey. But only for half of the baking. I like my apples to be soft but not mush. I always find that if I time the crisp based on the topping, the bottom layer is undercooked.

Apple Blueberry Mixture

That is a personal taste thing. So, I bake the fruit layer first, then add the top crisp layer, and cook for the remaining time. The crisp gets crunchy and brown, the fruit bubbles underneath. Perfection.

The best part of a fruit crisp for me is the combination of the warm spicy compote and the crunchy top layer, complimented with a cold, creamy ice cream topper.

Apple Blueberry Crisp

However, when you finally do bake the crisp and look in the freezer and find…mini ice cream sandwiches, you make due. The fourteen year old wonder that is my daughter took the time to take the chocolate sandwich part off, and place the perfect square of less than perfect vanilla ice cream on top. Well done kid, well done. That’s why you are my favorite (her brother doesn’t read the blog-he knows he’s my favorite too).

While this recipe is definitely is different, it isn’t so out of the box that it I couldn’t share it. I loved the way the oats did not get soggy, and added a nutty flavor to the crisp. Even the next day, the crisp held it’s crunch, and that says something.  Cinnamon, Brown Sugar, Oats, Blueberries, Apples, baked together to make a wonderful fall dessert, even if it was a day late.

I hope you enjoy this recipe, and as always, thank you for coming to the table!

Chrissy

Click below for a printable recipe!

Print

Apple Blueberry Crisp

Print Recipe

A combination of fruit with a gluten free oatmeal crisp topping!

  • Author: chrissy@mythankfultable.com

Ingredients

Scale
  • 3 Granny Smith Apples, peeled and sliced
  • 3 Macoun Apples, peeled and sliced
  • 2 Cups Blueberries – Fresh or Frozen
  • 1/3 Cup Dark Brown Sugar
  • 2 Tablespoons Cinnamon
  • 3 Tablespoons Butter

Oatmeal Crisp Topping

  1.  1 and 1/2 Cups Gluten Free Oats
  2. 4–5 Tablespoons Butter
  3. 1/3 Cup Dark Brown Sugar
  4. 1 Tablespoon Cinnamon

Instructions

  1. Preheat oven to 350*
  2. Prep your baking dish by giving it a coat of butter, then mixing some brown sugar and cinnamon and coat the baking dish. Just like you would with flour only yummier.
  3. Peel and slice apples and combine with blueberries in a bowl.
  4. Add cinnamon and brown sugar for apple mixture.
  5. Place apple and blueberry mixture in baking dish and dot with butter.
  6. Bake for 25 minutes without topping.
  7. In a new bowl, combine oats, brown sugar, cinnamon, and butter, mixing until crumbly.
  8. Remove apple blueberry mixture from oven
  9. Place crisp topping on now hot apple blueberry mixture and return to oven
  10. Continue to bake for another 25 -35 minutes. Depending on how bubbly you want your bottom layer.

Did you make this recipe?

Share a photo and tag us — we can't wait to see what you've made!


Posted in: Dessert, My Story, Recipes Tagged: Apple, Apple Blueberry Crisp, Apple Crisp, blueberry, Crisp, dessert, Fall Dessert, gluten free oats

Apple Cider Fritter Cake

October 4, 2017 by chrissy@mythankfultable.com

Apple Cider Fritter Cake

Even though Mother Nature keeps throwing us warm afternoons, and believe me I am thankful for it, the month of October is in full swing and all things fall are happening here in New England.

Mums and Pumpkins adorn doorsteps, the Halloween Decorations are appearing on lawns, and the Christmas stuff is out at various stores. Wait, What?

True. I was told last night Christmas is something like twelve weeks away. have I mentioned I am wearing capris to work? That my flip flops are still in my closet? That I still have to mow the lawn? YES! So this gal is going to hang onto fall with a death grip. Including this cake. Especially this cake.

Freshly Diced Granny Smith Apples

This cake can also be a “bread,” and is coffee cake like in nature. If you look up Apple recipes on the Pinterest (I also call Facebook the Facebook), you will see various recipes for Apple Fritter Bread. Which, had me at hello.

My Dad was a big fan of Apple Fritters. So, when a road trip would happen when I was younger, specifically to pick apples, another Mom and Dad memory, an apple fritter acquisition generally happened. As we grew up, this changed into a monster cookie with granola that is a particular specialty of the farm we visit, but the apple fritter still showed up on occasion.

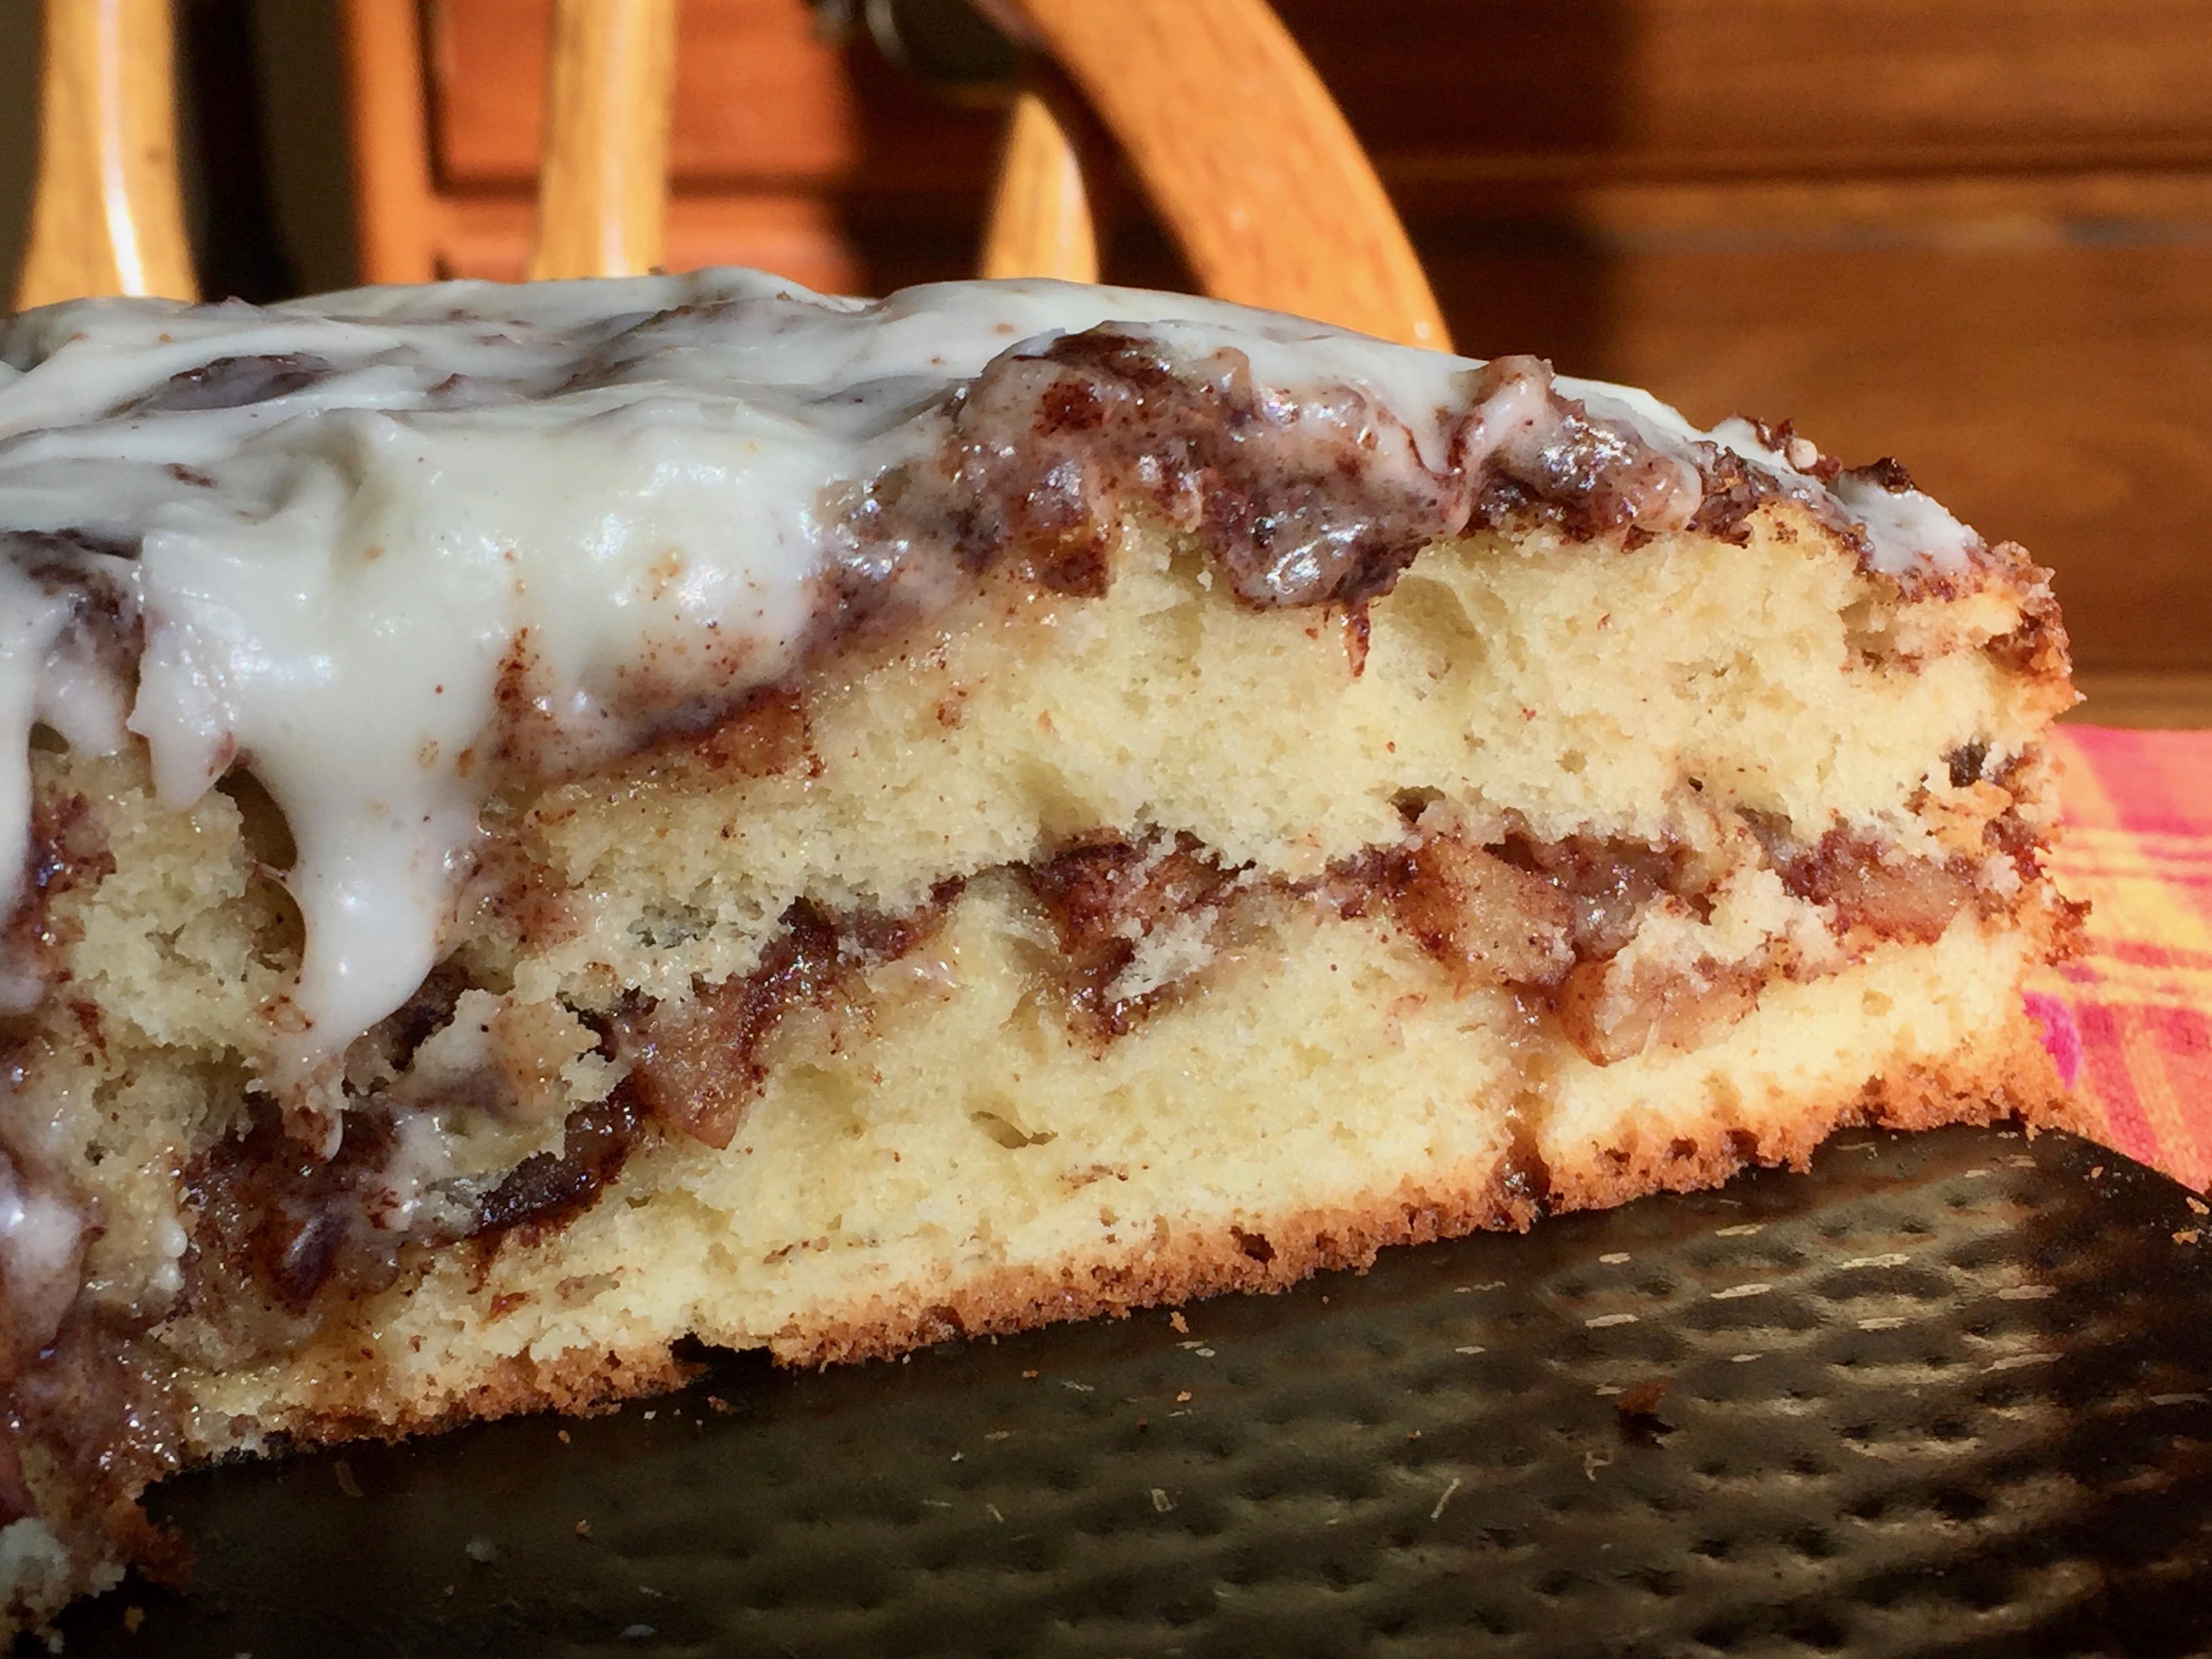
If you haven’t ever eaten an Apple Fritter, think soft chewy bits of apple, cinnamon, caramel, and dough. Fried. Glaze covered. Sharable in size. I know right? That is a beautiful thing.

So, when I stumbled upon these recipes, I made some changes, turned it into a cake, and hoped for the best. Not every test recipe is a gangbuster. In truth, when I ask my taste testers, I am looking for negatives to improve… and I would maybe add more cinnamon to the batter, but other than that, this one be banging.

It looks complicated, it isn’t. Actually, it’s pretty forgiving, and you get to lightly smoosh apples into the batter to make the middle layer. Then repeat the process. The brown sugar and cinnamon bake up into this delicious caramel layer and the apples get soft, but hold their apple-y-ness. (Have you noticed I make up my own words? It’s a thing. Fortunately those who live with me love me and can interpret for me on occasion).

Apple Cider Fritter Cake

If a recipe can bring my son up from the basement, where his man cave is, with the question, “What are you making?” with a sense of awe and wonder…I consider it a win. (Slight exaggeration in the awe and wonder, he is seventeen). When he asks for seconds, I know I’ve hit the mark.

This cake smells like everything perfect about fall. It would be ok as is. However, you need the glaze. If you wanted to do a simple glaze of powdered sugar and milk, it will satisfy. It will be delicious.

But hey, I had cream cheese frosting made up already. So…

This cake looks and smells like a gigantic cinnamon roll, but with the beautiful apple layer tucked inside.

Mic Drop. I can’t sell it any more than that. You need to make this cake. Just saying.

Another story for another day, my thankful table actually broke over the weekend. So, we are making due. This cake made my makeshift table my thankful table once more.

I hope you enjoy this recipe, and as always, thank you for coming to the table!

Click below for printable recipe!

Print

Apple Cider Fritter Cake

Print Recipe

This is the ultimate apple cake, filled with a cinnamon caramel sauce and topped with a cream cheese frosting.

  • Author: chrissy@mythankfultable.com

Ingredients

Scale

Apple Cider Fritter Cake:

  • 3 Granny Smith Apples, peeled, chopped into small pieces
  • 1/3 Cup packed Dark Brown Sugar
  • 1 Tablespoon Ground Cinnamon
  • 1 stick or 1/2 Cup Unsalted Butter
  • 2/3 Cup White Sugar
  • 2 Large Eggs
  • 1 Tablespoon Vanilla Extract
  • 1 1/2 Cups Bread Flour (this can be made with AP Flour)
  • 1 3/4 Teaspoons Baking Powder
  • 1/4 Cup Apple Cider
  • 1/4 Cup Milk

Cream Cheese Frosting

  • One package of cream cheese (usually 8 ounces)
  • 1/2 Cup Butter
  • 3 1/2–4 Cups of Confectioner’s Sugar (Add more for thickness)
  • 1 Tablespoon Vanilla (If you can find the clear vanilla-it won’t tint your frosting…but the real vanilla has a bean in it and it will be worth the trade off color vs. flavor)

Instructions

  1. Preheat oven to 350*
  2. Prepare a 9″ Springform Pan
  3. Peel and dice Granny Smith Apples into bite sized chunks.
  4. Mix Dark Brown Sugar and Cinnamon and set aside.
  5. In a mixer, cream butter and sugar together until light and creamy.
  6. Add eggs, one at a time.
  7. Add vanilla extract.
  8. Combine dry ingredients and add to butter mixture.
  9. Add Apple Cider and Milk to mixture and scrape down sides so all is incorporated.
  10. Pour approximately one half of the batter into the pan.
  11. Take one half of the apples, and press lightly into the cake batter.
  12. Sprinkle Half of the Brown Sugar Cinnamon mixture on top.
  13. Repeat. with remaining batter, apples and cinnamon mixture.
  14. Bake 40 minutes or until cake tester comes out clean.
  15. I put the frosting right on the hot cake and let it melt into a soft white glaze.

For Frosting:

  1. In a mixer, whip Cream together Cream Cheese and Butter until combined.
  2. Slowly incorporate confectioner’s sugar
  3. Add vanilla.

Did you make this recipe?

Share a photo and tag us — we can't wait to see what you've made!

Posted in: Dessert, My Story Tagged: Apple, Apple Cake, Apple Cider, Apple Cider Fritter Cake, Apple Fritter, cake

Salty Chocolate Chip Bars

September 18, 2017 by chrissy@mythankfultable.com

One of the best parts of having athletes for children, especially when you didn’t grow up an athlete, is the whole “team” concept. I am the mother of a Field Hockey  player and a Wrestler. They both do winter sports as well, but overall, those are the dominating sports in our home. Fortunately one ends, I have a few weeks, and the next begins. We are busy, we are on the move, but life is a gift.

Salty Chocolate Chip Bars

I love every minute. From early drop offs to all day sitting on a bench, I am thankful. Thankful for my children, thankful for their teams, thankful for the families we get to know and grow with as our kids train and play. We holler their names out when they succeed, and cheer them on when they need to hear “Good hustle!” or “Great endurance!” We do our parent thing.


Another wonderful part of being on a team is working together, providing snacks, helping out in the concession stand, ribbons for the team, supporting the fundraisers. Tomorrow, the team is helping out a family in need.

Salty Chocolate Chip Bars

Tomorrow the Field Hockey Team is having a fundraiser for a fellow student who was diagnosed with cancer. In addition to charging admission and opening up the concession stand, there will be a Bake Sale. So this week, all of the posts will be about baked goods for a cause. Today, we have Salty Chocolate Chip Bars.


If you ever thought about a big soft cookie with the shape of a brownie, chewy and buttery, with big chunks of chocolate, this is your dessert.

It is a one bowl, one pan mix with the addition of, you guessed it, salty on top.

This recipe can be made with Sea Salt Flakes, or freshly ground sea salt, but we have a sea salt allergy in my building, so when I make these for work, I use regular Kosher Salt. The combination of salt on top with the sweet of the cookie makes this the quintessential snack. In fact, it will be the snack I pack for the team when it is my game to host. They slice up nicely and the chunks of chocolate stay gooey. Who can say no?!

On our first day of Staff Professional Development, a pan of these made their way into the training, still warm from the oven. I took home an empty pan. That, to me, says it all.

Salty Chocolate Chip Bars

When a day spent in my kitchen brings smiles to people’s faces, my heart is happy. When I can add a fundraiser for a great cause to the mix, my heart is filled and overflowing. I’m hoping tomorrow there are no left overs, and a family in need is blessed.

I hope you enjoy this recipe, and as always, thank you for coming to the table!

Chrissy

(click below for printable recipe)


Print

Salty Chocolate Chunk Bars

Print Recipe

Delicious combination of sweet and salty.

  • Author: chrissy@mythankfultable.com

Ingredients

Scale
  • 3/4 C Softened Butter
  • 1/4 C Cream Cheese
  • 1 1/2 Packed Brown Sugar
  • 1/2 Tsp Kosher Salt
  • 1/2 Tsp Baking Soda
  • 1 1/2 Cup Cake Flour
  • 1 1/4 Cup AP Flour
  • 2 Large Eggs
  • 3 Tablespoons Vanilla Extract
  • 1 Package (approx. 2 Cups) Chocolate Chunks
  • Additional Kosher Salt for sprinkling

Instructions

  1. Line and prepare a 9 X 13″ cake pan with foil or parchment.
  2. Preheat oven to 350*
  3. Use either a hand held mixer or a stand mixer with paddle attachment.
  4. Cream together Butter and Cream Cheese, add Brown Sugar.
  5. Add Salt, Baking Soda, and Beat until combined.
  6. Add Eggs and Vanilla.
  7. Add Flour(s) until combined.
  8. Fold in Chocolate Chunks.
  9. Turn mixture out into prepared pan and smooth until flattened and even.
  10. Bake 20 minutes, until tester in center comes out clean.
  11. Sprinkle Kosher salt as soon as bars come out of oven.
  12. Cut into bars. (Wait for a few minutes before you devour them)!

Notes

You can use Sea Salt Flakes in this recipe, but for school we do Sea Salt Free (That’s what you do when your friend is allergic)!

Did you make this recipe?

Share a photo and tag us — we can't wait to see what you've made!

Posted in: Dessert, Recipes Tagged: Chocolate Chip, Cookie Bars, dessert, Salty, Salty Chocolate Chip Bars, Sweet

Peachy Peach Cobbler

August 30, 2017 by chrissy@mythankfultable.com


My love for Farmer’s Markets knows no end. I’m serious. Where some girls love the mall, you will find me with my reusable bag in hand, cash in my wallet, at least one child, and sometimes the dog. Oh, and my phone camera is on, because I am enchanted by bins of melons or stacks of radishes. I will be snapping pics as I go. At one point, I had a Farmer’s Market crush on the bread truck man. It could have been the chewy molasses cookies or the almond croissants he sold. I may be that shallow.

Why is a pile of beets or bags of freshly picked greens so alluring? I love the idea of local farmers and artisans selling directly, the camaraderie of the people shopping, supporting organic produce, and the fact that rain or shine, the sky is overhead and you get to know the people from whom you are purchasing your ingredients.

There are days I make Target runs. I also go to my grocery store, often. I have yet to be romanced by an end cap and florescent lighting like I am the vegetable laden table under a tent.

Anyways…this week one of the farmer’s market in my area (yes, I frequent several) had peaches. Fresh, locally grown peaches. White and Yellow. I needed both. The farmer told me not to eat them the day I purchased them, but within two days they would be perfection. They were. Peaches on salad, peaches in oatmeal, peaches next to my sandwich, and yes. Two desserts. I made a Peach Galette and this Peachy Peach Cobbler. Peachy Peach, because I used both white and yellow peaches combined.

When it comes to cobbler I need two things: The fruit has to be cooked down before the topping is added so it is bubbly and beautiful at the same time the topping is finished – AND – the topping can’t be biscuit like, nor crisp like. (We get enough crisp in the fall with apples).

So my dilemma. Can I make a topping that had the best of both worlds? Light like a biscuit and crunchy like a crisp without being so Crumbly and heavy? I tried!

I started the topping like a dough, cutting in butter. I used a quick cook oats so it would absorb moisture and have density but not heavy crunch. And to make it light? A trick where you add Baking Powder and boiling water right at the end. The boiling water and powder fizz up and give the mixture a little bit of puff without making it like a biscuit.

Also, I used light brown sugar to match the peaches and give the topping a little more caramel feel.

Two baking times, pre topping and post topping resulted in the sweet juicy bottom and the perfect texture top to match. If I could change this again (and I will) I would play with the spices. I kept it simple to not overpower the peaches, but part of me wanted more cinnamon.

Serve this warm with the good vanilla ice cream, (or maybe cinnamon ice cream?) and enjoy. It’s really the perfect dessert for the end of August, and hey, now I have room to go buy more peaches at the next farmer’s market.

I hope you enjoy this recipe, and as always, thank you for coming to the table!

Chrissy

Print

Peachy Peach Cobbler

Print Recipe

Making use of fresh summer peaches with just the right amount of topping. Cobbler topping is right between a biscuit and crisp topping, matching the sweetness of the peaches for a delicious summer dessert!

  • Author: chrissy@mythankfultable.com

Ingredients

Scale

Peachy Peach Cobbler

Chrissy@mythankfultable.com

Filling:

  • 6 Cups Peaches (I used a combination of white and yellow peaches)
  • 1/3 Cup Light Brown Sugar
  • 1 tsp Cinnamon
  • Juice of one lemon


Crumb Topping:

  • 1 Cup AP Flour
  • ½ tsp salt
  • 1 Stick (8 TBSP) Butter (grated on box grater or cut into small cubes)
  • 3 TBSP Light Brown Sugar
  • 1 Tsp Vanilla
  • 1 Cup Quick Oats
  • 2 Tsp Baking Powder
  • 2–3 TBSP Boiling Water

Instructions


Preheat oven to 350*

Combine filling ingredients and place in baking dish. Bake for 30 minutes until peach filling cook and thicken.

Combine flour, salt, brown sugar. Cut in butter into dry ingredients. Add quick oats and baking powder and combine. Add in vanilla. Add boiling water and stir quickly until mixture is moistened and combined.

Sprinkle crumb topping on top of peaches and return to oven. Bake for another 30-35 minutes. Peach filling should bubble up through the crumble topping. Serve warm!

Did you make this recipe?

Share a photo and tag us — we can't wait to see what you've made!

Posted in: Dessert, Recipes Tagged: Cobbler, dessert, peach, Peach Cobbler

Birthday Blessings and Banana Cake with Browned Butter Frosting

August 28, 2017 by chrissy@mythankfultable.com

So today, I bumped up to the older age group box on surveys. I’m not so troubled by the actual number. There are certainly things I notice on the day-to-day, like the fact that I am certainly wearing more sunscreen and investing in a new skin regimen for reversing aging. Hey, a gal can hope. I’m also making healthy choices, tracking what I eat and exercising more, because I need to be living in this body for a lot longer.

One year ago, I made a goal to find a gift in every day. Whether it was the joy of my first cup of coffee, the way my daughter comes out of her bedroom all sleepy and beautiful, or the way my son will randomly give me an unsolicited hug. It could be the things I grow in my garden, the sound of my mother’s laughter, the way my puppy snuggles on my significant other. Every day, I anticipated and acknowledged the daily gifts I was surrounded by. I made it a personal challenge to, as my mother says, “Find the Good.”

Even though I didn’t journal about these gifts, If I could, it became a photograph, and I even used #everydayagift on my Instagram posts. So for me, I was able to document my gratitude journal in visual format.

Did it change me?

Absolutely.

Being aware of the gifts around me on a daily basis made for a more positive, thankful heart. It steeped me in gratitude. I stopped comparing myself to other people. I started to look for ways to bless others.

I can’t say I never had hard or blue days, or didn’t have situations where one of my children asked me why my face was angry, I am human. I can say I handled some pretty interesting stuff with grace that I might not have had, and it is something I will definitely continue to do moving forward. I’m a better person when I am a grateful person.

So, this morning, when I woke up, the few things I wanted to do on my birthday:

Surround myself with family, go to church so I could go forward for the birthday prayer (I was raised Episcopalian and it was one of my favorite things as a child), Field Hockey scrimmage all afternoon to cheer on my kid, and baking this banana cake. I can’t believe it, but I wanted this cake over everything else. It’s that good.

This recipe actually comes from the www.tastesbetterfromscratch.com website. The original recipe is Banana Bread Bars, I was just going to follow the recipe as it was, and then I made minor changes, the flour mix, more banana, and in the glaze, I used more vanilla and heavy cream instead of milk. It is so simple and easy to create.

Now, in my house there are always bananas, and I am not a banana snob. I will eat a banana with bruises. But even I have my limit; and end up peeling, plastic bagging, and freezing those babies. So, that is how I ended up with five bananas instead of the original 3-4. Thaw, mush up, add to the batter.

Browned Butter for Glaze

As for the glaze. Dear sweet goodness in a frosting. I know, browned butter sounds scary. It isn’t. You take the butter in a pan, turn on the heat, let it cook. Watch that it doesn’t burn and keep the heat low. When it is ready, add your glaze ingredients (I threw mine into the mixer) and combine until smooth. If you spread it on the still warm cake, it smooths out to this creamy layer of sweet, without being confectioner’s sugar sweet. It’s more like a penuche fudge flavor. If you are from New England, penuche shows up at fairs and festivals, it’s a burned sugar fudge that is insanely good.

Now, you can wait to cut this beautiful cake until it is cool, but on this quiet birthday morning, I just wanted a small square still warm without a plate, looking out at my flowers.

When did I decide every day was a gift? When my children

were little and I realized they would be big before I knew it. When my father was diagnosed with cancer and we had less than a year before he lost his brave battle.

When every school year goes by faster and faster.

When I am going to more funerals, volunteering to make meals more, and praying for more friends and families who are struggling. Realizing how really blessed I am.

Every day. Is a gift.

Leave it to my mother to find a place in my flowers to bring my Dad into this day. Cardinals are supposed to be our loved

Banana Cake with Browned Butter Frosting

ones passed on, coming to visit. So he was here with us.

Today, I felt loved, which is all any of us want, right? To be truly loved? To be surrounded by the people who want to be with us and show up in our lives?

And here is this new blog thing, this beautiful new creative corner for me to do what I absolutely love. The things that bring me joy. I am learning and hopefully getting better every day.

So on this day, this perfect end of summer day, I choose to celebrate with this square of deliciousness. The rest will be boxed up and brought to school to make the first few days of school sweeter! I can’t have this around or I will eat the whole cake. No joke. And that does nothing for my eating healthy exercising more resolutions.

I hope you enjoy this recipe, and as always, thank you for coming to the table!

Chrissy

Print

Birthday Banana Cake with Browned Butter Frosting

Print Recipe

Delicious Banana Cake with Browned Butter Frosting. Based on the Banana Bread Bars recipe from Tastes Better from Scratch website.

  • Author: chrissy@mythankfultable.com

Ingredients

Scale

Banana Cake:

  • 1/2 C Butter
  • 1 1/2 C Sugar
  • 5 ripe Bananas (If frozen, thaw and mash)
  • 1 C Plain Greek-Style Yogurt
  • 2 Large Eggs
  • 3 tsp Pure Vanilla Extract
  • 1 tsp Baking Soda
  • 3/4 tsp Salt
  • 1 C AP Flour
  • 1 C Cake Flour

Browned Butter Frosting:

  • 6 TBSP Unsalted Butter
  • 3 Cups Confectioner’s Sugar
  • 2 TBSP Pure Vanilla Extract
  • 3–4 TBSP Heavy Cream

Instructions

  1. Preheat oven to 350*
  2. Prepare a 9×13″ pan
  3. Cream together butter and sugar until smooth
  4. Add Greek-Style Yogurt, eggs, mashed bananas, and vanilla
  5. Add dry ingredients and mix until combined
  6. Pour batter into prepared pan and bake for 25-35 minutes, until tester in center comes out clean.
  7. In a pan, (I use a larger wok style fry pan) melt butter and simmer until it turns a light brown in color.
  8. Remove butter from heat, add confectioner’s sugar, vanilla, and heavy cream until the glaze is smooth and to the desired thickness.
  9. Spread frosting over the cake while it is still warm.

Did you make this recipe?

Share a photo and tag us — we can't wait to see what you've made!


Posted in: Dessert, My Story, Recipes Tagged: banana, banana bread, banana cake, brown butter frosting, dessert browned butter

Peach Galette

August 26, 2017 by chrissy@mythankfultable.com

Nothing says, “I am an artisanal baker with a creative flair” like a galette. It’s baking snobbery, really. This elitist freeform pie with beautiful fruit filling bubbling to the surface. It’s ragged edges folded up just so. It brings dessert to a whole new level.

Except, if you have ever tried to roll out and fold a pie crust into a pie plate, then repeat the process over your filling…and pray it is enough…and get the top and bottom to match, then crimp edges, poke holes, etc.  you realize, a galette is really just a lazy man’s shortcut in the pie world.

A galette is actually quite brilliant because it makes a complicated process much easier, and makes you look smarter, and hey, who doesn’t want to be a show off when it comes to a fresh summer fruit dessert?

I saw a recipe on a post from smittenkitchen around the fourth of July for Star-shaped Red and Blue Berry Galettes for Independence Day. So pretty, so perfect…and the pastry dough had RICOTTA?! Say no more.

If there is such a thing as a food-spirit animal, or you’ve been asked what one thing would you bring to eat on a desert island if you could only have one food? It would be a hard question, but for me? Ricotta would win out.

Sure it wouldn’t be easy to keep on a desert island, and it doesn’t pack the nutritional value of broccoli. I’m aware. I also have no intention of being deserted on an island, so stay with me.

When you put ricotta into a crust, along with lemon zest, and fresh butter, it’s literally food porn. This dough rolled out so beautifully, and was flaky, pie crust perfection.

Now, I am a New England Girl- so I say Ga-Lette. Like Gi-llette stadium-yay Pats). I know this is wrong. But if you hear my voice when I am typing it, that’s how I am saying it. (It’s Ga-Lay in real life)

The beauty of a galette (is, you roll out the dough, place on a parchment lined baking sheet, scoop your beautiful filling on top in the center, and carefully fold up the edges.

This is not as difficult as you would think. Two reasons: 1. pinch with your fingers to make the dough go where you want it. You are the boss here.

2. “Bubbly fruit spillage is gross,” said no one ever.

Even if your perfect galette has one corner where the filling has bubbled over and made a fruity mess on the parchment, it kind of adds to the whole “I planned it to make my dessert look more free and artsy.” No one needs to know it was not on purpose.

My other go-to rule is I always pre-cook my filling. I hate HATE runny fruit filling. Such a disappointment. Sad little peaches and a puddle of peachy water. No thanks. It has to have a density to it before it goes in to the dough for me. It can only get better as it bakes. I’ve never pre-cooked my filling and ended up with a jam pie. It just hasn’t happened. So, take the extra step to make sure it turns out to be a hearty filling you can sink your teeth into.

Now, there are two schools on egg wash. Egg wash at the beginning or egg wash at the end. I’m an end times girl. I don’t want a dark brown pie crust and so my egg wash goes on right at the finish line of baking. Maybe 7-10 minutes before your end cooking time, pull the galette out of the oven, brush with egg wash, sprinkle with some sugar, and pop it back in to the oven.

I am going to say this…when you pull this amazing dessert out of the oven, bubbly, peachy, beautiful, you will want to break off just an edge piece to taste. I know. It’s just out there. But remember this, bubbly fruit filling is the same consistency of hot lava. It will burn you. Not that I know this from personal, ahem, experience. Just let it cool for a few.

On this day before I move up to a new age group check box (I hate those), I couldn’t think of a better way to celebrate than to share this beautiful summer dessert with you. After all, on my almost birthday, I can be a baking snob elitist, right?

I hope you enjoy this recipe, and as always, thank you for coming to the table!

Chrissy

Print

Peach Galette

Print Recipe

Make this beautiful free form tart using the summer’s fresh peaches! No one needs to know this perfect summer dessert is easier than pie!

  • Author: chrissy@mythankfultable.com
  • Method: Baking
  • Cuisine: Dessert

Ingredients

Scale


Crust:

  • 2 C AP Flour
  • ½ C Cake Flour
  • 1 tsp Salt
  • 4 TBSP Granulated Sugar
  • Zest of 1 Lemon
  • 16 TBSP Cold Butter, Grated
  • 1/2 C Ricotta
  • 3 – 4 TBSP Ice Water


Filling:

  • 4 Cups fresh, diced peaches (I used white and yellow)
  • 4 Tbsp Granulated sugar
  • 3 Tbsp Corn Starch
  • ½ tsp cinnamon
  • ½ Lemon (juiced)
  • pinch of salt


Egg Wash:

  • One egg, 1 TBSP water – blend


Instructions


For Crust, combine flours, salt, sugar, and zest together. Cut in butter, until mixture resembles sand. Add Ricotta, blend. Add ice water as needed until crust comes together. Wrap in plastic wrap and refrigerate at least 4 hours or overnight.


When ready to assemble galette, preheat oven to 400*


Place filling ingredients into a non-reactive pan and simmer on medium heat until thickened. Set aside.


Roll out crust on floured surface, place on parchment lined baking sheet. Place filling in center of crust dough, then carefully bring up sides of crust over the filling, leaving an open center for the filling to show.


Bake for 30 minutes at 400* until golden. I add the egg wash right before the galette is finished, for the final 7 minutes or so, then sprinkle additional sugar on top. You can do egg wash right at the beginning if you desire!

Did you make this recipe?

Share a photo and tag us — we can't wait to see what you've made!

Posted in: Dessert, Recipes Tagged: dessert, galette, peach, peach dessert, peach galette, ricotta pie crust dough
« Previous 1 2 3 4 5

Recipe Search

Recent Posts

  • Fluffernutter Cookies…You Heard Me April 12, 2024
  • On Nests July 30, 2023
  • Lemon Rosemary Shortbread Cookies April 24, 2022
  • Praline Sweet Potato Pie March 22, 2022
  • Italian Ricotta Cake March 13, 2022

Recent Comments

  • Cathy Carroll on To My Daughter On Her 18th Birthday
  • Maureen / Mimi on To My Daughter On Her 18th Birthday
  • Kathy G on To My Daughter On Her 18th Birthday
  • chrissy@mythankfultable.com on Cherry Crescent Moon Cookies and Finding the Joy
  • chrissy@mythankfultable.com on Cherry Crescent Moon Cookies and Finding the Joy

Archives

Categories

  • appetizer
  • bread
  • breakfast
  • Cookies
  • crockpot
  • crockpot
  • Dessert
  • Fruit
  • My Story
  • One Pan
  • Recipes
  • side dish
  • Side Dishes
  • soup
  • Vegan

Copyright © 2025 mythankfultable.com.

Lifestyle WordPress Theme by themehit.com