mythankfultable.com

Feeding the Heart, Body, and Family

  • My Pics
  • My Story
  • The Puppies
  • Contact Us
Feeding the Heart, Body, and Family

Recipes

Here is the recipe!

Blue Cheese Bacon Wrapped Figs Appetizer

October 21, 2017 by chrissy@mythankfultable.com

Fresh Figs

Figs. Where to begin? So much more than the cookie. I loves me some Newtons. It is the combination of the dry outer layer and the chewy inner filling…I don’t know. It reminds me of staying home sick, or deep dark winters. It is a healthier sounding cookie, even though in truth, it is a cookie indeed.

But what if we stepped outside the Newton and tried something new with figs? This is their season. Fresh figs are beautiful in color, as well as texture. They are light and sweet, and a fruit like no other. What if we took the fig out of the cookie and did something new? Let’s mix it up.

I’m talking about sweet and tangy, cheesey and melty and crispy with bacon. Essentially the fig is the perfect carrier for savory or sweet. So this post and the next are two really easy things to do with figs. Wow your family and table or just yourself, because, hey, you are worth it. I made both recipes on the same night and essentially had a fig fest. I know. But, at least it wasn’t me and a box of Newtons watching reruns on the DVR. Not that anything (ahem) is wrong with that.

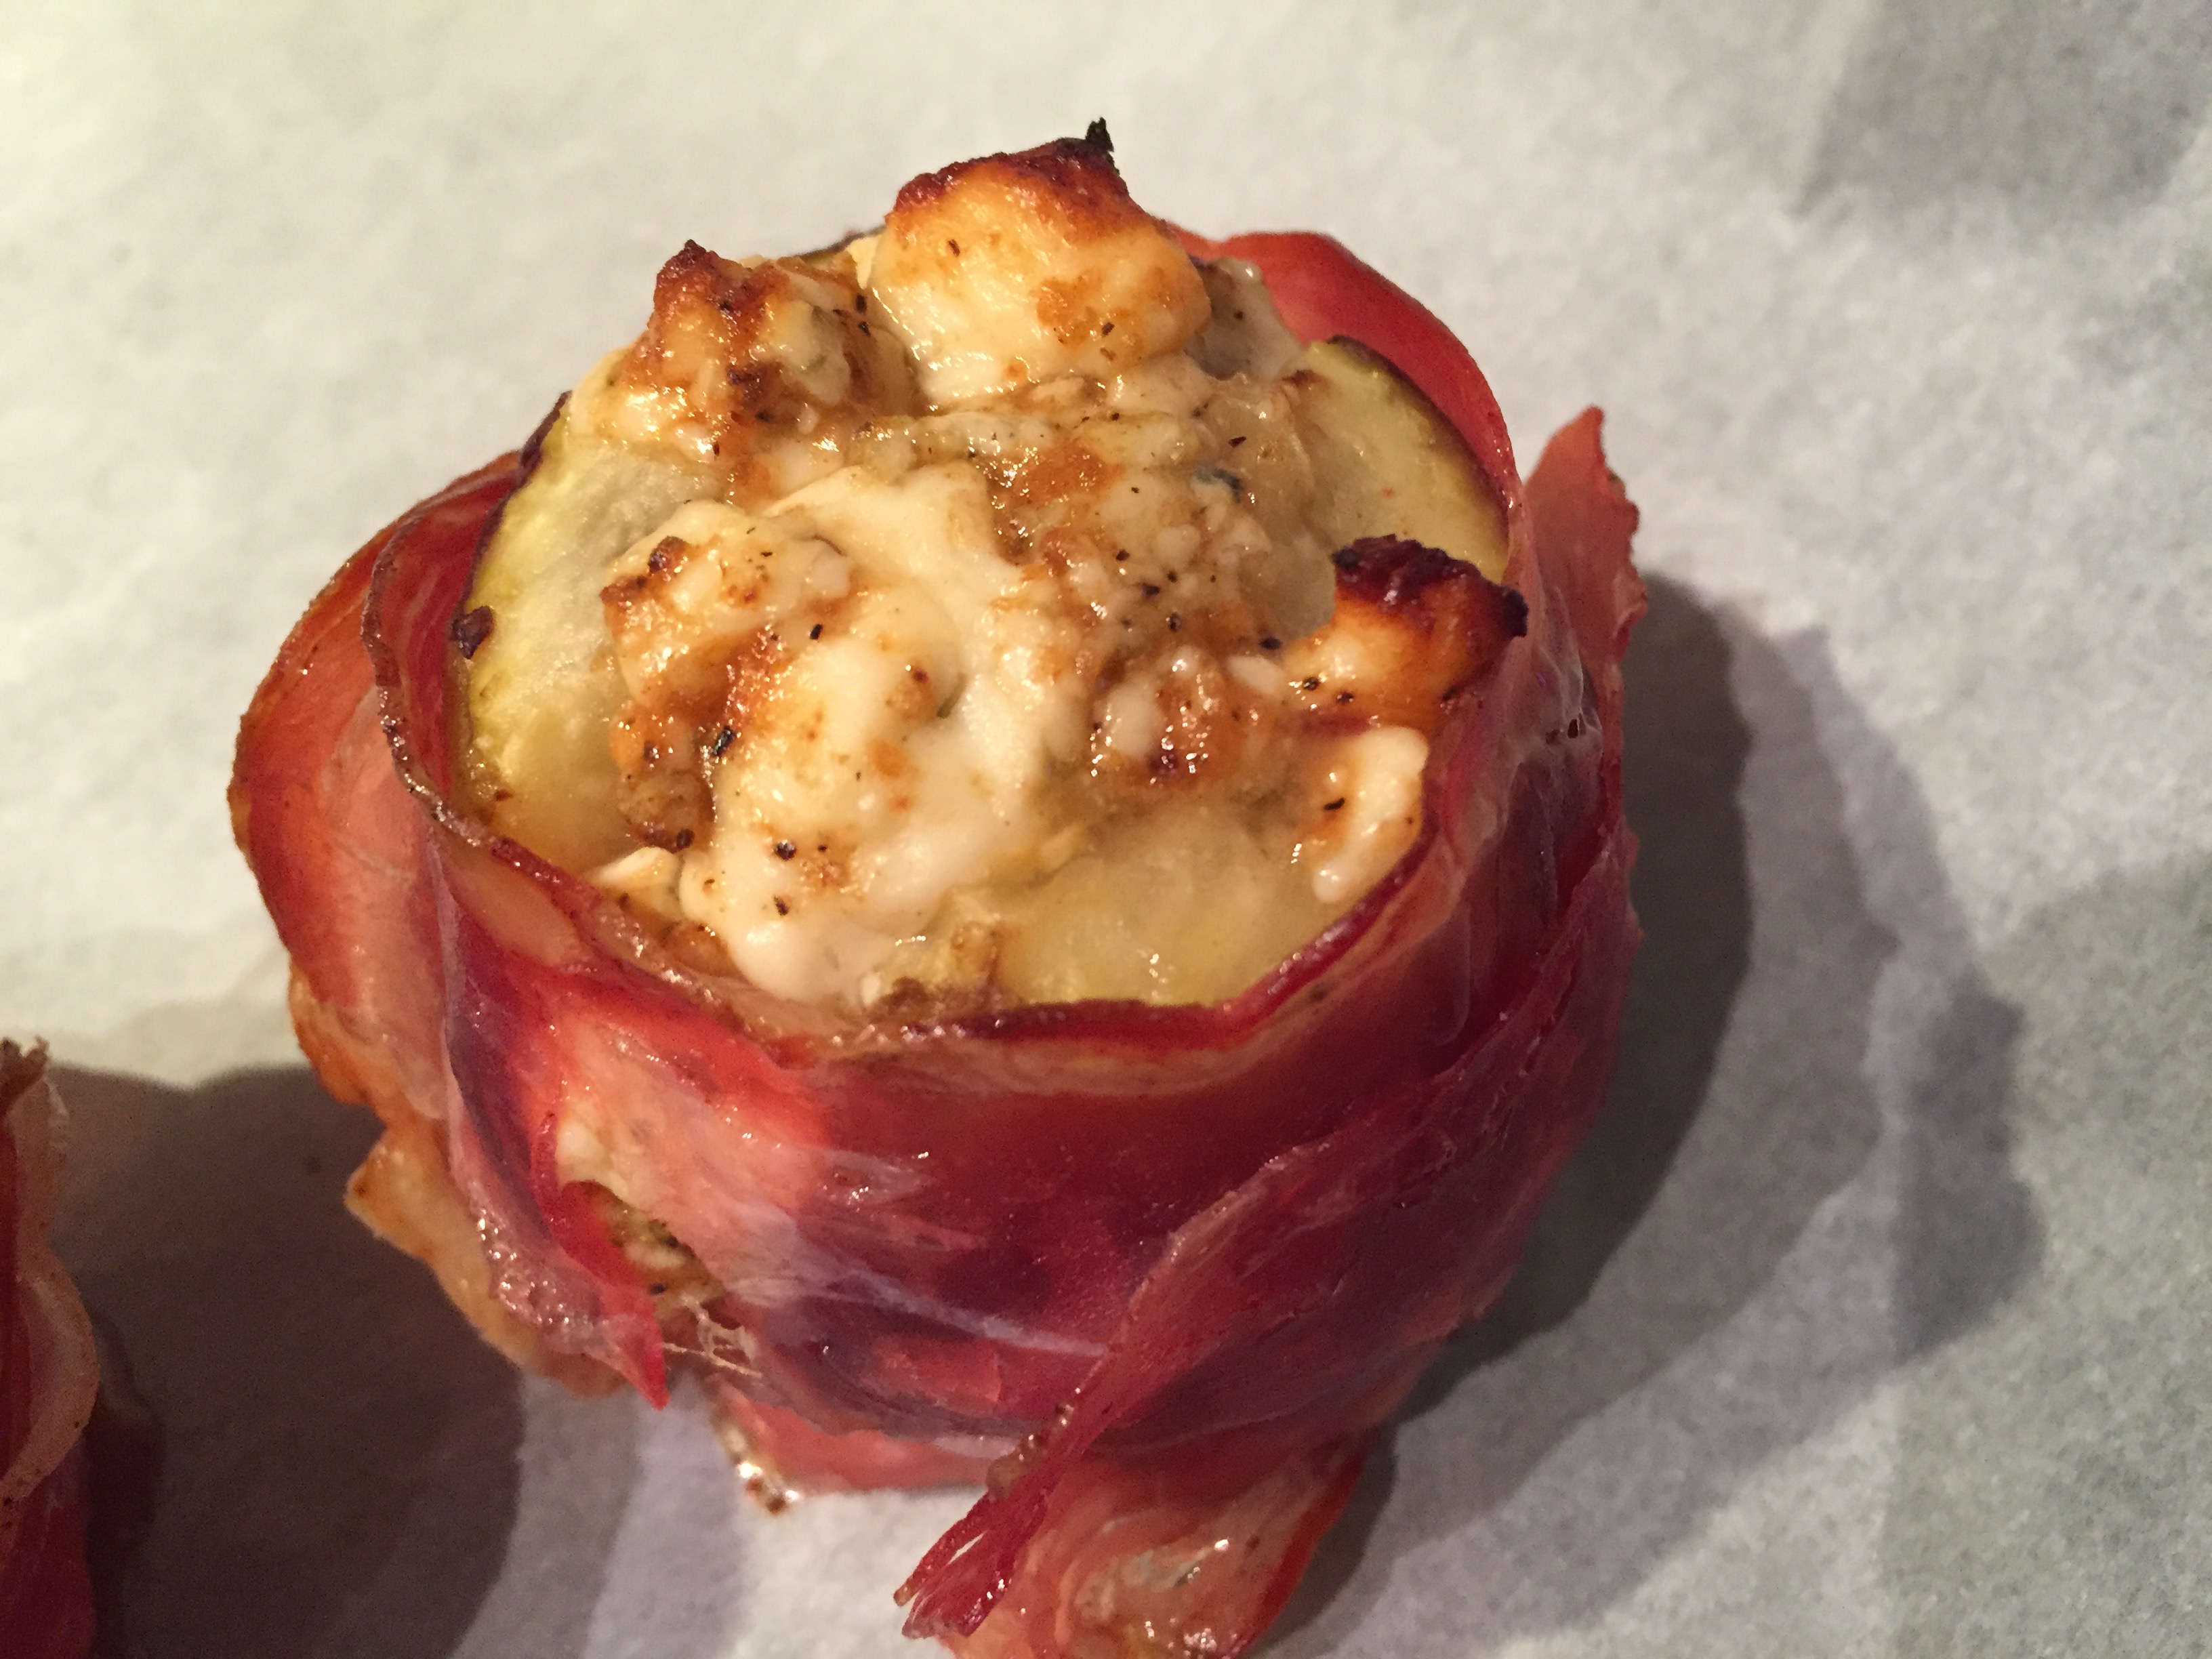
For this appetizer, you want to cut the figs criss-cross from the top until almost the bottom, keeping a tear drop shape but making room for the deliciousness that is the blue cheese middle.

This filling is simple, blue cheese crumbles, salt, pepper, hot sauce, a little heavy cream to combine, and then gently spoon into the fig. You want to keep the shape of the fig as much as possible, and the bacon wrapping not only adds to the flavor, it also helps to keep the fig’s shape.

Blue Cheese Stuffed Figs

You can make this batch as small or as large as you need. It is a beautiful and simple appetizer for the holidays or a dinner party, or even with a glass of wine on the back porch after a long week. I’m not a big drinker, but even I have those nights where appetizers for supper seem like a grand idea.

Wrap the fig in a slice of bacon and place on a Silpat or parchment lined baking sheet. Bake. Wait, what? We’re done?

Bacon Wrapped Blue Cheese Stuffed Figs

Yes.

That’s the recipe right there. Bake these beauties in the oven at 350* until the cheese is melty and the bacon crisps up. This was about 15-20 minutes in my oven. You could broil these but I am always nervous with the broiler. I use it, I am just very respectful of it. You will need to gauge it the first time you make this so you don’t have fig volcanos with blue cheese lava.

Once the figs have come out of the oven, I let them rest for a few minutes to set up. Scalding hot bacon and melted cheese is never a wise choice right out of the oven, but after a few minutes, you are good to go.

This is a simple recipe that can be super indulgent. And far far away from the Newton.

I hope you enjoy this recipe, and as always, thank you for coming to the table!

Chrissy

For a printable recipe, click below!

Print

Blue Cheese Bacon Wrapped Figs Appetizer

Print Recipe

This quick and easy appetizer that combines fresh figs with blue cheese and bacon!

  • Author: chrissy@mythankfultable.com

Ingredients

Scale
  • Fresh Figs

For each fig you will be making, you will need:

  • 1 Tablespoon Blue Cheese Crumbles
  • Salt, Pepper to taste
  • 1 Dash of Hot Sauce (of Choice)
  • 1 Slice of Bacon
  • 1 Teaspoon Heavy Cream
  • garlic powder or minced garlic if you -want not necessary

Instructions

  1. Remove stems from figs and slice cross-wise top down making a almost quartered but still in tact tear drop shape. (leave the bottom part together and cut open the top)
  2. In a bowl, mix blue cheese, hot sauce, salt, pepper, and heavy cream to create a soft and combined pasty consistency. Don’t over-mix. It should still have body and resemble blue cheese crumbles but hold together.
  3. Fill each fig with filling.
  4. Wrap each fig with one bacon slice.
  5. Bake in a 350* oven for 20 minutes. Or until bacon is crisp and cheese is melted.
  6. Let sit after baking for a few minutes before serving.

Did you make this recipe?

Share a photo and tag us — we can't wait to see what you've made!


Posted in: appetizer, Fruit, Recipes Tagged: appetizer, bacon, bacon wrapped figs, blue cheese, blue cheese stuffed figs, blue cheese stuffing, figs

Balance in Life and Diet and Chopped Apple Salad

October 20, 2017 by chrissy@mythankfultable.com

Chopped Apple Salad

Recently I went to a bounce place with one of my best friends (Erika from the Eggplant Rollatini Recipe), and our high school aged children. We bounced. As in, all of us. Me, my forty five year old body, workout clothes, and sock feet. We were maybe two of three adults in the place “bouncing,” total. Other adults were sitting in chairs along the sidelines on their cell phones and or guarding the “stuff.” You get a visual.

Now, I am a fledgling athlete, at best. I walk every day. I work like a pro digging dirt in my yard and edging borders like I’m a dude. I’m a single mom, so if stuff needs to get done, I find a way.

Ninja warrior? I am not.

That didn’t keep me from doing the Ninja Warrior Mazes at this bounce place. The easier one, and the harder one. I ricocheted off the wedges, I climbed rock walls, I fell off those monkey bar swings (many times), I managed the rope walls. BUT I ROCKED THE BALANCE LEDGE. You know, that tiny little strip of fabric you have to cross and not fall off to get to the next place? Yeah. This gal balanced the crap out of that thing. Did I mention I was slow at everything? Uh, there’s a time element? OK, so maybe I wasn’t as amazing as I felt in my head at the time…

Balance. Why is balance so hard?

Why is it I can be prepping a salad and the M&M’s that live in my daughter’s room down the hall call to me? Why is it when the stress of work and life in general should propel me to go to the gym I find myself wanting to curl up on the couch (I don’t) and eat Ben and Jerry’s (I eat Halo Top). Why is it when I am finally at an age where I know better and know more, I still struggle?

Balance. The balance of being kind to myself and yet being accountable. Of making good choices across the board and indulging once in a while. Ever. So. Careful. We. Balance.

Chopped Apple Salad

This recipe today is something I love to eat, and it packs up as a great lunch, side dish, or topper. It goes really well on a salad, on quinoa, on top of carnitas, wherever you feel the need for an apple-y crunch with a kick of coleslaw. Especially this time of year when the apples are ready for picking, you have another apple recipe in your arsenal.

Simply grate or chop your apples, throw in some shredded carrots, and shredded cabbage. While I find the art of chopping and dicing to be therapeutic, for this recipe, I just purchased the pre-shredded carrots and the pre-shredded cabbage, making this super easy to prepare.

I whipped up a quick vinaigrette, but if you wanted to make it even easier on yourself…you could use poppy seed dressing or coleslaw dressing that is bottled. This is supposed to be a quick, easy, healthy option for the table.

Now, if you want to amp this recipe up with walnuts, pecans, raisins, Craisins, go for it! Be empowered to change this recipe and do your thing!

If I make this recipe, it is almost always my lunch the next day, because apples get brownish even in the acids, and veggies never hold up with dressing the next day. They just don’t look the same. However, no mom ever turned her nose up at a pre made, grab quickly and enjoy lunch, whether the apples looked sad or not. At least, this mom doesn’t. There’s that balance again, you take it where you can!

I hope you enjoy this recipe, and as always, thank you for coming to the table!

Chrissy

Click below for a printable recipe!

Print

Chopped Apple Salad

Print Recipe

A quick and easy side dish that pairs apples and cabbage with a light vinaigrette!

  • Author: chrissy@mythankfultable.com

Ingredients

Scale

Salad:

  • two red apples (Macoun or Gala)
  • 1–2 Granny Smith Apples
  • 1 Cup Shredded Carrots
  • 1 Cup Shredded Cabbage

Vinaigrette:

  • 1/3 Cup Apple Cider Vinegar
  • 1/4 Cup Olive Oil (I found a Grapefruit Infused Olive Oil at Mainely Drizzle I love)
  • salt and pepper to taste
  • 1 Tsp Poppy Seeds (if desired)
  • (If you want it to be more creamy in texture – add 1/3 Cup Miracle Whip)
  • 1 Tablespoon Sugar (if desired)

Instructions

  1. Chop apples into bite sized chunks.
  2. Mix apples, carrots, and cabbage together.
  3. In a separate bowl, combine dressing ingredients (or used pre-bottled dressing of choice)
  4. Combine and refrigerate.

Did you make this recipe?

Share a photo and tag us — we can't wait to see what you've made!

Posted in: Recipes, Side Dishes Tagged: Apple Salad, Chopped Apple Salad, Coleslaw, fruit, side dish, Vegetarian

Buffalo Cauliflower

October 19, 2017 by chrissy@mythankfultable.com

Buffalo Cauliflower

“Cauliflower is nothing but cabbage with a college education” – Mark Twain.

Ok, true confession. I love this vegetable. Raw, steamed, riced, and my personal favorite, buffalo style. It’s a stinky veggie, but it is a good one. I love how the florets are a creamy white and solid, how they crunch when raw, and have a meaty texture when cooked, and how they rice up or mash-up and fake out the potato lovers in all of us. Does my house smell like a locker room after the team ate chili? Well, there is always the trade-off. Open a window and cook this precious vegetable.

This recipe is quick to prepare and easy to make. Simply cut the cauliflower head into florets, marinate in a hot sauce, then roast in the oven. I use a basic hot sauce – you can up the ante for this recipe and add cayenne, hot pepper seeds, whatever you’ve got in your spice arsenal. I like to not breathe fire when I eat, typically. But these are still hot in the spicy sense. Thus the name.

Marinated Buffalo Cauliflower

This is a weekly recipe in my house. I do a lot of meal prep for the week on Sunday, so come fall, when the cauliflower is abundant, you will find me roasting this very recipe for my lunches for the week.

I have seen recipes where you put a breading on the cauliflower, then fry or bake it, but I have found that the simplicity of this recipe and the fact that it is essentially a marinated roasted vegetable make it a

healthy and versatile option.  I will put this over a salad, serve it as a side dish, eat it instead of wings when I order them for the kids, and just all around enjoy it. It’s got kick, it opens the sinuses when you make it, hey…all things good.

I let the cauliflower marinate over night, then roast in a 375* oven until it is browned and cooked through, approximately 50 minutes. Half way through the cooking time , I pull the sheet pan out of the oven and toss the cauliflower so it roasts equally on all sides.

Buffalo Roasted Cauliflower

This is delicious right out of the oven, or as a cold topper for salad. It gives that “Meatless Monday” a fun twist, and I got my anti-vegetable eater in my life (you know who you are) to try it…and even like it. That’s a win-win.

I hope you enjoy this recipe, and as always…thank you for coming to the table!

Chrissy

Click Below for a Printable Recipe

Print

Buffalo Cauliflower

Print Recipe
  • 1-2 Heads of Cauliflower, Cleaned and Cut into Florets
  • 1/2-3/4 Cup Frank’s Red Hot (or hot sauce of your choice- I mix in Siracha, various hot sauces – a dash of this and that, etc.)
  • 1/2 Cup oil (I use regular canola oil or olive oil)
    • (I do have a cayenne infused olive oil I splash in here if I have it)
  • 1 Tbsp Garlic Powder
  • Salt and Pepper to Taste


  • Author: chrissy@mythankfultable.com

Ingredients

  1. Cut Cauliflower into florets and set aside
  2. Mix marinade ingredients, pour over cauliflower. (I do all of this in a gallon sized ziplock baggie)
  3. Coat Cauliflower evenly, and refrigerate for several hours to overnight.
  4. Remove Cauliflower, straining the excess marinade away if possible.
  5. Place Cauliflower on a cookie sheet and roast in the oven at 375*
  6. Halfway through the cooking time, (25 minutes) turn Cauliflower over to cook evenly.
  7. Remove from the oven when Cauliflower is browned and cooked through.

Did you make this recipe?

Share a photo and tag us — we can't wait to see what you've made!


Posted in: Recipes Tagged: Buffalo Cauliflower, Buffalo Sauce, Cauliflower, Vegetarian

Eggplant Rollatini and Friendship with Erika

October 18, 2017 by chrissy@mythankfultable.com

Eggplant Rollatini

Ever make a meal that really engages you as a cook? Where every step of the process becomes an adventure and you invest the time and energy you need to in each step? Not your everyday supper, more of a Sunday dinner or special occasion? This is that meal.

Eggplant Rollatini comes from the kitchen of my friend Erika. She is my treadmill buddy (when I get to the gym) and she is my Wonder Woman.

When she told me about how she slices, then dips in egg batter, and breads, then fries her eggplant, then stuffs them with a mixture of ricotta and sun-dried tomatoes and prosciutto, rolling them up and simmering in a pan of sauce I had to stop and say, “What, Whaaat? What is this deliciousness of which you speak?”

This recipe is an adventure and WORTH IT. Taking fresh eggplants, slicing them, breading them and frying in olive oil, making a creamy mixture of cheeses and spices, rolling them up into little wonderful packets of deliciousness. Then simmer this in a sauce and top with additional cheeses on top. You are welcome world. Another bonus? You can freeze this and reheat it in the oven on a day when you feel like planning supper is a burden (and yes, I too have those days). As I am writing this I am thinking, heck, you can even slap one of these on a beautiful roll and call is a sammich.

OK, back to the work part. Slice your eggplant length-wise I place my eggplant on a sheet pan and lightly salt and pat dry with paper towels. I let the eggplant slices sit out for a bit to remove excess moisture.

You don’t need to.

I do a three bowl set up, one with the eggplants, one with the egg (this is literally two eggs beaten with a little water), one with the breadcrumbs. I buy my breadcrumbs. I like the Italian style. You can leave it or add a little garlic powder or salt and pepper, etc. to your breadcrumbs.

I use about an inch of oil in my pan, get it good and hot, and the eggplants go to one bowl, the next bowl, and into the oil.

I know. Fried. Sigh. Just do it.

Fried Eggplant Slices

Then the fried eggplants (when golden remove from the oil) take a rest on the paper towel lined cookie sheet while I mix up the cheeses.

I mix ricotta (whole milk – this is too much energy involved to use part skim. NO). A mixture of Italian cheeses, sun-dried tomato pesto, and my spices.

Each eggplant slice gets a thinly sliced-you-can-read-the-paper-through-it slice of prosciutto. then a scoop of the cheese mixture, then roll.

Eggplant Rollatini Ready to Roll!

The rollatini are then placed in sauce and simmered in the oven.

You can alter this recipe in any way. Instead of adding sun-dried tomato pesto you can use regular pesto, or no pesto at all. You can add only mozzarella instead of a mix of cheeses, this is your show.

If I never thanked Erika for being awesome…Thank you Erika for being awesome. Thank you for this amazing supper idea and all the goodness you bring into our lives.


Eggplant Rollatini

I think one of the best things about finding someone who loves to cook and share is this common thread of conversation that weaves into your lives. It’s what we do. We feed people. We talk about it, and if we are really lucky enough, we get to write about it too.

I hope you enjoy this recipe, and as always, thank you for coming to the table!

Chrissy

Click below for a printable recipe!

Print

Eggplant Rollatini

Print Recipe

This recipe is love served up with cheese and saucy goodness!

  • Author: chrissy@mythankfultable.com

Ingredients

Scale
  • 2–3 Eggplants, sliced long-wise
  • 2 eggs
  • 2 tablespoons water
  • One container of Italian Style Breadcrumbs (or homemade if you are feeling fancy)
  • 1/4 Pound Thinly sliced Prosciutto (if you have an idea of how many slices you want, you can typically ask your deli/butcher and they will do it for you)
  • 2–3 Cups of Whole Milk Ricotta Cheese
  • 2 Cups Italian Cheese- save 1/2 Cup for topping (you will want more, so add more cheese to original amount)
  • 1/3 Cup Sun-dried Tomato Pesto
  • 2 Teaspoons garlic powder
  • Salt, Pepper, Oregano to Taste
  • Sauce for baking

Instructions

  1. Slice eggplants longwise and set out on a paper towel lined cookie sheets. Pat dry, season with salt and pepper.
  2. Mix egg and water together and set up for breading station.
  3. Pour breadcrumbs into additional bowl.
  4. heat oil in a pan for frying.
  5. Dip eggplant in egg, then breadcrumbs, and fry on either side until golden brown)
  6. Place fried eggplant slices on paper towels to drain.
  7. In another bowl, mix Ricotta, cheeses, spices, and Tomato Pesto, mix thoroughly.

Assembly:

  1. Take eggplant slices, lay a thin slice of prosciutto on each, covering the whole slice.
  2. Scoop cheese mixture on the larger end of the eggplant slice.
  3. Gently roll the eggplant with the mixture tucked inside.
  4. Place the eggplant Rollatini in the sauce.
  5. Cover Rollatini with additional cheese and bake in a 350* oven until cooked through.

Did you make this recipe?

Share a photo and tag us — we can't wait to see what you've made!


Posted in: Recipes Tagged: Eggplant, Eggplant Rollatini, Prosciutto, Ricotta

Vegan Pumpkin Oat Bars with Dark Chocolate Chips

October 10, 2017 by chrissy@mythankfultable.com

Pumpkin Mixture

I am not sure why on the weekend my body feels the innate need to rise before the sun like it does on the work week, but I’m telling you, it is not of my own volition. Oh for the days where my body could sleep for hours, with my mom starting the vacuum at ten am because no one should still be asleep at ten am.

When my children were babies, they too, were early risers. Many  day held the five am coffee and playing with the quiet toys, or watching of the cartoons with the volume low in the dark hours of dawn while praying for the energy to get to lunch.

Now, if I let them, and I do, because I am that mom, they sleep. One rises before the other, but they do, finally, more than a decade later, sleep. So I find myself with my coffee, my to do list, and this recipe to blog.

While I did go meat free for two years, I have never delved into the Vegan world. I am intrigued by it. I feel I would benefit from it, I know people who are vegan and are not deprived in any way. They eat amazing, Whole Foods. They fill their bodies with all things healthy and right in the world. And they still have desserts!

So here I am, finding myself trying out vegan recipes and learning…They are actually pretty wonderful.

OK, there is a different expectation when it comes to a vegan recipe. As in, no egg, no butter, no…but WAIT! Why am I focusing on the NO part?

Let’s focus on the YES! As in Hello Pumpkin Bars of goodness! This recipe asked two things of me: 1. To make my own gluten free oat flour. (you’ve got this) and 2. To anticipate vegan as being not less-than. It is actually less work, grinding oats included to bang out this recipe than many of my other dairy infused and sugar-ladened ones. Anticipating a great turn out…I was up for it!

This recipe bakes up like a traditional bar cookie, sweetened with a little brown sugar and applesauce, pumpkin puree, and a load of spices. It marries the fall of pumpkin, and lightens the guilt of this season of indulgences; you know the September fair through New Year’s resolution season. I grabbed half of a bar last night and felt 0% guilt. It satisfies the sweet tooth without being over the top.

Ok, I did put in a lot more chocolate chips than the original recipe called for. I’m sorry. It had to be done. Truthfully, you can half the chocolate and it will be delicious.

Vegan Gluten-Free Pumpkin Oat Bars with Dark Chocolate Chips

In a world where as a mom, and a single mom, and a working mom, I need to feel good about what I feed my kids. I really liked that these were a healthy snack, and that I am learning new things. Like how can I make more of these types of recipes? So keep an eye out. I’m into it.

Back to making my own oat flour. I know, the Little Red Hen sings out to me. “Who will help me grind the wheat?” This process took all of one minute tops. I scooped gluten-free oats into a processor, and pulsed the button. Come on. I take longer to pick out my coffee at Starbucks. Zoom Zoom, oat flour. Which, was pretty empowering. I made flour. Go me.

I love that it is healthier than anything else I have posted on this blog, I love that I can sneak a corner and not feel like I have wrecked my day, I love that it is pumpkin and spicy and it is delicious.

Did I mention it is delicious? As in, you don’t really feel like you need to say, “It’s vegan” in a hushed voice?

The true test, I brought them into work. They know everything they say is weighed in the final post, so I asked, and the result? Empty pan. And on a Breakfast Friday, when there are bagels and Danish pastries and donuts present. So, I say yay. The crowds approve.

I hope you enjoy this recipe, and as always, thank you for coming to the table!

Chrissy

Click below for a printable recipe!

Print

Vegan Pumpkin Oat Bars with Dark Chocolate Chips

Print Recipe

A delicious healthy vegan, gluten-free pumpkin oat bar with dark chocolate chips! This recipe was originally from www.ambitiouskitchen.com changes to the recipe were by me.

  • Author: chrissy@mythankfultable.com

Ingredients

Scale
  • 3 Cups Gluten-Free Oats – pulsed into flour using food processor, Nutri-bullet, etc
  • 1 Tbsp Baking Powder
  • 3/4 Tsp Baking Soda
  • 1/2 Tsp Salt
  • 1 Tablespoon Cinnamon
  • 24 Grates-2 Tsp Fresh Ground Nutmeg
  • 1/2 Tsp Ground Cloves
  • 1 can of Pumpkin Puree (not Pumpkin Pie Filling)
  • 3/4 C applesauce of choice (I used Granny Smith unsweetened)
  • 1 Tablespoon Vanilla Extract
  • 3/4 Cup Dark Brown Sugar
  • 1 1/2 Tablespoon Olive Oil
  • 1 package Vegan Dark Chocolate Chips (check ingredient list- some grocery store brands are in fact vegan)

Instructions

  1. Preheat oven to 350*
  2. Make your oat flour by taking the three cups of gluten free oats in a processor/nutribullet/blender and pulse until fine flour occurs. This is not a long process!
  3. Whisk in Baking Powder, Baking Soda, Salt, Spices and set aside.
  4. In a separate bowl combine Pumpkin, Apple Sauce, Vanilla Extract, Olive Oil, and Brown Sugar until combined.
  5. Slowly add dry ingredients to pumpkin mixture.
  6. Fold in Dark Chocolate Chips.
  7. Line a 8×11 rectangular pan with parchment paper.
  8. Smooth batter into pan, reaching the batter to the edges.
  9. Bake in a 350* for approximately 20 minutes. These bars cook up quickly. A tester should come out clean or with a few clinging crumbs.
  10. Cut into bars. Bars will keep for a few days in a sealed container, or will refrigerate/freeze.

Did you make this recipe?

Share a photo and tag us — we can't wait to see what you've made!


Posted in: Cookies, Dessert, Recipes, Vegan Tagged: Gluten Free, Healthy, Oat, Pumpkin, Pumpkin Bar, Vegan, Vegan Pumpkin Oat Bar

Sorry Not Sorry Bars

October 7, 2017 by chrissy@mythankfultable.com
Blondies with crushed Oreos and M&M Candies

Sorry Not Sorry Bars

I have fallen in love with the game of Field Hockey.

Mostly because my daughter has fallen in love with the game of Field Hockey.

I’ve gotten to be a sideline watcher mom, an almost coach mom, a real coach mom (who assisted with the ice packs and hydration and drills- not any real hard core stuff) and now, I am back to watching…and cutting ribbons, supporting boosters, and PACKING THE SNACK BOX.

My inner mom waged war with this idea. A post game snack should be rich in vitamins and nutrients. I KNOW those young bodies need not Oreos and M&Ms. I do. They wear small sizes and burn a lot of calories and CAN eat this treat, but SHOULD they? No.

Crushed Oreos

Crushed Oreos

Peer pressure can be cruel. I fell into the trap to be the cool mom who made the treats that fall on the less than healthy scale. I ply myself with ideas like, they ate these after the game and it was late, and they were bonding over sugar. They ran hard, won the game, and the calories won’t affect them like they would my old self.

Oh well. Sorry, not sorry.

These are a basic blondie with a whole lot of extra thrown in. Crushed Oreos and M&M’s made my cut, only because I couldn’t find a chocolate covered pretzel I liked and I didn’t want to over kill this recipe- but really, you can throw the kitchen sink in here. Whatever floats your boat. I used regular M&M’s but the last time I checked there were at least ten different flavors (Hello Caramel?? Can’t have within reach of my arms) so you could really have at it.

It is NOT a healthy snack. It isn’t even close. So if you make it, go all in. I saw this original recipe on www.averiecooks.com, and made the batch larger to feed my team. The Snack Box is a serious endeavor. I wanted extra. We don’t skimp at our house when it comes to servings. It’s an Italian thing. Or, maybe it’s a foodie thing.

Sorry Not Sorry Bars

This batter mixes up quickly, and bakes quickly as well. There isn’t baking soda or powder in the recipe, and it makes up two rectangular pans, making twenty four good sized squares. Perfect for a team or for a dessert tray at a function.

In any event, the team determined it was a great snack, and the box came back empty, so I consider that a good sign. I’ll take it. I may not be shouting instructions from the sidelines, but I can get my love in through the baked goods I supply. We all have our strengths.

I hope you enjoy this recipe, and as always, thank you for coming to the table!

Click below for a printable recipe!

Print

Sorry Not Sorry Bars

Blondies with crushed Oreos and M&M Candies
Print Recipe

Rich buttery blondie bar filled with Oreos and M&M’s Recipe originally found on www.averiecooks.com

This batch will fill two large rectangular pans- yielding 24 good sized bars. Perfect for the team!

  • Author: chrissy@mythankfultable.com

Ingredients

Scale
  • 1 and 1/2 C Melted Butter (Three Sticks)
  • 3 Cups packed Dark Brown Sugar
  • 3 Eggs
  • 3 Tablespoons Vanilla
  • 1 Package Oreos of Choice – crushed into bite size pieces
  • 1 Share Size Bag (2 Cups) M&M’s of Choice…so many to choose!
  • 3 Cups Flour

You can add any assortment of add-ins at this point. Think Go-Big-Or-Go-Home


Instructions

  1. Pre-Heat oven to 350*
  2. Line and spray/grease two 9×11 Pans with parchment paper.
  3. Melt Butter and combine in a mixer with Dark Brown Sugar until smooth and incorporated.
  4. Add Vanilla, Eggs, and combine.
  5. Add flour slowly to incorporate.
  6. Fold in all the other goodies (M&M’s, Oreos, Chocolate covered Pretzels, etc)
  7. Divide batter between two pans, smoothing out to edges gently.
  8. Bake for 20-25 minutes. These cook up quickly so keep an eye on them!
  9. Allow to cool completely before cutting.

Did you make this recipe?

Share a photo and tag us — we can't wait to see what you've made!


Posted in: Cookies, Dessert, Recipes Tagged: Bar Cookie, Blonde Brownies, Blondies, dessert, M&M's, Mix Ins, Oreos, Team Snack Box Recipes

Apple Blueberry Crisp

October 5, 2017 by chrissy@mythankfultable.com

If Autumn had a smell, it would be a combination of apples and cinnamon. While I save my pumpkin spice love for dessert and coffee, If I had to make a candle of the greatest hits of fall smells, cinnamon wins the prize.

Apple Blueberry Crisp

We are still in the crossroads between summer and fall, with put-your-socks-on-it’s cold mornings, warm sunny afternoons, and “Did you bring your sweatshirt to the game?” evenings.

Yards display a combination of plants ready to pull up, and the marigolds which are nothing short of spectacular color wise. (Though, a marigold will never be a candle of choice in my world. No thank you.)

I am hankering to pick apples this weekend, weather permitting, and yet, I still have blueberries in the freezer. What’s a girl to do?

Last weekend we made stroganoff (recipe to come soon) and in the cool night air after supper, my kids said, “Too bad you didn’t make apple crisp. It’s a good night for it.” Sigh. Missed opportunity, but hey, I made stroganoff. so, there ya go.

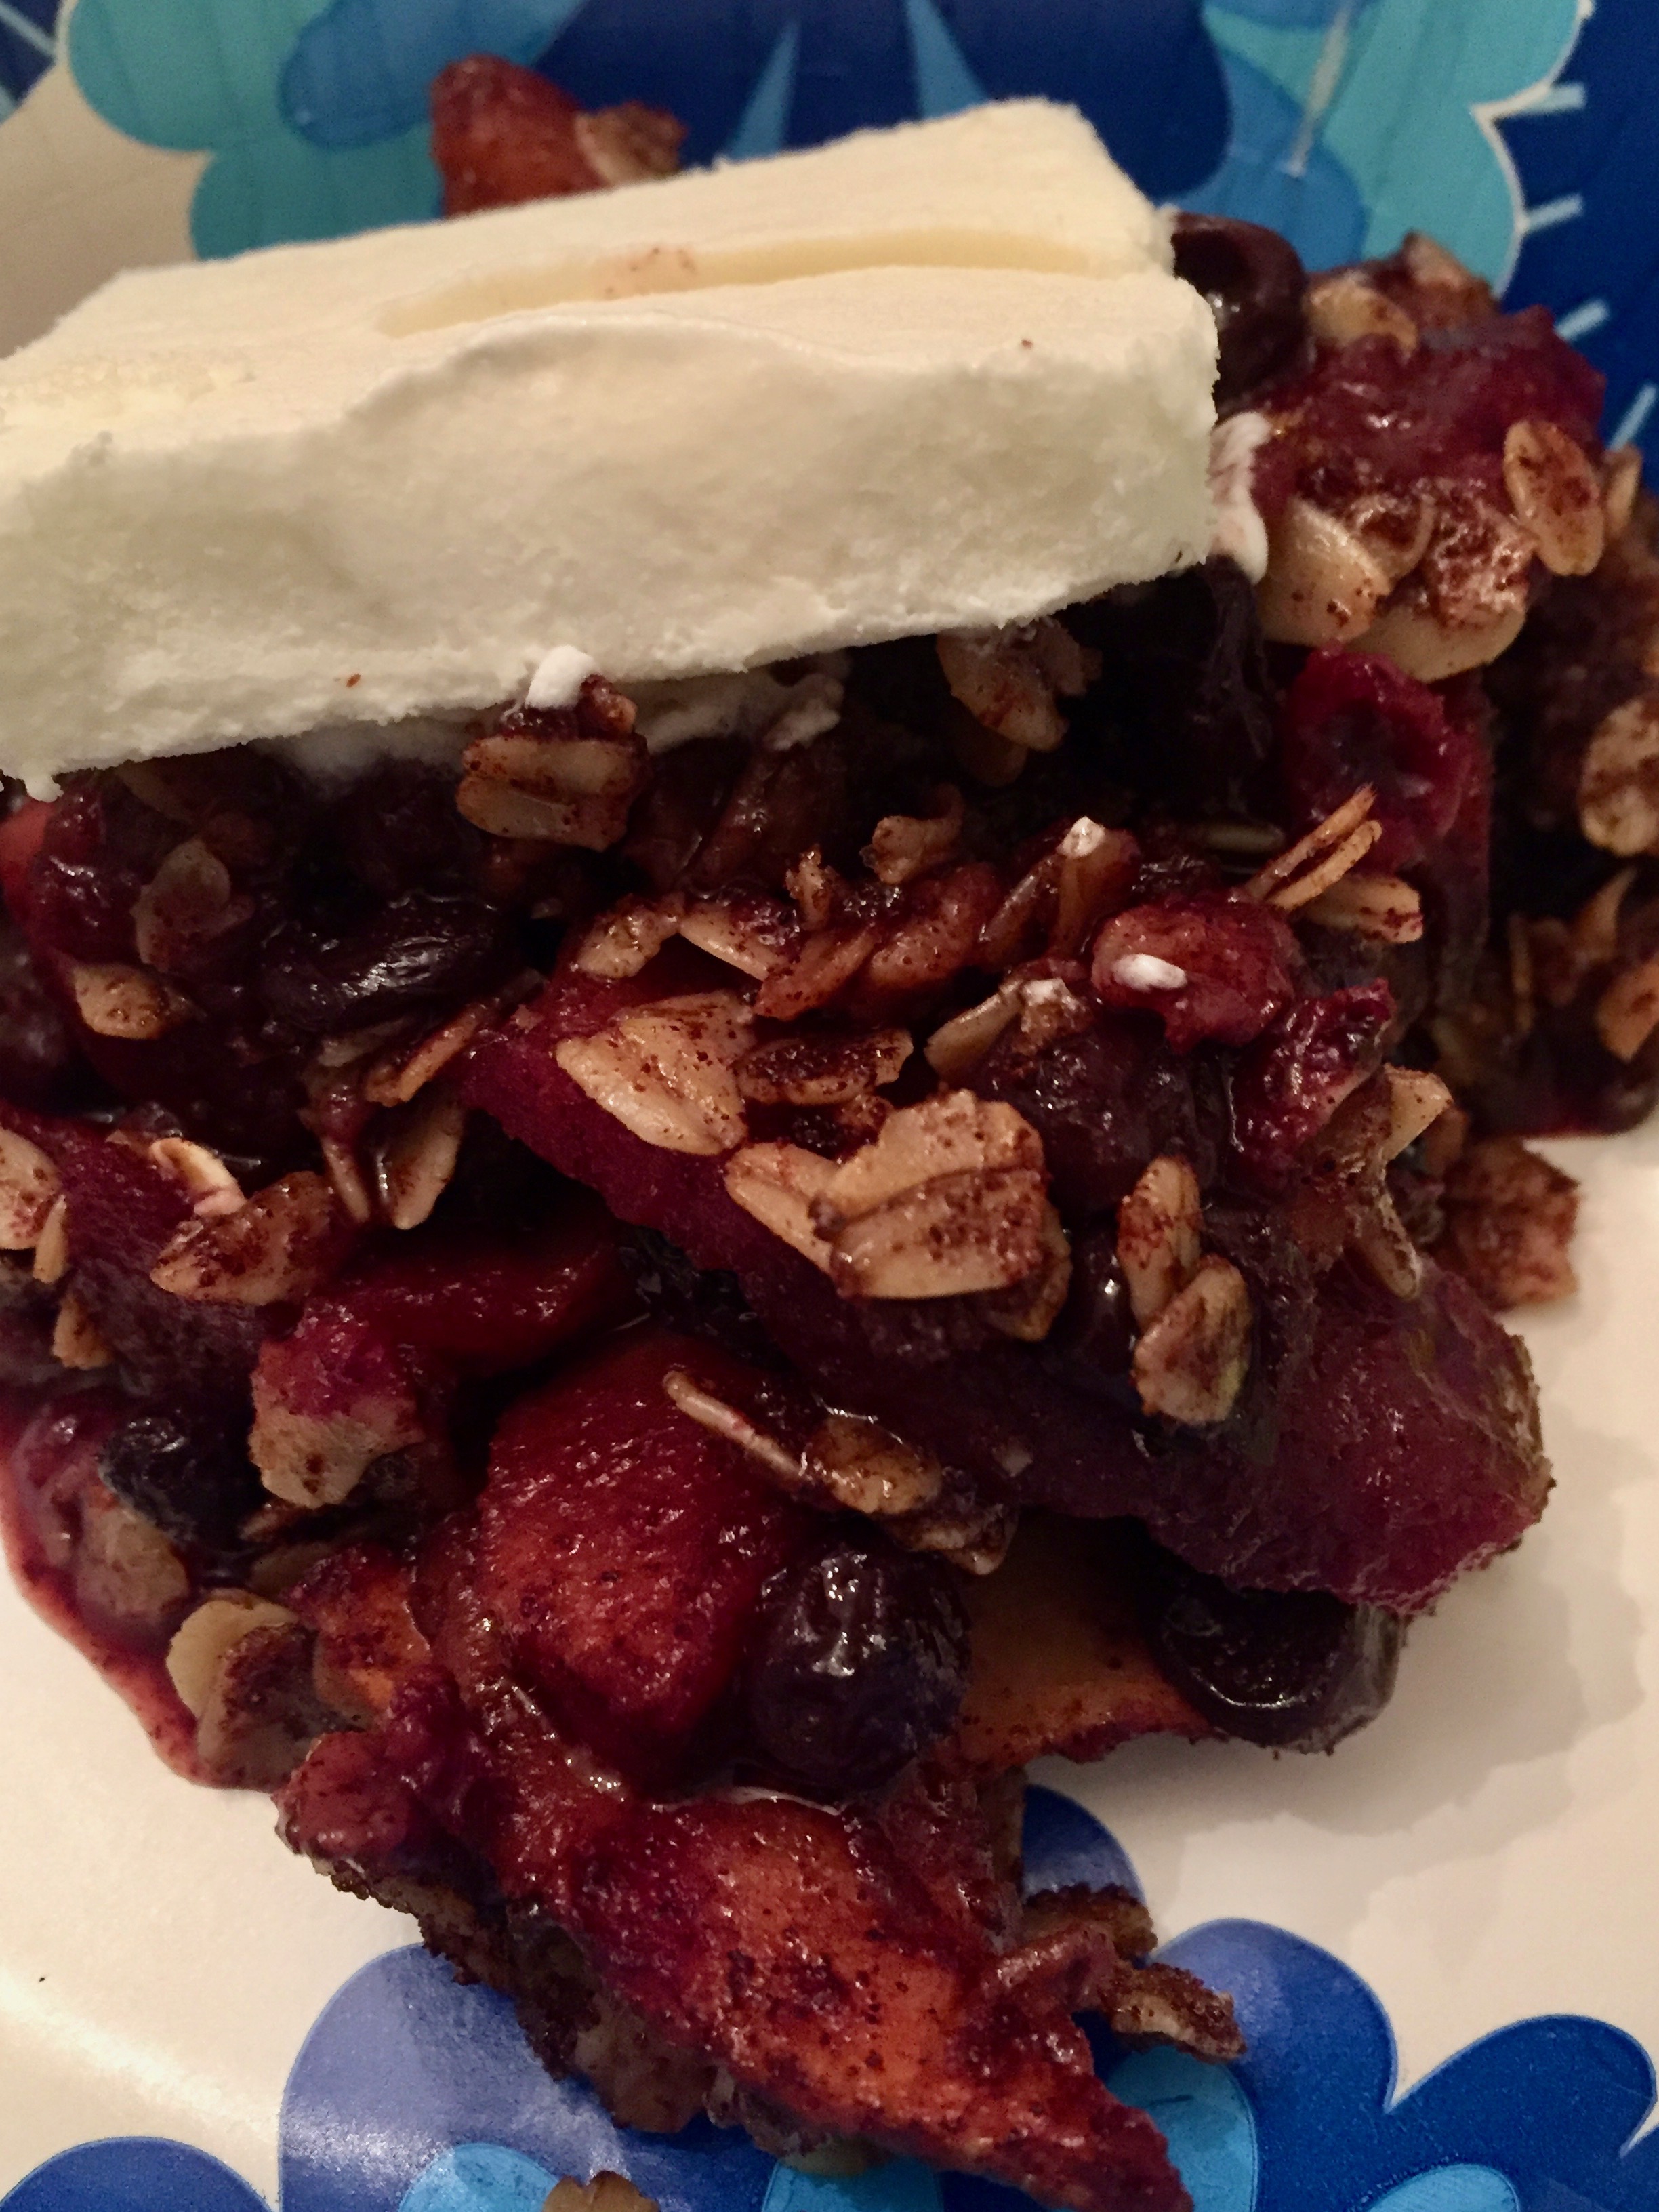
Which brings me to this recipe. I have never used Gluten Free Oats, I found these at Trader Joe’s actually for another recipe (coming soon). I wanted to play with them, and here was my opportunity to make that apple crisp. But, with blueberries. I love blueberries, and after being at the Fair, where Apple Crisp is sold in the Vermont Building and Blueberry Pie in the Maine building, it made sense. Let’s mix those two flavors and put an oat crisp topping on it!

A mixture of apples, blueberries, cinnamon and sugar nestled in a ceramic baking dish that has been buttered, cinnamon and sugared, then baked for 25 minutes in the oven, without the topping.

If I were a Rhianna song, I would say my dessert is Nakey-nakey-nakey. But only for half of the baking. I like my apples to be soft but not mush. I always find that if I time the crisp based on the topping, the bottom layer is undercooked.

Apple Blueberry Mixture

That is a personal taste thing. So, I bake the fruit layer first, then add the top crisp layer, and cook for the remaining time. The crisp gets crunchy and brown, the fruit bubbles underneath. Perfection.

The best part of a fruit crisp for me is the combination of the warm spicy compote and the crunchy top layer, complimented with a cold, creamy ice cream topper.

Apple Blueberry Crisp

However, when you finally do bake the crisp and look in the freezer and find…mini ice cream sandwiches, you make due. The fourteen year old wonder that is my daughter took the time to take the chocolate sandwich part off, and place the perfect square of less than perfect vanilla ice cream on top. Well done kid, well done. That’s why you are my favorite (her brother doesn’t read the blog-he knows he’s my favorite too).

While this recipe is definitely is different, it isn’t so out of the box that it I couldn’t share it. I loved the way the oats did not get soggy, and added a nutty flavor to the crisp. Even the next day, the crisp held it’s crunch, and that says something.  Cinnamon, Brown Sugar, Oats, Blueberries, Apples, baked together to make a wonderful fall dessert, even if it was a day late.

I hope you enjoy this recipe, and as always, thank you for coming to the table!

Chrissy

Click below for a printable recipe!

Print

Apple Blueberry Crisp

Print Recipe

A combination of fruit with a gluten free oatmeal crisp topping!

  • Author: chrissy@mythankfultable.com

Ingredients

Scale
  • 3 Granny Smith Apples, peeled and sliced
  • 3 Macoun Apples, peeled and sliced
  • 2 Cups Blueberries – Fresh or Frozen
  • 1/3 Cup Dark Brown Sugar
  • 2 Tablespoons Cinnamon
  • 3 Tablespoons Butter

Oatmeal Crisp Topping

  1.  1 and 1/2 Cups Gluten Free Oats
  2. 4–5 Tablespoons Butter
  3. 1/3 Cup Dark Brown Sugar
  4. 1 Tablespoon Cinnamon

Instructions

  1. Preheat oven to 350*
  2. Prep your baking dish by giving it a coat of butter, then mixing some brown sugar and cinnamon and coat the baking dish. Just like you would with flour only yummier.
  3. Peel and slice apples and combine with blueberries in a bowl.
  4. Add cinnamon and brown sugar for apple mixture.
  5. Place apple and blueberry mixture in baking dish and dot with butter.
  6. Bake for 25 minutes without topping.
  7. In a new bowl, combine oats, brown sugar, cinnamon, and butter, mixing until crumbly.
  8. Remove apple blueberry mixture from oven
  9. Place crisp topping on now hot apple blueberry mixture and return to oven
  10. Continue to bake for another 25 -35 minutes. Depending on how bubbly you want your bottom layer.

Did you make this recipe?

Share a photo and tag us — we can't wait to see what you've made!


Posted in: Dessert, My Story, Recipes Tagged: Apple, Apple Blueberry Crisp, Apple Crisp, blueberry, Crisp, dessert, Fall Dessert, gluten free oats

Apple Cider Fritter Cake

October 4, 2017 by chrissy@mythankfultable.com

Apple Cider Fritter Cake

Even though Mother Nature keeps throwing us warm afternoons, and believe me I am thankful for it, the month of October is in full swing and all things fall are happening here in New England.

Mums and Pumpkins adorn doorsteps, the Halloween Decorations are appearing on lawns, and the Christmas stuff is out at various stores. Wait, What?

True. I was told last night Christmas is something like twelve weeks away. have I mentioned I am wearing capris to work? That my flip flops are still in my closet? That I still have to mow the lawn? YES! So this gal is going to hang onto fall with a death grip. Including this cake. Especially this cake.

Freshly Diced Granny Smith Apples

This cake can also be a “bread,” and is coffee cake like in nature. If you look up Apple recipes on the Pinterest (I also call Facebook the Facebook), you will see various recipes for Apple Fritter Bread. Which, had me at hello.

My Dad was a big fan of Apple Fritters. So, when a road trip would happen when I was younger, specifically to pick apples, another Mom and Dad memory, an apple fritter acquisition generally happened. As we grew up, this changed into a monster cookie with granola that is a particular specialty of the farm we visit, but the apple fritter still showed up on occasion.

If you haven’t ever eaten an Apple Fritter, think soft chewy bits of apple, cinnamon, caramel, and dough. Fried. Glaze covered. Sharable in size. I know right? That is a beautiful thing.

So, when I stumbled upon these recipes, I made some changes, turned it into a cake, and hoped for the best. Not every test recipe is a gangbuster. In truth, when I ask my taste testers, I am looking for negatives to improve… and I would maybe add more cinnamon to the batter, but other than that, this one be banging.

It looks complicated, it isn’t. Actually, it’s pretty forgiving, and you get to lightly smoosh apples into the batter to make the middle layer. Then repeat the process. The brown sugar and cinnamon bake up into this delicious caramel layer and the apples get soft, but hold their apple-y-ness. (Have you noticed I make up my own words? It’s a thing. Fortunately those who live with me love me and can interpret for me on occasion).

Apple Cider Fritter Cake

If a recipe can bring my son up from the basement, where his man cave is, with the question, “What are you making?” with a sense of awe and wonder…I consider it a win. (Slight exaggeration in the awe and wonder, he is seventeen). When he asks for seconds, I know I’ve hit the mark.

This cake smells like everything perfect about fall. It would be ok as is. However, you need the glaze. If you wanted to do a simple glaze of powdered sugar and milk, it will satisfy. It will be delicious.

But hey, I had cream cheese frosting made up already. So…

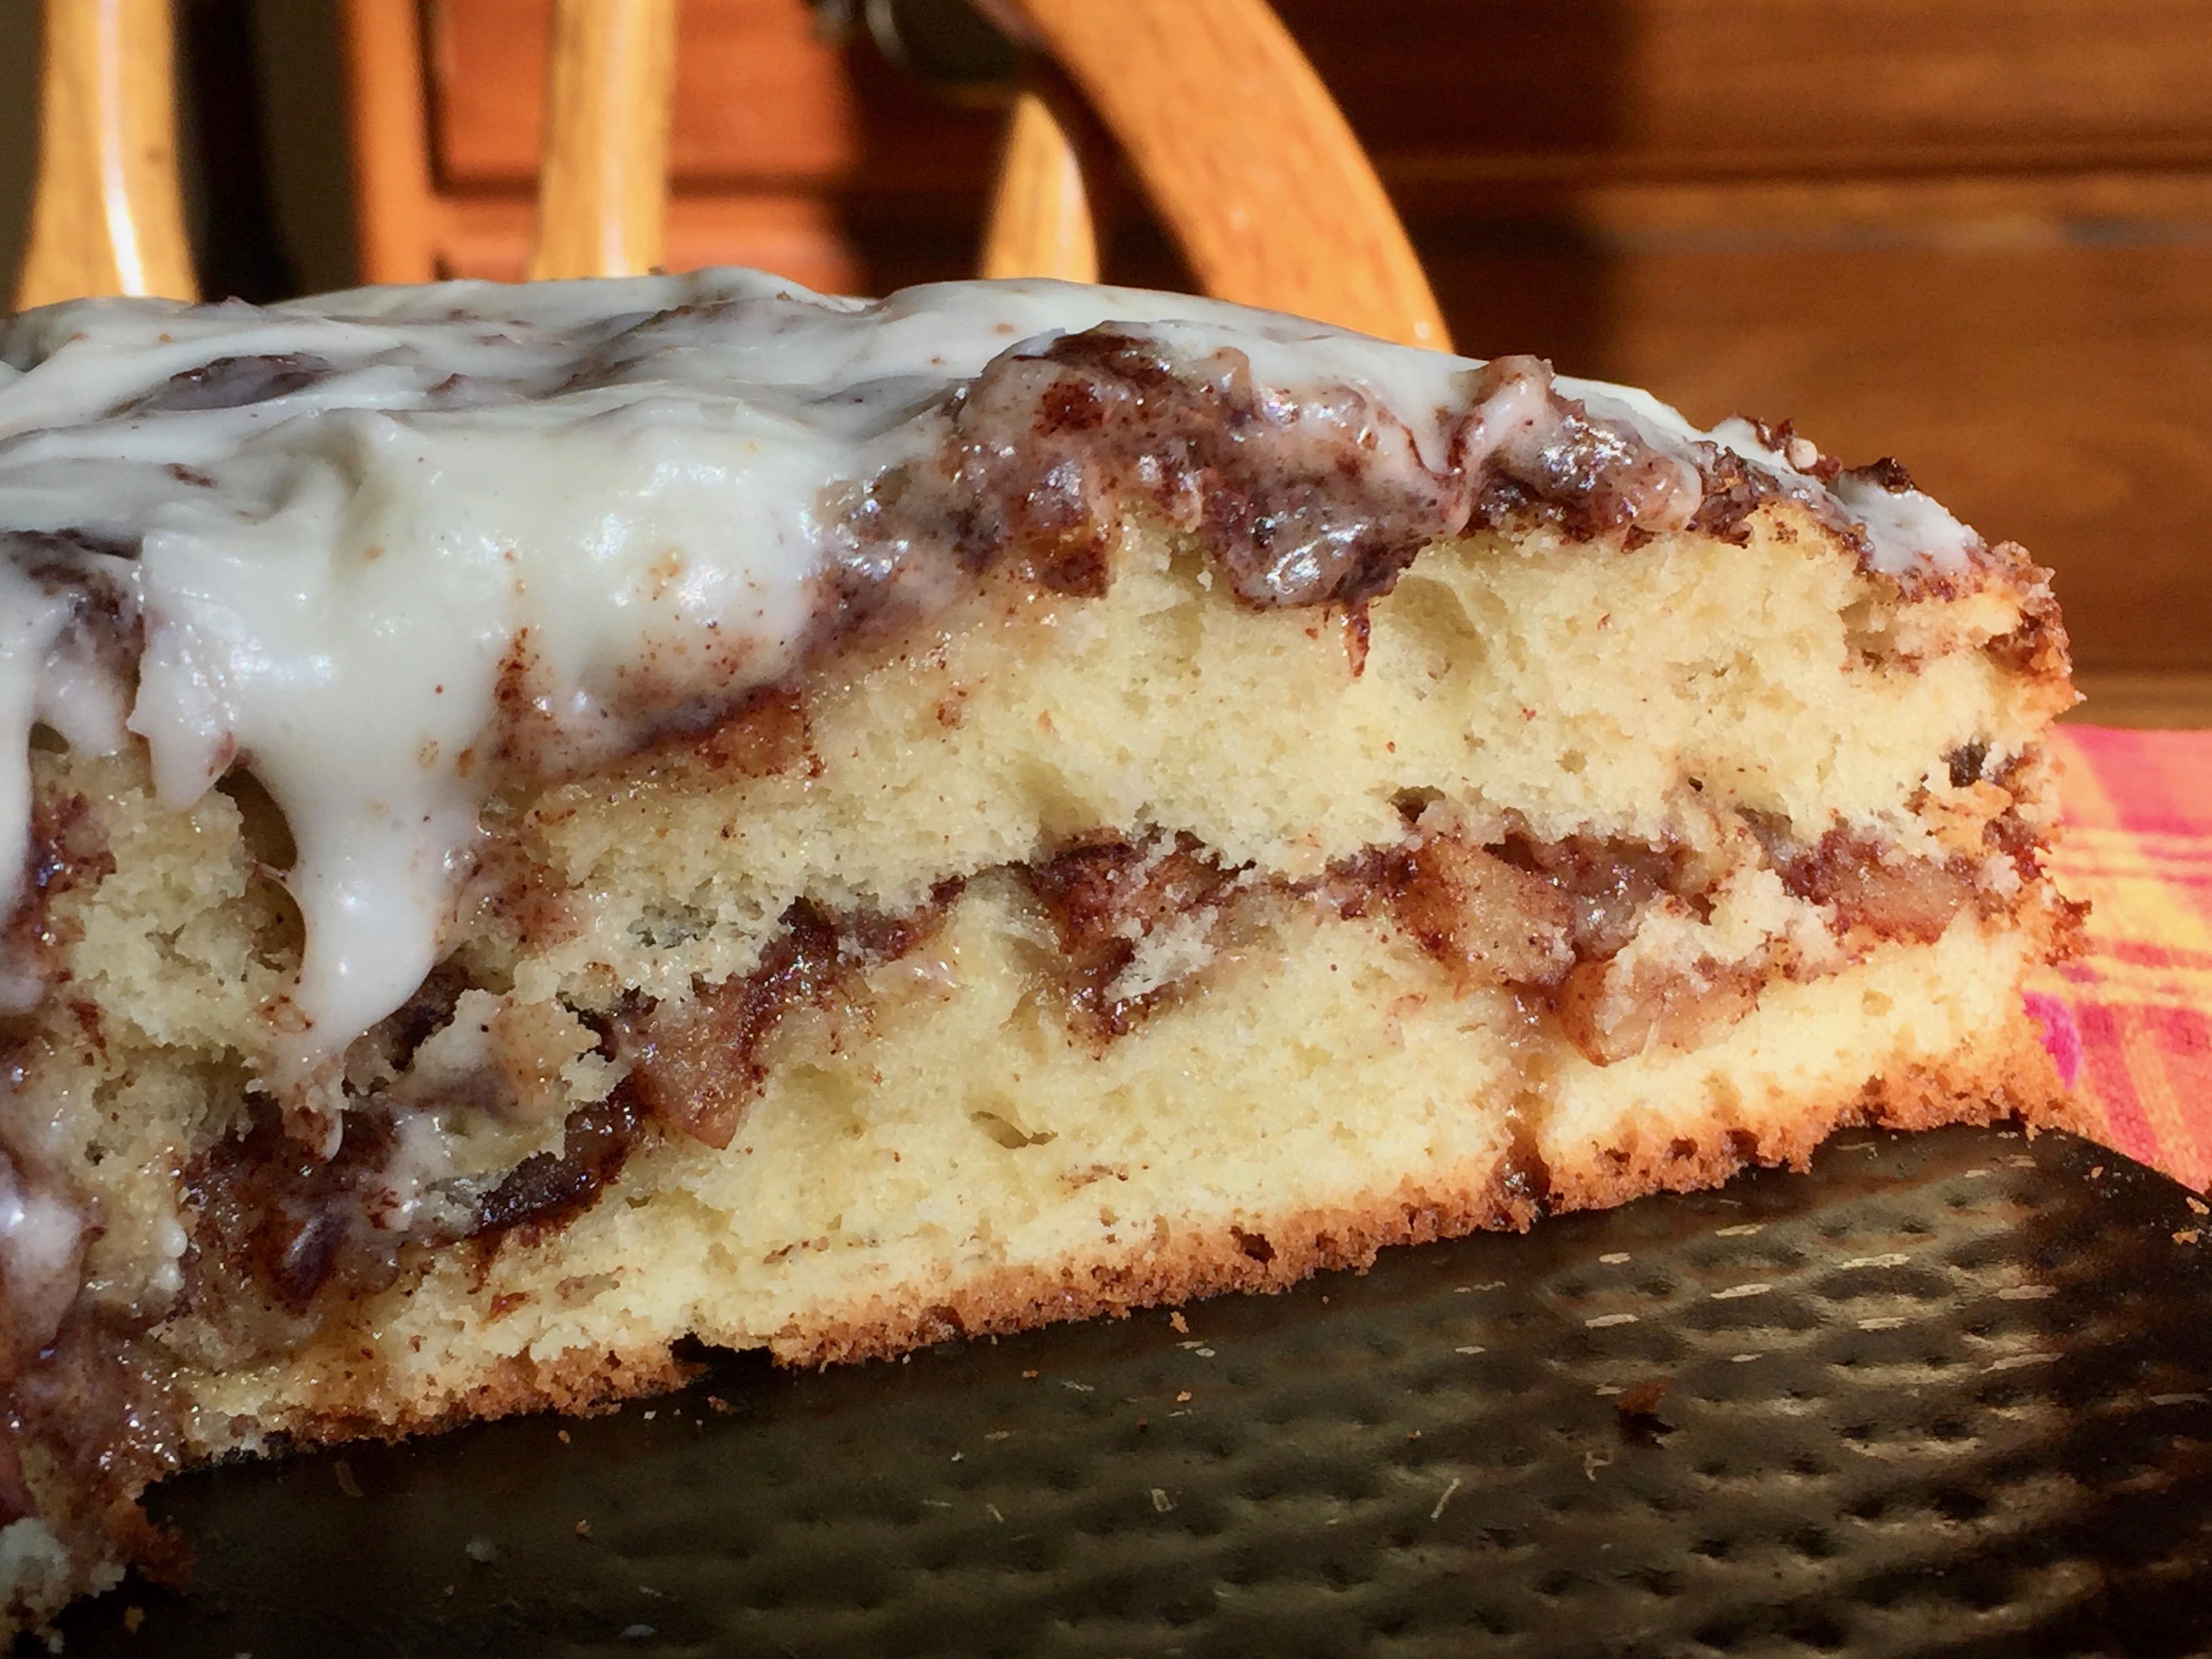
This cake looks and smells like a gigantic cinnamon roll, but with the beautiful apple layer tucked inside.

Mic Drop. I can’t sell it any more than that. You need to make this cake. Just saying.

Another story for another day, my thankful table actually broke over the weekend. So, we are making due. This cake made my makeshift table my thankful table once more.

I hope you enjoy this recipe, and as always, thank you for coming to the table!

Click below for printable recipe!

Print

Apple Cider Fritter Cake

Print Recipe

This is the ultimate apple cake, filled with a cinnamon caramel sauce and topped with a cream cheese frosting.

  • Author: chrissy@mythankfultable.com

Ingredients

Scale

Apple Cider Fritter Cake:

  • 3 Granny Smith Apples, peeled, chopped into small pieces
  • 1/3 Cup packed Dark Brown Sugar
  • 1 Tablespoon Ground Cinnamon
  • 1 stick or 1/2 Cup Unsalted Butter
  • 2/3 Cup White Sugar
  • 2 Large Eggs
  • 1 Tablespoon Vanilla Extract
  • 1 1/2 Cups Bread Flour (this can be made with AP Flour)
  • 1 3/4 Teaspoons Baking Powder
  • 1/4 Cup Apple Cider
  • 1/4 Cup Milk

Cream Cheese Frosting

  • One package of cream cheese (usually 8 ounces)
  • 1/2 Cup Butter
  • 3 1/2–4 Cups of Confectioner’s Sugar (Add more for thickness)
  • 1 Tablespoon Vanilla (If you can find the clear vanilla-it won’t tint your frosting…but the real vanilla has a bean in it and it will be worth the trade off color vs. flavor)

Instructions

  1. Preheat oven to 350*
  2. Prepare a 9″ Springform Pan
  3. Peel and dice Granny Smith Apples into bite sized chunks.
  4. Mix Dark Brown Sugar and Cinnamon and set aside.
  5. In a mixer, cream butter and sugar together until light and creamy.
  6. Add eggs, one at a time.
  7. Add vanilla extract.
  8. Combine dry ingredients and add to butter mixture.
  9. Add Apple Cider and Milk to mixture and scrape down sides so all is incorporated.
  10. Pour approximately one half of the batter into the pan.
  11. Take one half of the apples, and press lightly into the cake batter.
  12. Sprinkle Half of the Brown Sugar Cinnamon mixture on top.
  13. Repeat. with remaining batter, apples and cinnamon mixture.
  14. Bake 40 minutes or until cake tester comes out clean.
  15. I put the frosting right on the hot cake and let it melt into a soft white glaze.

For Frosting:

  1. In a mixer, whip Cream together Cream Cheese and Butter until combined.
  2. Slowly incorporate confectioner’s sugar
  3. Add vanilla.

Did you make this recipe?

Share a photo and tag us — we can't wait to see what you've made!

Posted in: Dessert, My Story Tagged: Apple, Apple Cake, Apple Cider, Apple Cider Fritter Cake, Apple Fritter, cake

Easy Homemade Macaroni and Cheese

October 3, 2017 by chrissy@mythankfultable.com

Homemade Macaroni and Cheese

I know, I know. Macaroni and Cheese is daunting. It requires many steps and making something like Mac and Cheese from a box is easier, and cheaper. Hey, even the organic box mix goes on sale 10/$10.00 every once in a while.

However, homemade Mac and Cheese is actually pretty simple and painless to make. It involves making a basic béchamel sauce (read: butter, flour, milk) and adding cheese, and then wait for it, boiling noodles separately…and then adding them together. Like I said, pretty easy.

The difference between box Mac and Cheese and homemade is significant. As in, your family will burst out into song significant.

Basic Béchamel Sauce Ingredients

If you want to put things over the top, throw what we call “The Crunchies” on top, and throw it in the oven until it is creamy, melty, golden brown. Oh yeah. This is comfort food. Comfort as in, fill your belly and grab a blanket and snuggle comfort food. It has butter, and cheddar cheese, and it is pasta. It is to be eaten with the full knowledge that it’s an indulgent meal. Which is ok, because, making it in the first place seems scary, right?

Here are the basics: Melt your butter completely and add your flour. Stir, stir, stir. This does two things: 1, it cooks the raw taste out of the flour, and 2, insures there are no lumps. Then, add your milk. This will thin out the mixture, and make it like a thick, creamy gravy. At this point, you add your cheese.

Bechamel Sauce

I am a huge believer that recipes are to be changed. As in, we are a cheddar family. White, extra sharp. I also like messing around with adding Romano, or provolone, or even American if I have it in the cheese drawer. (The cheese drawer is literally a drawer in my fridge where we keep an assortment to of cheese…if I were lactose intolerant I would be thinner and this drawer would not exist). So, if you have a favorite cheese or an assortment of cheeses you’d like to try, have at it.

I add salt, pepper, and hot sauce to mine. I like a little kick. You can add more and make it buffalo Mac and cheese. You can do a lot with this. If you do, write a comment and let me know!

Béchamel with Cheddar Cheese

Now, for pasta. We do medium sized shells. YOU can do small shells, elbow, bow ties, whatever you want. It is your dinner. I use one pound of pasta, and cook and drain.

Now for the blessed arrangement that brings us together today:
add your cooked pasta to your cheese sauce and fold. Oh yes, this moment is the reason you are trying this recipe. The look of stringy cheese sauce enfolding pasta is a beautiful thing.

At this point you are done. It can and should be tasted out of the pan over the stove, so you can add whatever you need if you need it. OR, you can place this glorious mixture into a buttered casserole dish, top with buttered Panko breadcrumbs, and bake for 25 minutes.

My children who do not like crumbles on their muffins do love crunchies on their Mac and cheese. So, at this point I am making a salad, putting final touches on the pulled pork, or setting the table. Because, as soon as that timer goes off, we are ready for this meal.

Homemade Macaroni and Cheese Topped with Easy Crockpot Pulled Pork

The best part? It heats up nicely as leftovers, should there be any. The gross but even better best part? It’s not bad cold either. There, I said it. But it’s true.

I hope you enjoy this recipe, and as always, thank you for coming to the table!

Chrissy

Click below for a printable recipe.

Print

Easy Homemade Macaroni and Cheese

Print Recipe

Homemade Macaroni and Cheese that is quick and easy to make…and even easier to eat!

  • Author: chrissy@mythankfultable.com

Ingredients

Scale
  • 8 Tablespoons/1 Stick of butter
  • 1/3 Cup Flour
  • 1–2 Cups Milk (depending on how loose you would like your Macaroni and Cheese to be! – I start with 1 cup and add as needed as I go.
  • 4 Cups shredded Cheddar Cheese
  • Salt and Pepper to taste
  • Dash of hot sauce to taste
  • 1 pound of pasta of choice

Instructions

  1. Boil pasta until al dente. Drain and set aside.
  2. In a medium sized pan, melt butter completely over low heat so as not to burn.
  3. Add flour, salt, and pepper into melted butter and raise heat slightly.
  4. Stir mixture until flour is completely dissolved and looks like a light roux. Flour taste will be cooked out and thickened.
  5. Gently add 1 to 1 and 1/2 Cups of Milk (I use 2% but this can be really decadent and add 1/2 and 1/2 if you want) and stir.
  6. Slowly add shredded cheese to the mixture and melt until creamy and smooth.
  7. Combine pasta and cheese sauce until thoroughly combined.
  8. If you would like to add additional milk, hot sauce, etc. at this point, this is the time!

Nutrition

  • Serving Size: 12

Did you make this recipe?

Share a photo and tag us — we can't wait to see what you've made!

Posted in: Recipes Tagged: cheddar, cheese, comfort food, homemade, macaroni, macaroni and cheese

Soft and Chewy Maple Cookies

September 28, 2017 by chrissy@mythankfultable.com

I seem to be hitting a wall as far as time and the ability to get all of the ideas up on the blog. I am cooking, taking pictures and editing, and then when it comes to writing…the day is done and this momma is tired.

Soft Maple Cookie

However, this is fair time, and in my area there is one REALLY BIG fair, which encompasses the best of the New England States. Oh yes, its a Big deal.

Like any fair goers, we have our stand-by-go-to things to do and food to eat, I am a huge fan of the baby pigs that run around, reminiscent of my now seventeen year old’s laugh when he was little. Something about piglets running around a pen had him  laughing with that big belly chuckle.

Soft Maple Cookie Dough

Or the baby chicks hatching, which reminds me of the time my dad lifted me up so I could see, and I literally felt like I was invincible.

The food, which always welcomes a new cast of characters each year, such as the one pound meatball, the crazy burger, fried cannoli, you get the picture.

Scoops of Soft Maple Cookie – Pre Drop to Get Crinkle

But one thing that stands out for me is Maple. Maple cotton candy, maple fudge, maple lemonade slushes… whether you embrace it or not, maple is a present contender in a fair that boasts the best of New England products.

Enter, the soft maple cookie. Now, this isn’t something you can get at the fair, but if you are looking for a melt in your mouth maple cookie, you have found your recipe.

I first saw this recipe several years ago online at www.averiecooks.com. Ever see a recipe online and think, yes! I need to make you NOW! I had that sort of reaction.

Cooling Soft Maple Cookies

I have a few cookies that I consider the perfect New England cookie. Soon, I will post a cranberry orange shortbread that will rock your cranberry world. But today, we focus on this New England Cookie.

Another great thing about this recipe is the batter/dough keeps in the refrigerator for a few days, so especially when in September the heat rises to 90+ degrees, you don’t have to turn on your oven. You can pre scoop the dough and refrigerate, or scoop the dough after it has chilled.

These are baked at a 325* oven, as all of my cookies are. I would rather low and slow and not crispy bottoms. I also think lower temp baking results in a softer, chewier, cookie. That, is a beautiful thing.

Lastly, when you take these cookies out of the oven, they will look slightly underdone. Cooked, but not dry, if you know what I mean. This is a good thing. The most fun is the end part, where you smack the bottom of the cookie sheet on the stove top or counter, to slightly flatten the cookies. Back in the day when I worked at a restaurant that made the famous Otis Spunkmeyer cookies, this was a trick of the trade, to drop the cookie sheets to make the cookies have that flattened, somewhat cracked open look.

Soft Maple Cookie

I don’t do that with many cookies, but with these, they look just right.

Now, when photographing these cookies, I did think, “wow, you don’t visually pack a punch.” Sorry cookies, but you don’t have the same glory as the melted caramel of the Browned Butter Sea Salt Caramel Cookies, or the Peaks of Dad’s Macaroons, or even the frosted glory of the Cream Cheese Frosted Carrot Cake Cookies. You are just kinda…well, simple.

Soft Maple Cookie

However, I dare you to pop one of these babies into your mouth and think, “meh.” So soft, chewy, maple-y and just enough sweet without making you think, “TOO MUCH!” It’s like a soft sugar cookie and fresh maple syrup had a baby. Only this baby doesn’t actually HAVE maple syrup in it. Find yourself some Maple Extract and make yourself some of these cookies. Even if you have your air conditioner on in September in New England, you will be lost in a chewy Maple Wonder.

I hope you enjoy this recipe, and as always, thank you for coming to the table!

Chrissy

Click below for a printable recipe.


Print

Soft and Chewy Maple Cookies

Print Recipe

This recipe can originally be found on www.averiecooks.com the soft, brown sugar maple cookies bring all things fall to the table!

  • Author: chrissy@mythankfultable.com

Ingredients

Scale
  • 3/4 Cup Butter
  • 3/4 Cup Dark Brown Sugar (You can use all Dark Brown Sugar in this recipe- 1 Cup total)
  • 1/4 Cup Light Brown Sugar
  • 1 large Egg – Brought to Room Temperature
  • 3 1/2 Tablespoons Maple Extract
  • 2 Cups Flour (Original recipe calls for 1 C bread flour, 1 C AP Flour, but you can use 2 C AP flour as well)
  • 2 Teaspoons Cornstarch
  • 1 Teaspoon Baking Soda
  • 1/2 Teaspoon Salt


Instructions

  1. Cream together butter and sugars until light and combined, scraping sides of bowl to incorporate.
  2. Add Egg, Maple Extract, and mix until thoroughly combined.
  3. Slowly incorporate flours and other dry ingredients.
  4. Place dough in refrigerator and chill thoroughly. You can either pre-scoop cookies, or scoop chilled dough. Chill for a few hours to a few days. I chilled mine for two days due to the heat, and they were delicious!
  5. Preheat oven to 325* and bake for 12 minutes. The cookies will be slightly undercooked- but
  6. Upon taking the cookies out of the oven, bang the cookie sheet on the stove top or counter, causing the cookies to flatten out slightly.
  7. Allow cookies to cool on the baking sheet for a few minutes, or until you need to load that sheet up again!!!

Did you make this recipe?

Share a photo and tag us — we can't wait to see what you've made!

Posted in: Cookies, Recipes Tagged: Cookie, Maple, Soft and Chewy Cookies, Soft Chewy Maple Cookie, Soft Maple Cookie
« Previous 1 2 3 4 5 6 7 8 9 10 11 12 Next »

Recipe Search

Recent Posts

  • Fluffernutter Cookies…You Heard Me April 12, 2024
  • On Nests July 30, 2023
  • Lemon Rosemary Shortbread Cookies April 24, 2022
  • Praline Sweet Potato Pie March 22, 2022
  • Italian Ricotta Cake March 13, 2022

Recent Comments

  • Cathy Carroll on To My Daughter On Her 18th Birthday
  • Maureen / Mimi on To My Daughter On Her 18th Birthday
  • Kathy G on To My Daughter On Her 18th Birthday
  • chrissy@mythankfultable.com on Cherry Crescent Moon Cookies and Finding the Joy
  • chrissy@mythankfultable.com on Cherry Crescent Moon Cookies and Finding the Joy

Archives

Categories

  • appetizer
  • bread
  • breakfast
  • Cookies
  • crockpot
  • crockpot
  • Dessert
  • Fruit
  • My Story
  • One Pan
  • Recipes
  • side dish
  • Side Dishes
  • soup
  • Vegan

Copyright © 2025 mythankfultable.com.

Lifestyle WordPress Theme by themehit.com