mythankfultable.com

Feeding the Heart, Body, and Family

  • My Pics
  • My Story
  • The Puppies
  • Contact Us
Feeding the Heart, Body, and Family

Bread

Dilly Bread and Book Club

February 21, 2022 by chrissy@mythankfultable.com

It has taken me a ton of self help books, almost fifty years, and a global pandemic to realize I am an introvert. LOL. I find I regenerate in the quiet. There is something earned in stillness that I cannot find entrenched in social stuff. I have also learned that this is perfectly ok.

Never to be one who liked theme parks or waiting in lines for rides, crushed by bodies at concerts or events, I am good to just…not. I like events. I like social things. I do like people. I just kinda have realized that I deplete after a while. Now add a couple of years of isolating and social distancing. I’m not sure where I fit in. I’m figuring it out. As we all are, but wow, am I finally ok to politely say “no” to things. With only slight guilt…that I can eventually sort through.

I have learned in the last however many years of books and podcasts that WE NEED TO LIVE AS AUTHENTIC SELVES. I got the memo. So here, I sift through if I really need-to-want-to-should. I have no diagnosis for any of my “stuff.” I’m just a woman approaching the world a whole lot less concerned about belonging than I did three years ago, and that’s probably on par with a lot of people in life right now.

That being said, there is such a communion in being with people you love. With people who interest you and make you smarter. With others who teach you and give you grace and make you better. So, no one is an island. We need to be around the people who make us better humans.

I am fortunate in my career to have such amazing friends. While education is not the same field I entered at all, I love what I do when I get to do what I do. I have a community of kind people who carry one another. I am so, so lucky in this.

And then there are the cool things in life (or cool to me) like book clubs, and groups of people who do the things and get to be together to talk about it. I have a friend who plays billiards weekly, and while it is a fun thing to do on a weeknight, it is also about the community that plays. Bottom line is, whether we find it at the gym or church, the local pub, or the library, we need people.

One thing I miss quite a bit is Cookbook Bookclub. My local library holds a meeting once a month and there is either a theme, a specific cookbook, or a topic such as “SOUP” that we all have for that one meeting. Then we bring a prepared item, the recipes are typed up by an amazing volunteer, and we share. Covid took care of that whole concept for a while. Not possible. Now they are still meeting, and while I took a break, I realize how important it is to be with people who love to cook. How did this recipe go? What did you substitute? Why is this spice so unbelievably expensive? Etc. Beautiful humans gathered around a table. Which, is kind of my thing. I hope to go back and soon.

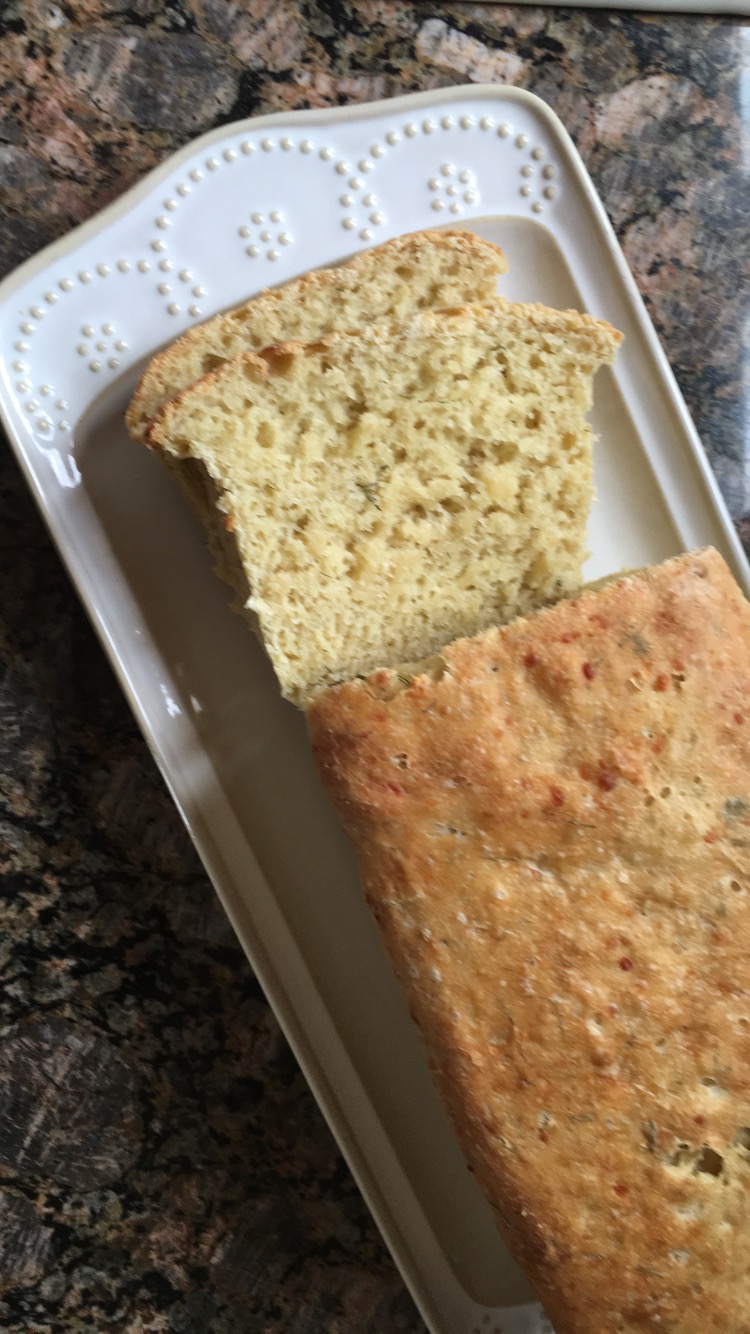
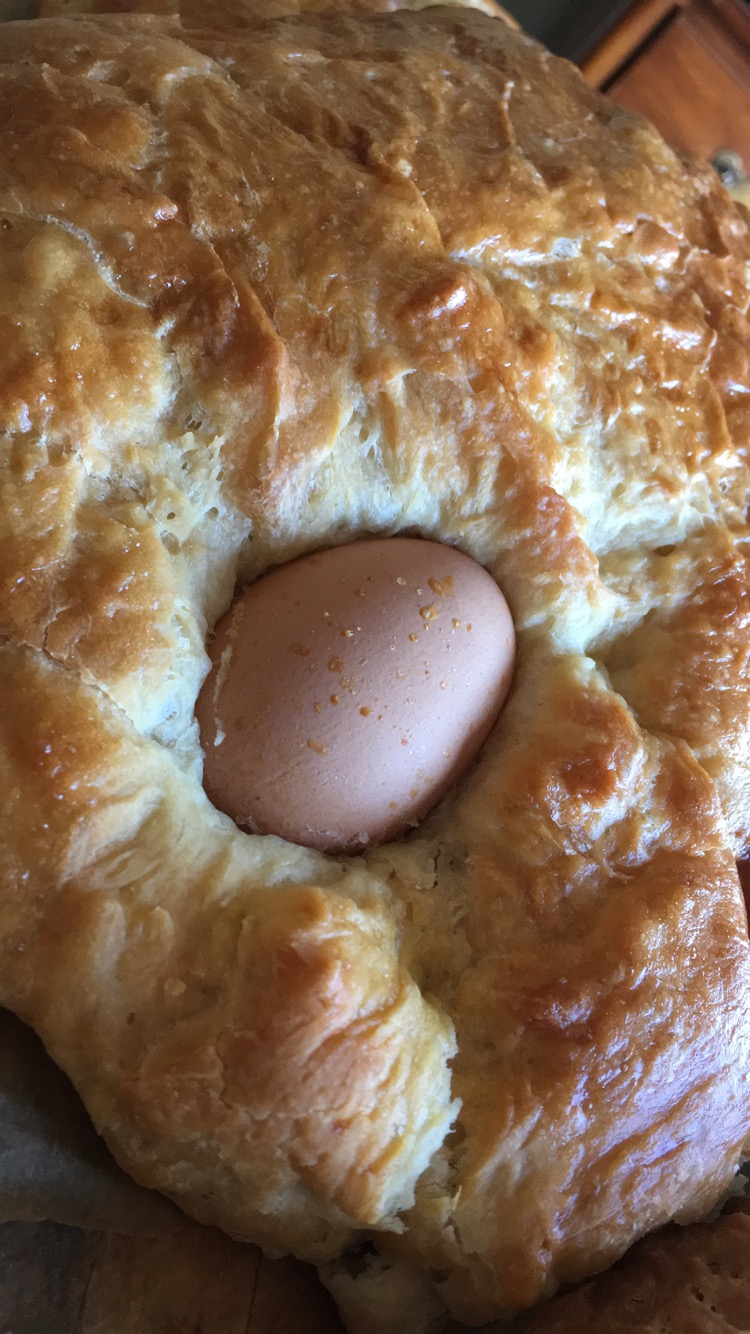
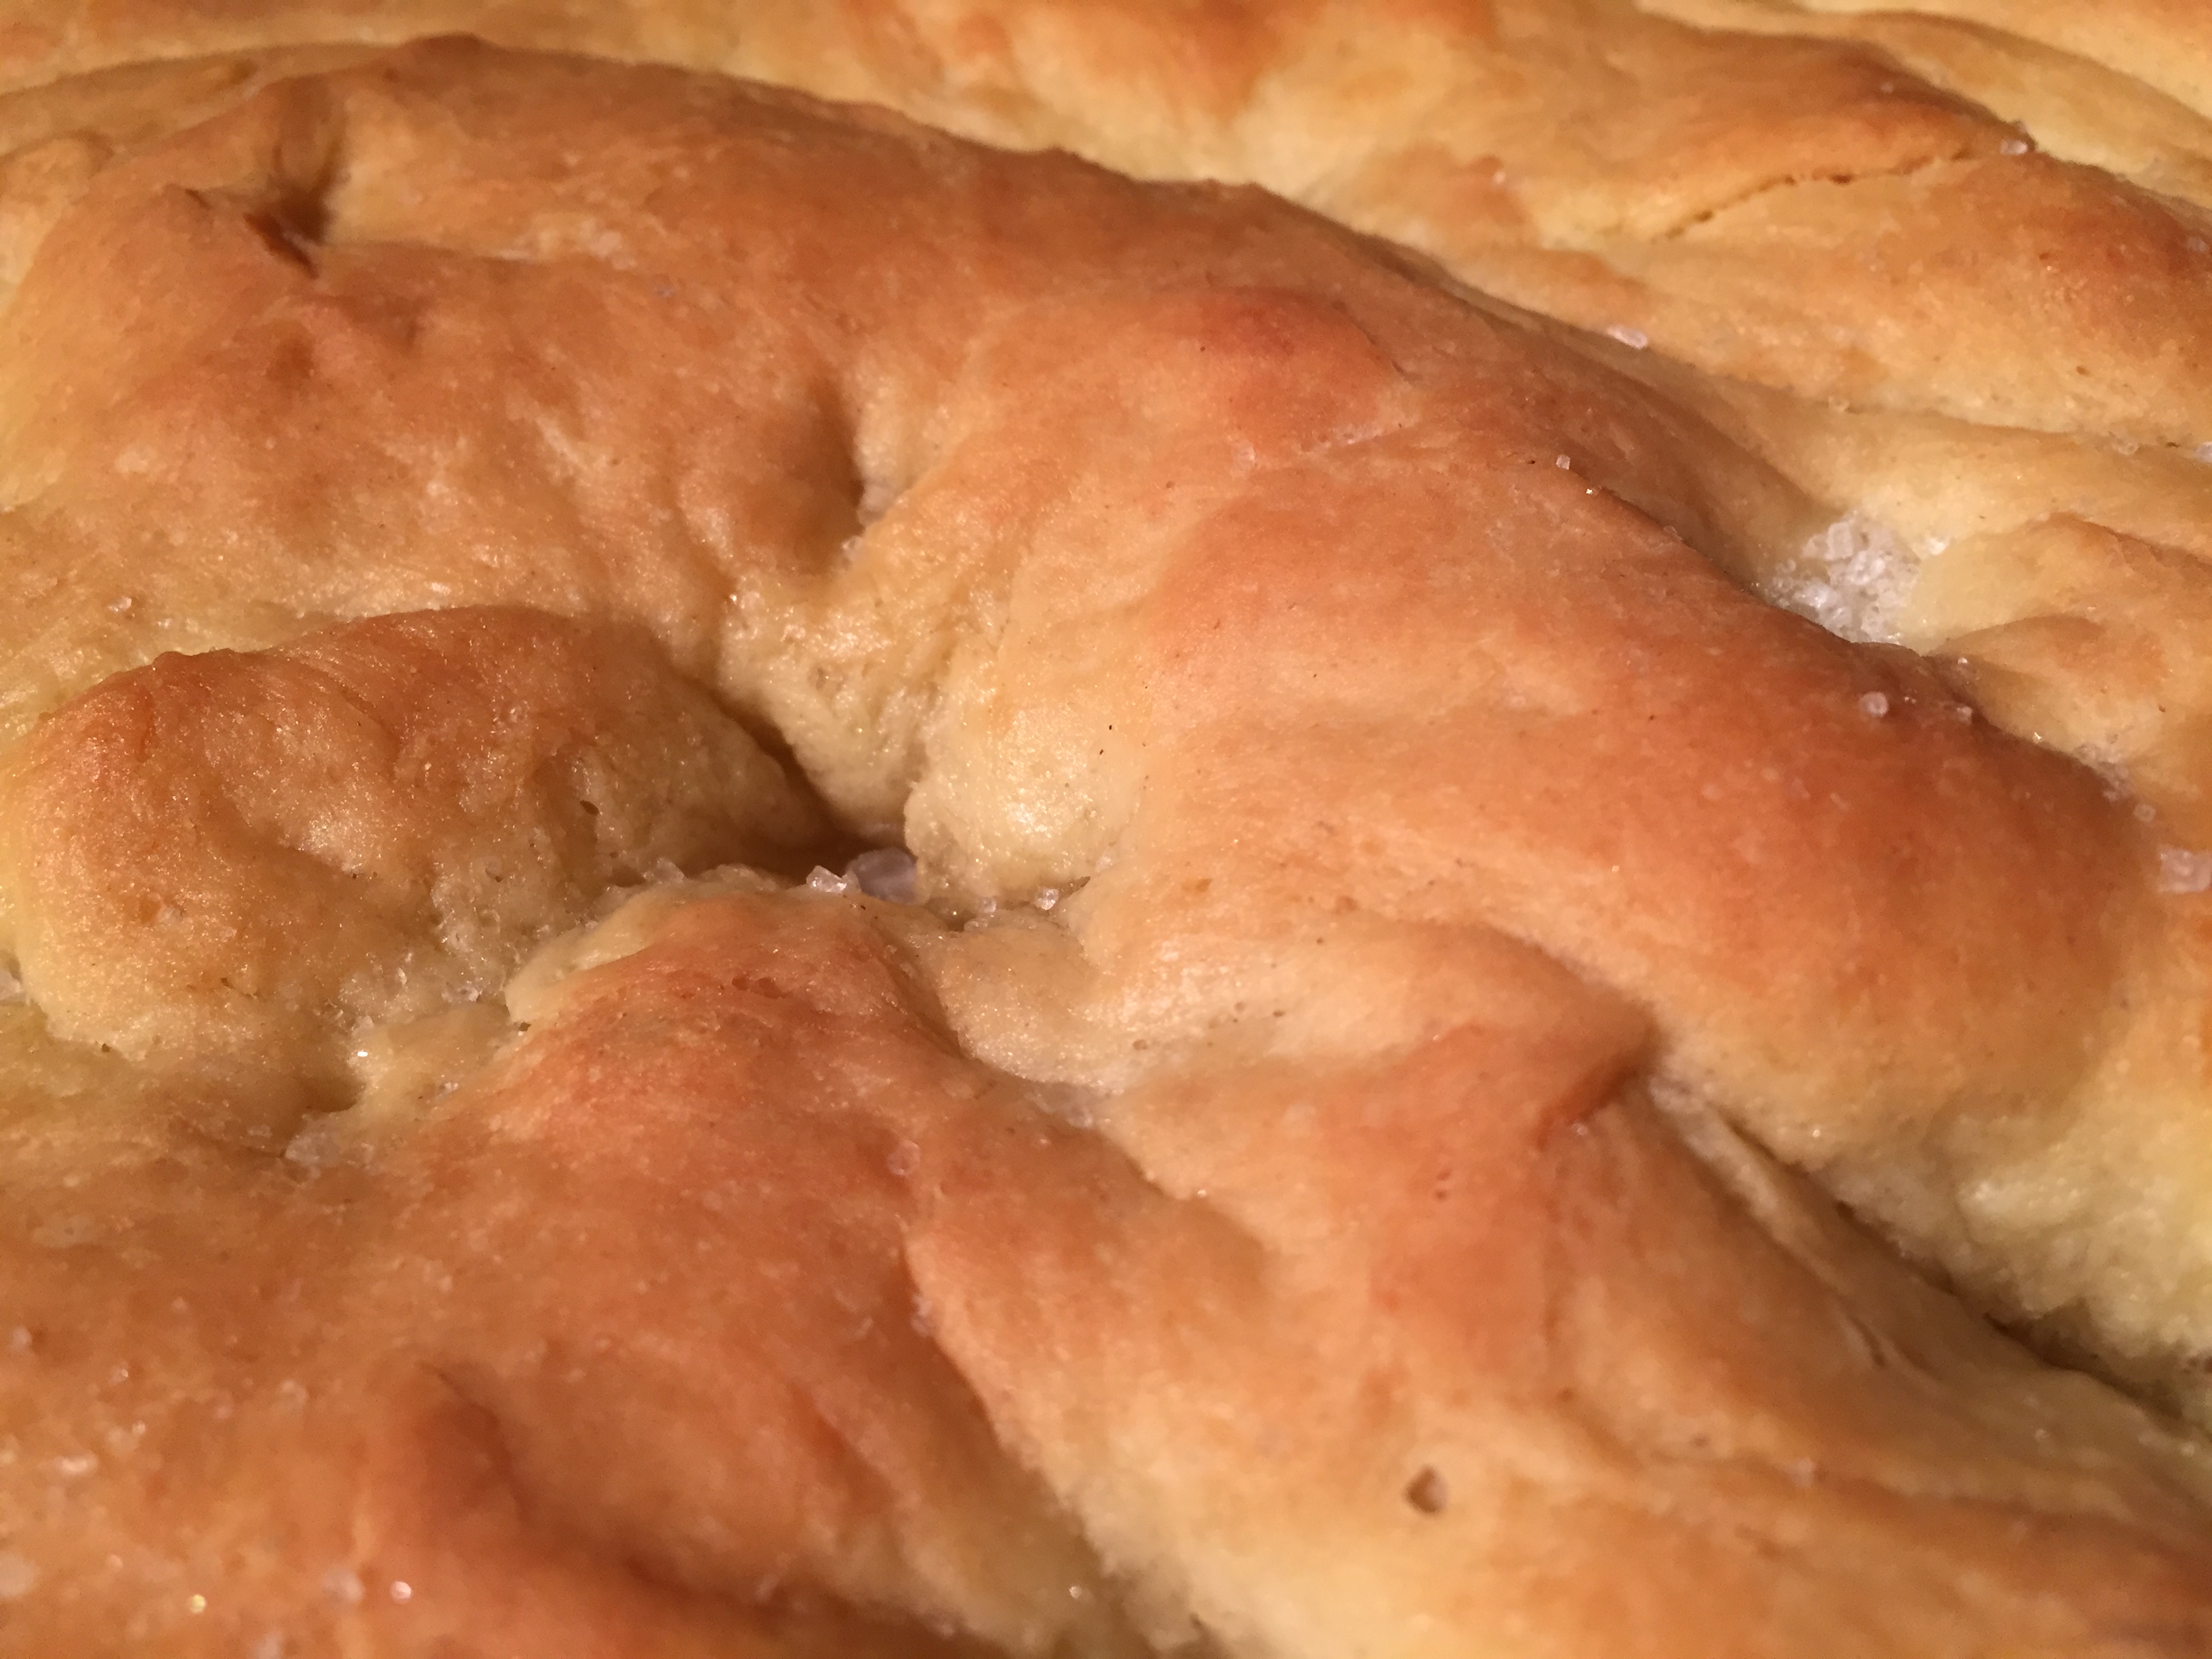
One of the fun events we held was an author’s visit from the Pudding Hollow Cookbook. What a treat. There was also a bit of pressure to get the recipe right, since the author of the recipe would be at the actual table. This recipe for Dill Bread adds an additional kick in the fresh scallions and dill added to the dough. It also has a new (to me) ingredient of adding cottage cheese to the bread dough as well! This recipe is written up exactly as it appears in the cookbook, I did not alter it in any way. Two beautifully flavored loaves of bread are the yield. As in the photos, the texture is not like a typical sourdough or white bread, it is more dense, and obviously flavorful in its own way.

This bread is the perfect accompaniment to a hearty soup or stew, salad, even as a savory breakfast side. It is moist, flavorful, and hearty without being heavy. Definitely a win. I happen to love the flavor of dill so this recipe really delivers in the “cool bread” category in my opinion. Being able to celebrate the cookbook with the author and the recipes she collected (as well as the stories behind each) made it even more special.

So, for new recipes, coming together around a table, being social, and figuring out where the lines of this newly defined life after loss of what was (good with the bad), at least I know there are wonderful things such as bread and the people who give our life sustenance. That gives me hope. 🙂

I hope you enjoy this recipe, and as always, thank you for coming to the table.

Love,

Chrissy

Print

Dilly Bread and Book Club

Print Recipe

This recipe is from the Pudding Hollow Cookbook by Tinkie Weisblat. We had the pleasure of meeting the author at my local library’s amazing CookBook Book Club. This bread is light and has the delicious flavor of dill and scallion. It is the perfect side dish to a soup or salad! 

  • Author: chrissy@mythankfultable.com

Ingredients

Scale
  • 2 Cups Creamed Cottage Cheese 
  • 2 Tablespoons Sweet Butter
  • 2 Tablespoons plus Fresh Dill (half if dried)
  • 2 Tablespoons Minced Scallion
  • 1/4 Cup Sugar
  • 1/4 Teaspoon Baking Soda
  • 2 Teaspoons Salt
  • 2 Eggs, Beaten
  • 1/2 Cup Lukewarm Water
  • 1 Package Dry Active Yeast
  • 5–6 Cups Unbleached Flour

Instructions

  1. Warm the cottage cheese and Butter.
  2. Add dill, scallions, sugar, baking soda, salt, and eggs. Beat until blended.
  3. Combine the water and yeast until dissolved.
  4. Stir yeast mixture into the warm cheese mixture. 
  5. Stir in as much flour as possible, and knead in more until dough is no longer sticky.
  6. Place dough in a greased bowl. Cover and let rise until it doubles in bulk.
  7. Punch down the dough, and shape into two loaves. 
  8. Allow to rise again until it has doubled.
  9. Bake in greased loaf pans in a preheated 375* oven for 35-45 minutes.

Notes

This recipe yields two loaves.

Did you make this recipe?

Share a photo and tag us — we can’t wait to see what you’ve made!

Posted in: bread, My Story Tagged: Bookclub, Bread, Dill, Loaf

When Life Gives You Stale Bread…Make Bread Pudding ;)

March 27, 2020 by chrissy@mythankfultable.com

I’ll say this…we are using what we have, and I am loving it. My children aren’t big fans of leftovers. Yet, here we are eating them. This momma made a fresh loaf of bread because, bread is life and therapy for me. I took the uneaten bread, cubed it up, along with the rest of the borderline-toss-bread and made this little treasure. You too can make this magic with whatever you have on hand.

Bread pudding is the ultimate comfort food. It is warm, and sweet. It has crunchy parts (my favorite) and the soft parts (my daughter’s favorite). This one is literally a hodgepodge of the stuff I had to use in my pantry. No complaints friends, no complaints.

The basics in the recipe are: old bread, eggs, milk, sugar. I used part 2% milk and part almond milk, because it is what I had. You can alter the recipe to suit your supplies. I also added Vanilla Bourbon because, why not add booze to your bread pudding? I threw in chocolate chunks because I always have some sort of bagged chocolate in my baking stash. I sprinkled straight brown sugar on top, without nuts or anything else mixed in. Think little rivers of melty brown sugar puddled in the mix. But, if you have walnuts or pecans on hand, add away. You can even melt some butter and add that to the topping, if you want. There is nothing spectacular in making bread pudding, and yet…it is glorious.

You could share your stale bread with the critters outside… or you could take a few minutes and make this dessert. Which, by the way, could also be considered a breakfast of sorts…think French toast casserole.

Cube up your older bread and leave to get stale overnight. Butter a casserole pan of choice. Mix together eggs, milk, bourbon, vanilla extract, sugar. Add your goodies, chocolate chunks, pecans, raisins (never in my world but you do you), what have you. Sprinkle a topping on top if you want. Then bake. It is that simple.

I find that depending on the size dish you use to bake, you may have to cook a little longer. I do not like the idea of raw egg mix hanging out in the middle of my bread pudding. I bake it for additional 5-7 minute increments based on how it looks. It should not be runny, it should not look done. The edges should be golden and it will smell like deliciousness.

I will say that in this time of being home the salty has called out to me, the sweet has not. I also just haven’t wanted to bake. One, I am taking this meal-by-meal. Two, I can’t have an abundance of sweets in this house to be divided by three people, two of whom are new to leftovers. That said, when I did pull this out of the oven the kids emerged from their spaces and we all had a dish, warm from the oven. It was lovely.

Right now life is imperfect and different. We are making some things up as we go. And there are soft bits and crunchy bits. We mix and match and do the best we can. So hey, why not give that crusty bread a second chance to be something warm and delicious? You won’t regret it. I promise.

I hope you enjoy this recipe, and as always…thank you for coming to the table.

Love, Chrissy

Click below for a printable recipe.

Print

When Life Gives You Stale Bread…Make Bread Pudding 😉

Print Recipe

This is a throw together, left over, waste-not-want-not dessert that is making the best of this time of COVID-19. There is no wrong path here…

  • Author: chrissy@mythankfultable.com

Ingredients

Scale
  • 5 Large Beaten Eggs
  • 1 Cup White Sugar
  • 1 Cup Brown Sugar
  • 1 Cup Milk
  • 1 Cup Almond Milk
  • 3 Cups Cubed Stale Bread
  • 1 Bag of Chocolate Chunks/Chips (or whatever you want to throw in)
  • Butter to coat inside of casserole paper
  • Additional Brown sugar to top

Instructions

  1. Cube bread and leave out to get stale overnight.
  2. Preheat oven to 350* and lightly butter a casserole dish (I used an oval Corelle ware white casserole, you can use anything up to a 13×9″ baking pan).
  3. Mix together eggs, milk and vanilla in a bowl, incorporate sugars and mix thoroughly.
  4. Pour egg mixture over bread mixture and combine. Let sit for 10 minutes to soak in.
  5. Add chocolate chunks or other mix ins and put in casserole dish. (I actually poured the egg mixture over the bread in the casserole dish and let it sit…whatever is easier for you).
  6. Sprinkle additional brown sugar over the top of the saturated bread.
  7. Bake for 45 minutes minimally- check and continue to bake until it is set.

Did you make this recipe?

Share a photo and tag us — we can’t wait to see what you’ve made!

Posted in: bread, breakfast, Dessert, My Story, Recipes Tagged: almond milk, Bourbon, Bread, bread pudding, chocolate, chunk, eggs, milk

Grandma’s Angootie/Ungootie (Easter Bread)

April 16, 2019 by chrissy@mythankfultable.com

This post is about a year in the making. Partially because I wanted more research on this recipe prior to sharing…and partially because I haven’t found the answers I was looking for. For example…

What is the real name of this bread?

How do you really spell its name? This is phonetically spelled I am sure.

Where did this recipe originate?

Which recipe is the right recipe?

The answers to those questions? There are many answers. This is a recipe my Grandmother made, that she learned from her mother in law (my Great Grandmother). The recipe varies and regardless of researching “Italian Easter Bread” in old Italian church cookbooks, online resources, etc…I am coming up empty handed.

Actually, I come up with an abundance of information…just not my specific answers. Every region in Italy has a variation of this bread. It can be covered with glaze, sugar, colored eggs, plain eggs, sprinkles, no sprinkles. It is named with a list of names, but I could not find one the way our bread is named. (It is pronounced UN-GOO-TEE). But, I didn’t find it anywhere other than in the family recipes. I have learned that Easter Bread is Easter Bread. It usually is sweet, enriched with some sort of butter, oil, or shortening. It typically holds one or multiple eggs, and is served as a part of Easter weekend.


I do, have the recipe from family three sources, each slightly different, but I am going to use the one my own Grandma used. It is also a tradition to make it on Good Friday. I figure empty/over handed or not, I don’t want to wait another year to post this recipe. If my readers can add to the story, or fill in the blanks, I will update this post as I go.

This bread starts out with melting Crisco in boiling water, then allowing it to cool. Milk is added, along with a large quantity of flour and sugar. This bread can be baked into larger loaves, or, as I remember them, smaller individual loaves.

Once the dough is risen, it is rolled and shaped around an egg. Our recipe does not call for coloring the eggs, but I can see the attraction. It’s pretty with the colored eggs, and while I am at it, the glaze and sprinkles make it not only sweeter but a decorative bread. This recipe is pretty basic when it comes to decoration, but it is a tradition I can’t imagine letting go. Even though carbs are my enemy. Even though sweet bread is in essence, a dessert. It is the kind of bread I rip a hunk off of, and it can be served with coffee or tea, eaten for breakfast, etc. It doesn’t need butter or preserves. It is a complete taste in and of itself.

Italian Easter Bread

When I was little, this bread was a part of Easter weekend, as we helped my Grandma with the making of the bread, and Easter dinner was served with each place setting having a bread. (I am not sure if this was just one time or every time…but it is distinctly imbedded in my brain, seeing the little breads at the table).

I never knew “Nona” or the stories around this bread. I just know it was something my Grandmother, along with second cousins, and other family members carry on as a tradition of family and food. I can be a part of that, and continue it on for another generation.

Now the egg. It is baked in the oven, and apparently has the same consistency of a hard boiled egg but better. I have never eaten it. At our house, my Father would always eat the egg the day the bread was made. I can very clearly see him taking a hunk of bread, the egg, and a cup of coffee to his space at the table. I didn’t eat the egg when I was little because Dad always did, and there was only one egg. Now I don’t, only because the bread is out on the counter and not refrigerated…and for some reason the egg is still in my heart, the part my Dad would eat. It’s a heart thing for me.

I am thankful for memories of my family, and for traditions that were part of my childhood, such as this bread. It makes me smile, the idea of my Grandmother being in my kitchen with me as I make the breads. I’d like to think she would be happy they are still being served. I wish I knew Nona, she seemed like quite a lady. I am glad she was willing to share the recipe with her daughter in law, so we could have it with us today.

I hope you enjoy this recipe, and as always, thank you for coming to the table!

Chrissy

Click below for a printable recipe.

Print

Grandma’s Angootie/Ungootie (Easter Bread)

Print Recipe

This is the Easter Bread I grew up with. As I have researched, there are many variations, even within my own family! I love that nothing is specifically measured, but it usually turns out as a sweet bread. I don’t eat the egg and we have never died the egg or put a glaze on it, but both of those additions sound wonderful!

  • Author: chrissy@mythankfultable.com

Ingredients

Scale
  • 5 Pound Bag of Gold Medal Flour (I have used other kinds of flour but this is the recipe my grandmother gave me).
  • 3 Packages Dry Active Yeast – Check the date
  • 3 Good heapings salt (we use salt to taste now)
  • 2 to 2 1/2 Cups Granulated Sugar
  • 1– 1 1/2 Pound Crisco  (we use 1 pound now)
  • 1 1/2 Quarts Boiling Water
  • 1/2 Quart Milk

Instructions

  1. Boil water and add Crisco, allow it to melt.
  2. Add milk and allow mixture to cool to tepid temperature.
  3. Mix flour, salt and sugar.
  4. Make a well in your flour and add cooled crisco mixture.
  5. Add yeast in and knead.
  6. Let rise in a warm place, cover with a damp towel.
  7. When the dough has risen, knead until silky, cut and shape into form (form is a round shape surrounding a raw egg).
  8. Place on baking sheet, cover with a damp towel and allow to rise a second time.
  9. Brush with beaten egg yolk.
  10. Bake at 365*-375* approximately 50 minutes or until golden brown.

Did you make this recipe?

Share a photo and tag us — we can’t wait to see what you’ve made!

Posted in: bread, My Story Tagged: Bread, Holiday, Italian Easter bread

Pumpkin Bread (Super Moist)

December 4, 2018 by chrissy@mythankfultable.com

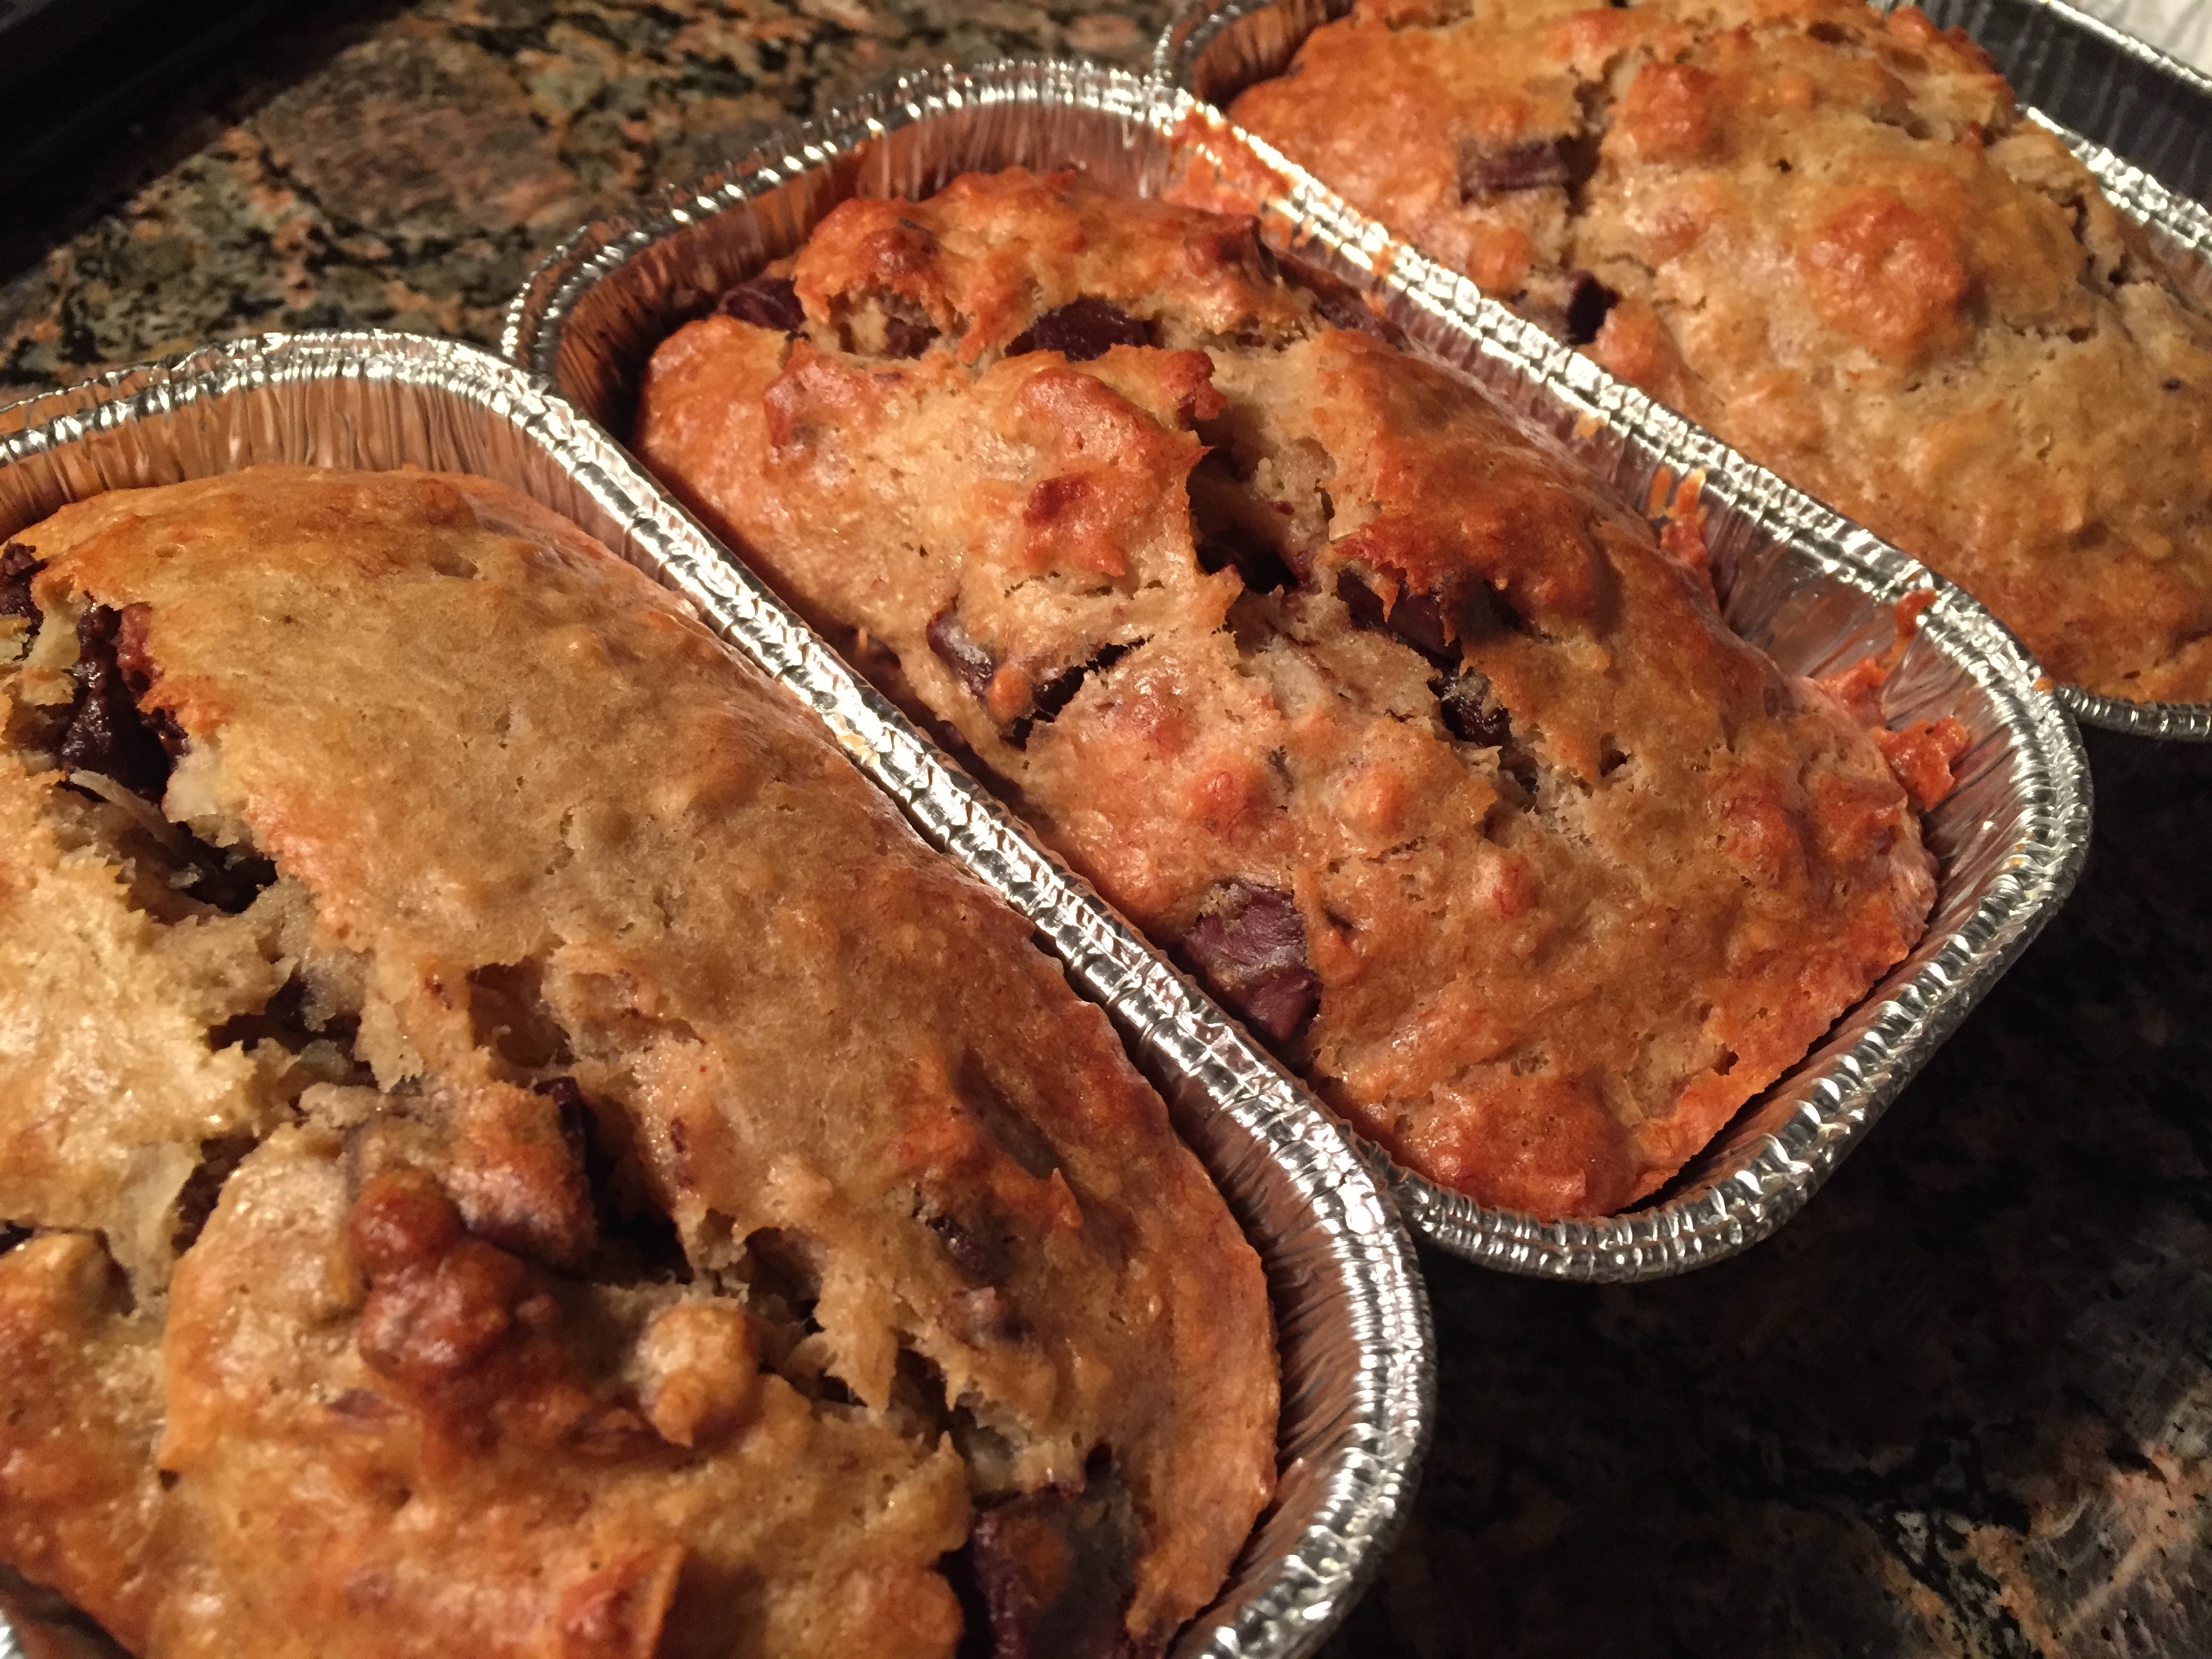
If for some reason you are not a fan of pie during the holidays, never fear, the world is filled with this fall-ish deliciousness. I have been whipping up pumpkin protein smoothies and muffins, and this spectacular bread made from the Key Ingredient Recipes website. This makes three full loaves or six smaller loaves, should you wish to share.

What I love about this bread is that it is super moist. As in, stays that way for a few days. It is fully cooked but somehow doesn’t dry out and get crumbly. I’m a fan. Another bonus is that even though I was reticent to add as many spices as the recipe called for, I followed the recipe to the letter and found it was just enough without being too much. I always consider myself heavy-handed in the spice department, but for some reason I shy away from cloves. Cloves seem to be a heavyweight and a bossy pants when added to a recipe. In this recipe, clove reigns supreme. It is enough to bring out the fall-ish celebration that is pumpkin bread.

And wait…did I mention it is EASY? As in one bowl throw together mix and pour into pans easy? It is. I know the directions say to add the dry ingredients at once, but I mixed my wet ingredients and moved from small to large in dry quantities (I ended with the flour) and did it all in one bowl. I have done this more than once, it has not impacted the quality of the bread. It is still delicious.

This bread freezes nicely, and the recipe makes enough to share. It’s perfect with a cup of coffee or tea, it is perfection still warm from the oven. I will tinker with the recipe to add less sugar, and maybe even a cream cheese swirl because, hello, cream cheese and pumpkin.

I am so thankful for the holidays and for a time to gather with the family you are born into and the family you are grafted into. The people you love and hold close to your heart. I am for sure adding this amazing bread recipe to my table.

I hope you enjoy this recipe, and as always, thank you for coming to the table!

Chrissy

Click below for a printable recipe!

Print

Pumpkin Bread (Super Moist)

Print Recipe

This recipe from Key Ingredient Recipes is an amazing moist pumpkin bread full of flavor!

  • Author: chrissy@mythankfultable.com

Ingredients

Scale


  • 3 Cups Sugar
  • 3 1/3 Cups Flour
  • 2 Teaspoons Baking Soda
  • ½ Tablespoon Baking Powder
  • 1 ½ Teaspoon Salt
  • 1 Teaspoon Nutmeg
  • 1 Teaspoon Ground Cloves
  • 1 Teaspoon Cinnamon
  • 4 Whole Eggs
  • 15 Ounces *1 Can Pumpkin
  • 1 Cup Oil
  • 1 Cup Water

Instructions

  1. Preheat oven to 350*
  2. Mix dry ingredients in a bowl, set aside.
  3. Combine eggs, oil, water, pumpkin in another bowl.
  4. Add wet ingredients to dry ingredients all at once.
  5. Mix well, prepare three 9×4 or six 3×5 bread pans.
  6. Bake at 350* for 45 minutes -an hour (when knife or toothpick comes out clean).

Did you make this recipe?

Share a photo and tag us — we can't wait to see what you've made!


Posted in: bread, breakfast, My Story Tagged: Bread, Cinnamon, Cloves, Fall, Nutmeg, Pumpkin, Pumpkin Bread

Lemon Blueberry Zucchini Bread

July 21, 2018 by chrissy@mythankfultable.com
Lemon Blueberry Zucchini Bread

Lemon Blueberry Zucchini BreadI’m just going to put it out there, the word “moist” does not have a big following. But in a bread, loaded with freshly picked (I picked mine but hey picking a carton out at the grocery store counts too) blueberries, the zing of lemon, and a superhero ingredient of zucchini, this bread is so good, sweet and tart and yes, moist.

When you add zucchini to anything, even if you squeeze the liquid out before hand, it still adds to the texture of a bread. I shred mine on a box grater (actually it is a six-sided grater – so a hexagon grater) on the fine shred side. You can do this and pop it in the freezer or the refrigerator before hand. I give the shredded zucchini a squeeze to remove extra liquid but don’t make a big deal out of it. (There is no wringing it out in a towel  or setting out overnight). Because I use a finer shred, not only is it barely detectable, the bread maintains the integrity of being lemony and blueberry without looking or tasting like a zucchini bread.Lemon Blueberry Zucchini Bread

This recipe calls for two key ingredients that you can find in abundance right now where I live. The first round of berries (bigger and sweeter) are ready, and everybody who has a garden with squash has one or two or ten extra to give away. So bake it up into a bread and put some glaze on it.

The bread uses lemon extract as well as the punch of zest. I go overboard on the blueberries because that’s how I roll, but you can certainly reduce the berries, use vanilla extract, and switch up the oil as well. I used a mixture of vegetable oil and greek style yogurt (I like what it adds to the texture of the bread). I used Siggis Vanilla yogurt, but if I had Lemon flavored yogurt on hand I would have used that, or plain-no flavor yogurt.

If I am going to cave for a sweet at my local coffee shop, it will be for the glazed lemon loaf. It better taste like lemon. Not yellow bread. So, I will be heavy-handed in the zest. You will find it in the bread as well as the glaze.

The glaze…oh you sweet lemony goodness. Glaze is temperamental in the fact that you don’t want a mouthful of sugar. You want balance of sweet and tart. You want it to not be sticky and gross all over your bread. It’s not frosting. So, you play with it. If it needs more lemon juice or heavy cream, add it. Ideally, you want it loose enough to spoon into a plastic baggie, snip the end off, and drizzle. It will firm up after a bit and maintain it’s pretty design on the top of your bread.

Fresh picked blueberriesIn a world where I can not only be productive and useful, utilizing berries I picked and fresh zucchini from the farm stand, I want a little sweet. A bread with the tart of lemon, the jewel-like blueberries, which visually and taste wise are remarkable, and the ninja like skills of hidden zucchini will get my vote every time.

I hope you enjoy this recipe, and as always, thank you for coming to the table!

Chrissy

Click below for a printable recipe!

Print

Lemon Blueberry Zucchini Bread

Lemon Blueberry Zucchini Bread
Print Recipe

This deliciously moist bread combines the flavors of lemon, blueberry, with finely shredded zucchini to combine the flavors of the season. Recipe yields two loaves, or one large loaf and three smaller loaves of bread.

  • Author: chrissy@mythankfultable.com

Ingredients

Scale
  • 2/3 Cup Vegetable Oil
  • 1 container (5.3 ounce) Greek Style Yogurt
  • 3 Eggs
  • 3 Cups AP Flour
  • 2 1/4 Cup White Sugar
  • 2 Cups Finely Grated Zucchini
  • 2 Teaspoons Lemon Extract
  • 1 Teaspoon Vanilla Extract
  • Zest of one Lemon (OK- I use three lemons but it is because that is my thing)
  • 1 Teaspoon Salt
  • 1/2 Teaspoon Baking Soda
  • 1 Teaspoon Baking Powder
  • 4 Cups Blueberries

Lemon Glaze:

  • 1 Cup Powdered Sugar
  • Zest of 1/2 Lemon
  • 1 Tablespoon Lemon Juice
  • 1 Tablespoon Whipping Cream

Instructions

  1. Preheat oven to 350*
  2. Prepare either 2 loaf pans or four small loaf pans with cooking spray or oil.
  3. In a mixer with a paddle attachment, combine oil, yogurt, and sugar.
  4. Add eggs and combine.
  5. Add zuchinni, extracts, zest, flour, salt, baking powder, and baking soda until combined.
  6. Fold in blueberries.
  7. Pour batter into prepared pans.
  8. Bake for 50 Minutes.

Did you make this recipe?

Share a photo and tag us — we can't wait to see what you've made!

Posted in: bread, breakfast, Recipes Tagged: blueberry, Bread, breakfast, lemon, Lemon Blueberry Zucchini Bread, Zucchini

Coffee Cake Banana Bread

July 18, 2018 by chrissy@mythankfultable.com
Coffee Cake Banana Bread

Coffee Cake Banana Bread

I don’t know if it is an age thing or a mom thing, but I tend to forget. I make lists and set reminders and own a large stock in post-its of every color and size to compensate for this, but the truth is, if I don’t write it down, I forget. I tell my kids to remind me when I am older that I did this when I was in my forties to make me feel better.

I forget the ingredient that I specifically went to the grocery store for, even though I buy other stuff I forgot to write down. I forget to put the card in the mail even though I bought it two weeks ago just so it wouldn’t be late (I am the worst auntie ever, sorry kids for the late birthday cards…).

I remember to pay my bills and feed and clothe my children and keep a house that’s clean and my yard is nice. I am kind to the dog and I do my job at work to the very best of my ability. So, for the most part, the forgetting is the other stuff.

Which includes myself. I forget to remember that exercise is important. That rest is necessary. That self-care is not only a priority but is essential to the people around me. I get caught up in not wanting to be selfish but the truth is, sometimes, in order to survive, we need to not forget ourselves.

Like anything you let slide, getting back into the remembering is hard at first. Remembering how good it feels to leave the gym after a workout. Remembering that meal prep and eating healthy is actually not as hard as you thought it was. Remembering how writing resonates deep within after not being able to string along sentences for a while. That taking the time to stop and enjoy life around you is worth remembering to do.

I would like to say I have found perfect balance and have achieved whatever zen I am looking for in my life, my kitchen, my table. I haven’t. I still want to eat a slice of banana bread or a cookie after I eat my salad with a protein. It is what it is. I am trying to remember balance, and kindness to myself, and indulge without going overboard. Like this Coffee Cake Banana Bread. (Creative stretch to segue into the recipe? Maybe?) It’s a stretch…but I’ll take it.

Banana bread is beautiful on its own. But combine it with a Coffee Cake Crumble topping and you have a healthy base with an indulgent flare that says, “YES PLEASE!” It is a moist tender bread with the crumbly crunch of cinnamon and sugar. It is worth the freezing of the ripe bananas. It is worth the effort to bake from scratch. It reminds me to stop. Sip the coffee. Eat the banana bread. Enjoy the view.

While I will continue to write post it notes and lists for myself, I will also remember to feed my soul, in whatever form that takes. Because healthy is important, as well as a generous portion of crumble topping.

I hope you enjoy this recipe, and as always, thank you for coming to the table!

Chrissy

Click below for a printable recipe!

Print

Coffee Cake Banana Bread

Coffee Cake Banana Bread
Print Recipe

This moist banana bread is topped with a buttery crumb topping. Original recipe from www.alattefood.com.

  • Author: chrissy@mythankfultable.com

Ingredients

Scale
  • ½ Cup Butter, softened
  • 1 Cup White Sugar
  • 2 Tablespoons Brown Sugar
  • 1 ½ Teaspoon Vanilla Extract
  • 2 Eggs
  • ½ Teaspoon Cinnamon
  • 2 Cups Flour
  • 3–4 Mashed Ripe Bananas
  • 1 Teaspoon Baking Soda
  • ¼ Teaspoon Salt
  • 2 Tablespoons Sour Cream or Plain Greek Yogurt

Crumb Topping:

  • 1 Cup Flour
  • 1 Tablespoon Cinnamon
  • 1 Cup Brown Sugar
  • 6 Tablespoons Butter, Cold and cubed

Instructions

To prepared the Crumb Topping:

  1. Combine cinnamon, brown sugar, and flour.
  2. Cut in butter until crumbly in texture.

To Prepare Banana Bread:

  1. Preheat oven to 350*
  2. Spray two 8 x 4 pans with non-stick spray, butter, or oil of choice. (I also make these in the smaller loaf pans and it makes approximately five loaves.
  3. In a mixer, cream together butter and sugars until light and fluffy.
  4. Add in eggs, vanilla extract, and sour cream (or Greek yogurt)
  5. Add in mashed bananas until combined.
  6. Combine dry ingredients in a separate bowl.
  7. Add dry ingredients until incorporated.
  8. Divide batter between two prepared pans.
  9. Sprinkle Crumb topping generously over both pans.
  10. Bake at 350* for 35-40 minutes until tester comes out clean.

Did you make this recipe?

Share a photo and tag us — we can't wait to see what you've made!

Print

Coffee Cake Banana Bread

Coffee Cake Banana Bread
Print Recipe
  • Author: chrissy@mythankfultable.com

Ingredients

Scale
  • ½ Cup Butter, softened
  • 1 Cup White Sugar
  • 2 Tablespoons Brown Sugar
  • 1 ½ Teaspoon Vanilla Extract
  • 2 Eggs
  • ½ Teaspoon Cinnamon
  • 2 Cups Flour
  • 3–4 Mashed Ripe Bananas
  • 1 Teaspoon Baking Soda
  • ¼ Teaspoon Salt
  • 2 Tablespoons Sour Cream or Plain Greek Yogurt

Crumb Topping:

  • 1 Cup Flour
  • 1 Tablespoon Cinnamon
  • 1 Cup Brown Sugar
  • 6 Tablespoons Butter, Cold and cubed

Instructions

To prepared the Crumb Topping:

  1. Combine cinnamon, brown sugar, and flour.
  2. Cut in butter until crumbly in texture.


To Prepare Banana Bread:

  1. Preheat oven to 350*
  2. Spray two 8 x 4 pans with non-stick spray, butter, or oil of choice. (I also make these in the smaller loaf pans and it makes approximately five loaves.
  3. In a mixer, cream together butter and sugars until light and fluffy.
  4. Add in eggs, vanilla extract, and sour cream (or Greek yogurt)
  5. Add in mashed bananas until combined.
  6. Combine dry ingredients in a separate bowl.
  7. Add dry ingredients until incorporated.
  8. Divide batter between two prepared pans.
  9. Sprinkle Crumb topping generously over both pans.
  10. Bake at 350* for 35-40 minutes until tester comes out clean.

Did you make this recipe?

Share a photo and tag us — we can't wait to see what you've made!

Posted in: bread, breakfast, My Story Tagged: banana, banana bread, Bread, breakfast, Cinnamon, Crumble Topping

Rosemary Parmesan Skillet Bread

March 26, 2018 by chrissy@mythankfultable.com

Rosemary Parmesan Skillet Bread

When my son was almost a year old, I remember reaching into the pockets of my big bathrobe and discovering about twenty cheerios and a binkie (pacifier). I stood still and thought to myself, “Well, I guess I am officially a mom.”

To me, the day I baked bread and it not only smelled like heaven but looked and tasted divine, I decided I was a baker.

I make mistakes when I bake. Sometimes I pour in butterscotch chips instead of peanut butter chips and make a happy little accidents. Sometimes I go off recipe and double the zest or the extract and blaze my own trail. But bread? the beauty of bread is that it starts as a promise and grows. There is (a little) room for imperfection.

I think bread is like faith. You have to wait and see. You feed it, you give it a warm place to grow, and you shape it.

Rosemary Parmesan Skillet Bread

You place it in the fire and you wait for it to become something real.

This bread, like all good things, takes time. However, it is pretty simple as far as labor goes. Mix the ingredients, cover and place somewhere warm, shape, and bake. It bakes in a cast iron skillet in the oven , which is such a great idea.

Filled with rosemary, brushed with olive oil and topped with more rosemary and parmesan cheese, This gorgeous crusty loaf of bread has a beautiful crumb and the flavor of rosemary just carries through the whole loaf.

Now,

Rosemary Parmesan Skillet Bread

I do grow my own rosemary. I have two small plants that every year I marvel that they return. They technically shouldn’t because of my zone, but maybe where they are located in my yard just has magic, because last year I harvested some. Another neat fact is that I don’t use a lot of rosemary in my cooking, so, two little plants make more than enough for this bread and more.

My children do not like things in their bread. No to chunks or seeds or spices. No to raisins. No to herbs. But this bread is too good for me not to make because the kids I brought into this world can’t appreciate it.

Make this with French Onion Soup and use the bread instead of croutons. Make this when it snows and the warm Rosemary and Parmesan will make shoveling and snow removal worth it. It can be paired with salad, tomato soup, beef stew, made into grilled cheese sandwiches, oh, the list goes on.

Rosemary Parmesan Skillet Bread


What I love about homemade bread is the fact that you know exactly what goes into it. Flour. Yeast. Salt. Water. Sugar to feed the yeast if you are like me and want to make sure it blooms. Time. Love. Pretty simple stuff.

I use a basic AP Flour but have since purchased Artisanal Flour (More expensive and fancier bag) and have noticed little difference. You can play with heartier flours, but it will impact the density and consistency of the bread.

Rosemary Parmesan Skillet Bread
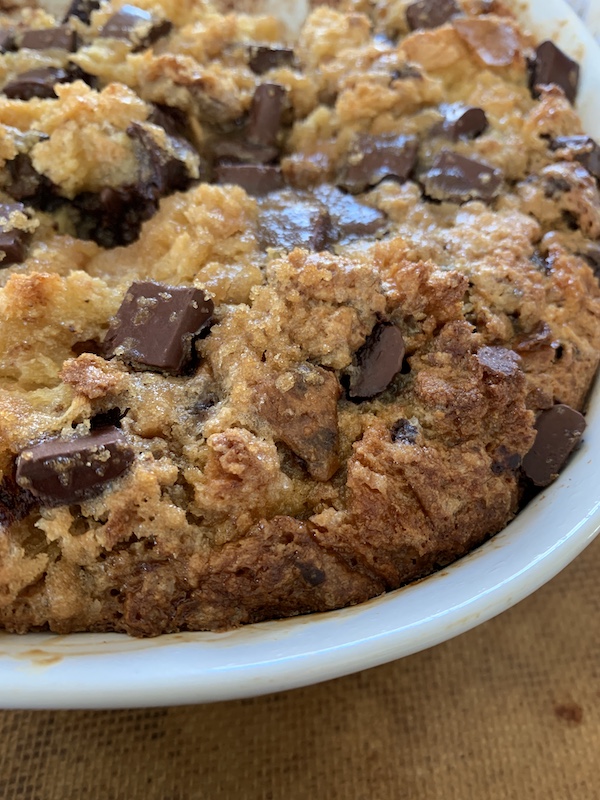
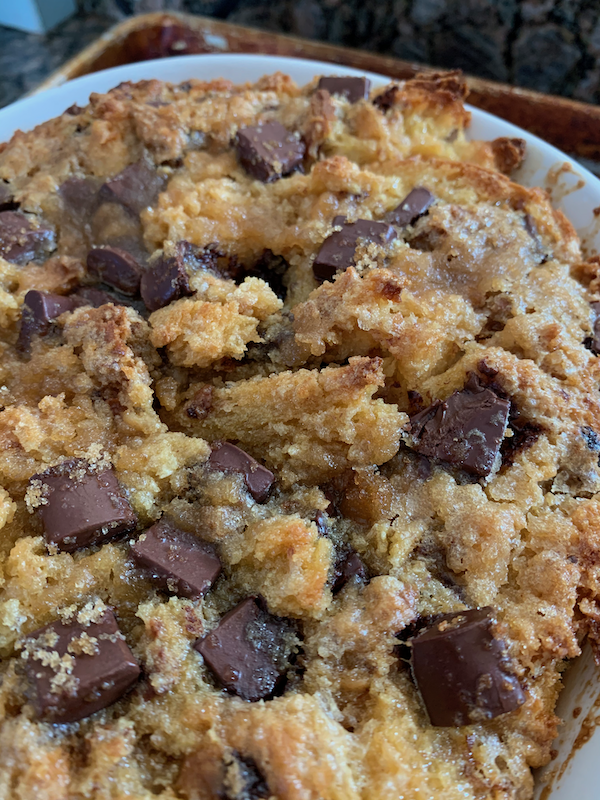
I can not express how proud you will be when you take this out of the oven. Like those cheerios, it will rename you as a baker, for sure.

I hope you enjoy this recipe, and as always, thank you for coming to the table!

ChrissyRosemary Parmesan Skillet Bread

Click below for a printable recipe!

Print

Rosemary Parmesan Skilled Bread

Print Recipe

Original recipe from www.handletheheat.com with a few modifications by yours truly. So delicious, the combination of rosemary and parmesan make this the perfect accompaniment to soup or salad, or stand alone with or without butter!

  • Author: chrissy@mythankfultable.com

Ingredients

Scale
  • 2 Cups of Lukewarm Water
  • One Packet of Instant Yeast (2 1/4 Teaspoons)
  • 4 1/2 Cup Bread Flour
  • 3 Tablespoons dried Rosemary (I did not chop this- I crumbled it in my hand to both make the dried rosemary into smaller pieces and release natural oils.
  • 1 1/2 Teaspoon Salt
  • 3 Tablespoons Olive Oil
  • 1/3 Cup Freshly grated Parmesan Cheese

Instructions

  1. Place yeast and warm water in a large mixing bowl.
  2. Combine flour slowly, stirring with a wooden spoon or plastic spatula.
  3. Incorporate rosemary, salt, and mix until combined.
  4. Cover bread dough with a clean, warm, damp towel and leave in a warm spot to double in size. (I left mine over night, but it was ready for the next step in an hour or so).
  5. Place two tablespoons of olive oil in the cast iron skillet, making sure to oil the surfaces where the bread dough will touch.
  6. With floured hands, remove dough from the bowl, shape into a ball, and place in the oiled skillet.
  7. Preheat oven to 400*
  8. Allow bread dough to rise a second time in the skillet, approximately 30 minutes.
  9. Right before placing dough in the oven, pour remaining olive oil on the dough and brush to cover the top surface.
  10. Make a slash on the top of the bread in an X shape with a sharp knife.
  11. Sprinkle additional rosemary on top of the bread.
  12. Bake in a 400* for 25 minutes.
  13. Pull Bread out of the oven, sprinkle liberally with the Parmesan cheese, and return to the oven.
  14. Bake for an additional 20-25 minutes, when golden brown.

Did you make this recipe?

Share a photo and tag us — we can't wait to see what you've made!


Posted in: bread, Recipes Tagged: Bread, Parmesan, Rosemary, Skillet Bread, Yeast Dough

Overnight Easy Artisinal Bread

March 13, 2018 by chrissy@mythankfultable.com

Overnight artisanal Bread

You know how you can be really good at some things in a day but not good at others? That’s how the blog has been for the last few weeks. Between sinus infections and wrapping up sports and school and more storms (when will winter end?), the blog has been the thing I have let go.

I have managed to be a mom, housecleaner, meal preparer, Language Arts Consultant, daughter and friend. I have headed back to the gym and hot yoga classes. I bought a cold press juicer. So, in some ways, I am doing good things. I. Am. Just. Not. Writing.

Which is hard, because the whole point of this blog was incorporate two great loves and some of me and make food magic while learning how to keep up with technology and plug-ins and whatnot. It’s a learning curve I put myself on willingly, so to put it aside is hard. I get the blog-guilt. Which, is not unlike mom-guilt.

What I have kept doing, is cooking, photographing, and editing photos. So, like the days when you only wash and dry the laundry but don’t fold it (Some people do this). I am just getting to the final stage now.

This bread. Oh bread, if you were one last meal you would be enough. Bread is the sound and smell and warmth of all things good. I am not allergic to gluten, obviously. If I was, I would be in love with something else. But for me, bread would be my “If you could only have one food forever what would it be?” food.

I don’t mind kneading, I have just started to hand the kneading part over to my dough hook and kitchen aid, but this bread…Oh this glorious bread needs nothing. Except, time.

This bread is mixed the night before. Left somewhere warm overnight; the longer the better, then shaped into a ball and placed in a casserole dish in the oven and baked. It is that simple.

When you take this bread out of the oven it sings to you. A series of cracks and pops and you think to yourself, “I am amazing.” and you are.

When I make this bread, my son comes out from whatever hidey-hole-man-cave he has


hidden himself in and grabs a knife for the butter. He stands at my kitchen counter and makes crumbs and smiles because he has the bread bug too. So, for me, this bread has more magic – because to make your child smile is a gift on any day.  To make my son smile is a small miracle. So bake bread I will.

In New England we are getting yet another nor’easter tomorrow (sigh), and I will be starting this bread tonight so tomorrow afternoon, snow day or not (we will be I school until almost July) we will have bread. It will be a gift, my house will smell wonderful and my son will be happy. I think you should bake this bread too.

I hope you enjoy this recipe, and as always, thank you for coming to the table!

Chrissy

Click below for a printable recipe!

Print

Overnight Easy Artisinal Bread

Print Recipe

This overnight artisanal bread delivers all of the promise of bread without the hard work. Recipe from The Baker Chick via Simply So Good.

  • Author: chrissy@mythankfultable.com

Ingredients

Scale
  • 2 Packets Active Dry Yeast
  • 1 Tablespoon of Sugar
  • 1 1/2 Cups Lukewarm Water
  • 3 Cups of Artisinal or All Purpose Flour
  • 2 Teaspoons of Kosher Salt

Instructions

  1. Dissolve packets of yeast into lukewarm water, and add sugar.
  2. Stir mixture and allow yeast to bloom.
  3. When the yeast mixture has a soft, light bubbly surface, combine with flour and salt.
  4. Combine mixture and place in a bowl. Place somewhere warm and cover with either plastic wrap or a warm, moist towel (I use a bartender towel for this).
  5. Allow dough to sit for 8-24 hours. It will rise and get bubbly.
  6. Preheat oven to 450* and place dutch oven or casserole dish in the oven to preheat.
  7. Turn dough onto a well floured surface and shape into a ball. Allow to rest.
  8. When the dutch oven has preheated, carefully remove and place dough into it.
  9. Return to oven and cover with lid for 30 minutes.
  10. Remove lid and continue to bake for an additional 7-15 minutes.

Did you make this recipe?

Share a photo and tag us — we can't wait to see what you've made!

Posted in: bread, My Story Tagged: Bread, Easy, Overnight Artisinal Bread, yeast, Yeast Dough

Late Night Focaccia with Jacob and Being a Mama Bear

January 21, 2018 by chrissy@mythankfultable.com
Focaccia Bread

About four years ago I wrote a paper for my MFA about my son, Jacob. He is a mixture of poetry and chaos. He is the kid that will run into the ice-cold ocean without hesitation. He is my grumpy-hoodie-wearing, grab-all-the-groceries-from-my-car-in-one-trip-kid. He is the kid who may not want to talk before school, but never leaves the house without saying, “love you.” We may approach life differently, but every day I see myself as well as his father in that kid. I am fiercely in love with that boy. He was the first to hear my heart beat from the inside. 

Jake’s Focaccia

The life lesson I have learned about my son is: the difference between poetry and chaos is cadence. It’s how you time things, how you shape things, how you let things rest for a bit. Which is also, a lot like making bread.

There are some mean people in this world. People who feel better when they judge or make other people feel inferior. People who feel they are entitled to say or do what they want when they want to unleash their misplaced anger on others.

I have had enough life experience to nod my head or acknowledge position, to do the right thing and to show kindness, and then there is that time when you are just done. And, that is when it involves my children.

I am all about “it takes a village.” I expect people who love my children to admonish them, if necessary. My friends know they are my fill in- that is a relationship based on trust and time. They have invested in my children’s lives, know who they are and who their Mom wants them to be. It is part of family, grafted or blood. We take care of each other.

I understand that I am far from the perfect parent and that I have made mistakes. Those are the things I replay in my mind, the “Should I have…” or the “Maybe if I didn’t…” But the bottom line is, I knew what it meant to have children before I had them, and I am a key player, not a sideliner. From single parenting as a result of divorce to now single parenting as my ex has passed, I am in this game. This long, exhausting, but ever so rewarding game of parenthood.

I tell my kids that you don’t stop loving or expecting or protecting because they get older and more responsible. It just doesn’t turn off. I never turns off.

So, when my child gets verbally lambasted whether he/she deserved correction from another adult or not, I am ever impressed when he/she does the right thing. When they show respect, follow instruction, chose the right path, I think, “Well all right, I have done a good job after all.”

However;

I have to say this, because as a mom, I may not have done the right thing if I had been there to see it happen.

I might have said all the things I think in my head but filter on a good day.

Maybe, I would have verbally leveled that person like they did my kid, and they could deal with the aftermath.

I might have even enjoyed it.

I don’t think Mama Bears look back at the people who put their cubs in danger and feel remorse.

Every day as an educator, I  ask myself, “How would I want a teacher to treat my kids in this situation?” If you are lucky enough to have had amazing teachers for your children, my bet is, they ask themselves the same question. That isn’t a skill taught in college, but some people who spend time with developing hearts and minds know enough to know be a guide, or a mentor, or even a role model. They step out of themselves to see the perspective of another before acting.

And then, as a parent, you know your children will encounter the garden variety ass, who feels entitled to “parent” your child. They like the way it feels when they reduce someone else’s kid to where they think he or she should be.

Especially, when they look and see that you aren’t around to see you aren’t there to see this behavior? You know the type. Sadly, me too.

Transition to bread for a moment: I know bread is evil. I got the memo. It has carbs and gluten and essentially destroys the universe. Blah, blah. So do mean people.

Here’s the beauty of bread. You take yeast and water and create life. You add flour, oil, salt. You stir and knead and move and flip it over and pound and then carefully place it into an oiled bowl. You lovingly run a clean cloth under hot water, wring it out, and fold it over the bread. You place it somewhere warm. You let it rise.  You knead it again and allow it to rise a second time. And then, you bake perfection.

So, when my son asked me to make focaccia after supper one night, and even found the recipe on-line to do make it happen, I stayed up late to coach the baker I didn’t know existed in my kid.

We used Anne Burnell’s recipe from the food network. Simple-salted dough that is doused in olive oil and set to rise in two sessions, dimpled with finger holes, and baked to a golden brown.

As a mom, I can’t tell you the joy of watching my son follow the directions, and to see him knead the bread and actually like the cadence of kneading the flour and the dough on the board. As a baker, who does use the kitchen for therapy, I am more than happy to know he too will have this outlet, should he choose.

We didn’t need to make bread. I have bread. What we did need, was time together. Time to create poetry out of chaos.

It was well past my bedtime when the focaccia came out of the oven and I admit we did not wait for it to cool before I cut into it.

I know dipping focaccia in olive oil and sea salt and cracked pepper around ten thirty at night is a bad dietary choice. I know it is not calorie friendly. I know all of the things and why it was a bad idea.

But sometimes, you stand in the kitchen with your son who has been through some stuff, and you eat the bread he baked because it is a celebration of what he can do. To create something amazing in the midst of brokenness. You embrace the poetry of your kid and rip off a piece of golden salty amazingness. You leave the dishes on the counter and you talk. And you thank God for the moment you have been able to capture in your heart.

I ride my kids hard. I am always the tough parent, just by reality dictating that I must be the consequence giver and the line toe-er. I have rules and expectations because I am the mom. That is my job. MINE.

I feel like in a world where people feel compelled and entitled to spout their verbal garbage, (can I get an amen?) our kids should at least have a way to combat the wounds inflicted. Bullies come in all sizes. Some even smile at you when they say hello.

All that to say, I am glad my kids know that even when the outside world can be unkind, they can create and make beautiful things. If I have taught them to respect people, to follow rules, to be kind to others, and even bake bread, they too can make poetry out of chaos.

I don’t think people intentionally hurt, or at least I would like to believe it, but I am wrong. Some people are really that ugly on the inside. And while as a grown up I know it’s really their issues, I can’t help but wonder. I can’t protect my kids from everything, but God help you if it warrants my stepping in. I am raising children in an imperfect world, as an imperfect parent, but my love is strong. My love is big, and hopefully, my kids know I have their back.

With Momma love, and perfect bread, the world can be a better place.

I hope you enjoy this recipe, and as always, thank you for coming to the table!

Chrissy

Click below for a printable recipe

Print

Late Night Focaccia with Jacob

Focaccia Bread
Print Recipe

Chef Anne Burrell’s recipe for Focaccia Bread is easy and delicious. It also makes for an excellent late night snack with your favorite teenager.

  • Author: chrissy@mythankfultable.com

Ingredients

Scale
  • 1 3/4 cups warm water
  • 1 package active dry yeast
  • 1 tablespoon sugar
  • 5 cups all-purpose flour, plus additional for kneading
  • 1 tablespoon kosher salt, plus coarse sea salt, for sprinkling
  • 1 cup extra-virgin olive oil, divided

Instructions

  1. Combine warm water, yeast and sugar in a small bowl. Put the bowl in a warm, not hot or cool, place until the yeast blooms, at least 15 minutes.
  2. In the bowl of a mixer, using a dough hook, combine the flour, 1 tablespoon of kosher salt, 1/2 cup olive oil together.
  3. Slowly add the yeast mixture and combine on low speed.
  4. Once the dough has come together, continue to knead for 5 to 6 minutes on a medium speed until it becomes smooth and soft.
  5. Transfer the dough to a clean, lightly floured surface, then knead it by hand for five minutes.
  6. Lightly oil the inside of a bowl with olive oil and place dough inside, turning to coat. Cover it with a damp cloth and put it in a warm place until the dough has doubled in size, at least 1 hour.
  7. Coat a jelly roll pan with the remaining 1/2 cup olive oil.
  8. Put the dough onto the jelly roll pan and begin pressing it out to fit the size of the pan. Turn the dough over to coat the other side with the olive oil. Continue to stretch the dough to fit the pan.
  9. Make finger hole impressions all the way through the dough.
  10. Put the dough in the warm place until it has doubled in size, about 1 hour. While the dough is rising a second time, preheat the oven to 425 degrees F.
  11. Give a generous sprinkle of seas salt over the top of the focaccia.
  12. Lightly drizzle a little oil on top.Bake the dough until the top of the loaf is golden brown, about 25 to 30 minutes. Remove the focaccia from the oven and let it cool before cutting and serving.

Did you make this recipe?

Share a photo and tag us — we can't wait to see what you've made!


Posted in: bread, My Story, Recipes Tagged: Bread, Focaccia, Food Network Recipe, Olive Oil, Salt, yeast

Chunky Monkey Banana Bread

November 14, 2017 by chrissy@mythankfultable.com

Chunky Monkey Banana Bread

If banana bread stuffed with coconut, walnuts, and chocolate chunks is wrong, I don’t want to be right. We are a don’t-waste-that-banana-family. As in, I will stick that ripe banana in the freezer rather than throw it away family. Frozen bananas can be transformed into “nice” cream, eaten as a snack, or tossed into something wonderful, such as this banana bread.

I love banana  bread, but it has to be the right consistency. The right amount of moisture, the right amount of chunk-age. I don’t usually put nuts in my banana bread, but for this recipe, it was go big or go home.

Chunky Monkey Banana Bread

This recipe calls for greek style plain yogurt, shredded coconut, chopped walnuts…and of course the chunks of chocolate. Because, in my world, all breads have chunks of chocolate.

It is a super easy one bowl recipe, that bakes up evenly, with a nice density and crumb. The coconut holds the moisture and gives the bread a more than bread texture. The melty chocolate and walnuts say “HELLO!” to your tastebuds.

In a world where I wish all things were as easy as this bread, most of life isn’t. Some people aren’t fans of banana. Don’t let your view of banana dim your opinion of this bread. The original recipe is from www.spoonfulofflavor.com and it is Banana Coconut Crunch Bread with Coconut Cream Icing. I changed a few things and it does call for an additional frosting/glaze made with coconut cream and cream cheese. Truthfully, when I made this bread, I didn’t want to go the extra step for the icing…and it didn’t lack a thing. It was sweet enough and yummy enough. Not every thing I bake needs to have frosting. I know. Even I have limits.

Chunky Monkey Bread

Now that the days have officially declared WINTER IS COMING (why is New England so darn cold all of a sudden?), some times it is just nice to sit with a cup of tea or coffee or almond milk and think about how blessed you are. This recipe made up four small loaf pans, which is perfect for bake sales or sharing with your friend, which is what I did.

Here is a shout out to the momma’s who are tired. Who run kids to practices, help with homework, keep the laundry going, set healthy (mostly) meals before their children, try to fit in exercise, do the rest of their work after they have put kiddos to bed, spend weekends running to catch up, and love love love until they are exhausted.

Chunky Monkey Banana Bread

That’s the kind of friend I shared my bread with. My teacher friend who I believe was my hallway neighbor for a reason. The kind of friend who, on a Monday morning, I am happy to say, “Hey, I baked for you!” (Or actually, I baked for your family because I know you don’t like banana bread but your husband and kids will like it…I hope)!

She’s the friend who is the first to text, “What can I do to help?” She reminds me I too am a good momma. That my kids will turn out just right. Even when I question and worry. Don’t we all need someone like that in our lives? If we don’t have one, let’s be one.

I wish for you a moment where you can whip up this bread, smell it baking, eat a slice while it is still warm, and a real friend to share it with. That, to me is a beautiful thing.

I hope you enjoy this recipe, and as always, thank you for coming to the table!
Chrissy

Click below for a printable recipe!

Print

Chunky Monkey Banana Bread

Print Recipe

Delicious banana bread with the addition of coconut, walnuts, and chocolate chunks! Recipe from www.spooonfulofflavor.com

  • Author: chrissy@mythankfultable.com

Ingredients

Scale
  • 3 Ripe Bananas, Mashed
  • 1/4 Cup Plain Greek-Style Yogurt
  • 2 Eggs
  • 3/4 Cup White Granulated Sugar
  • 6 Tablespoons of Melted Butter, (Cooled)
  • 1 Tablespoon Vanilla Extract
  • 3/4 Teaspoon Baking Soda
  • 1/2 Teaspoon Salt
  • 1 Cup Chopped Walnuts
  • 1 1/2 Cup Shredded Coconut (I used sweetened)
  • 2 Cups Flour

Instructions

  1. Prepare four small loaf pans with non-stick spray.
  2. Preheat oven to 325*
  3. In a mixer, combine mashed bananas, yogurt, eggs, butter, vanilla until combined.
  4. Add sugar, salt, baking soda.
  5. Add flour and shredded coconut
  6. Fold in walnuts and chocolate chunks
  7. Bake for 50 minutes or until cake tester comes out clean.

Did you make this recipe?

Share a photo and tag us — we can't wait to see what you've made!

Posted in: bread, breakfast Tagged: banana, banana bread, Bread, breakfast, chocolate, Chocolate Chunk Walnut Banana Bread, Walnut

Recipe Search

Recent Posts

  • Fluffernutter Cookies…You Heard Me April 12, 2024
  • On Nests July 30, 2023
  • Lemon Rosemary Shortbread Cookies April 24, 2022
  • Praline Sweet Potato Pie March 22, 2022
  • Italian Ricotta Cake March 13, 2022

Recent Comments

  • Cathy Carroll on To My Daughter On Her 18th Birthday
  • Maureen / Mimi on To My Daughter On Her 18th Birthday
  • Kathy G on To My Daughter On Her 18th Birthday
  • chrissy@mythankfultable.com on Cherry Crescent Moon Cookies and Finding the Joy
  • chrissy@mythankfultable.com on Cherry Crescent Moon Cookies and Finding the Joy

Archives

Categories

  • appetizer
  • bread
  • breakfast
  • Cookies
  • crockpot
  • crockpot
  • Dessert
  • Fruit
  • My Story
  • One Pan
  • Recipes
  • side dish
  • Side Dishes
  • soup
  • Vegan

Copyright © 2025 mythankfultable.com.

Lifestyle WordPress Theme by themehit.com