mythankfultable.com

Feeding the Heart, Body, and Family

  • My Pics
  • My Story
  • The Puppies
  • Contact Us
Feeding the Heart, Body, and Family

dessert

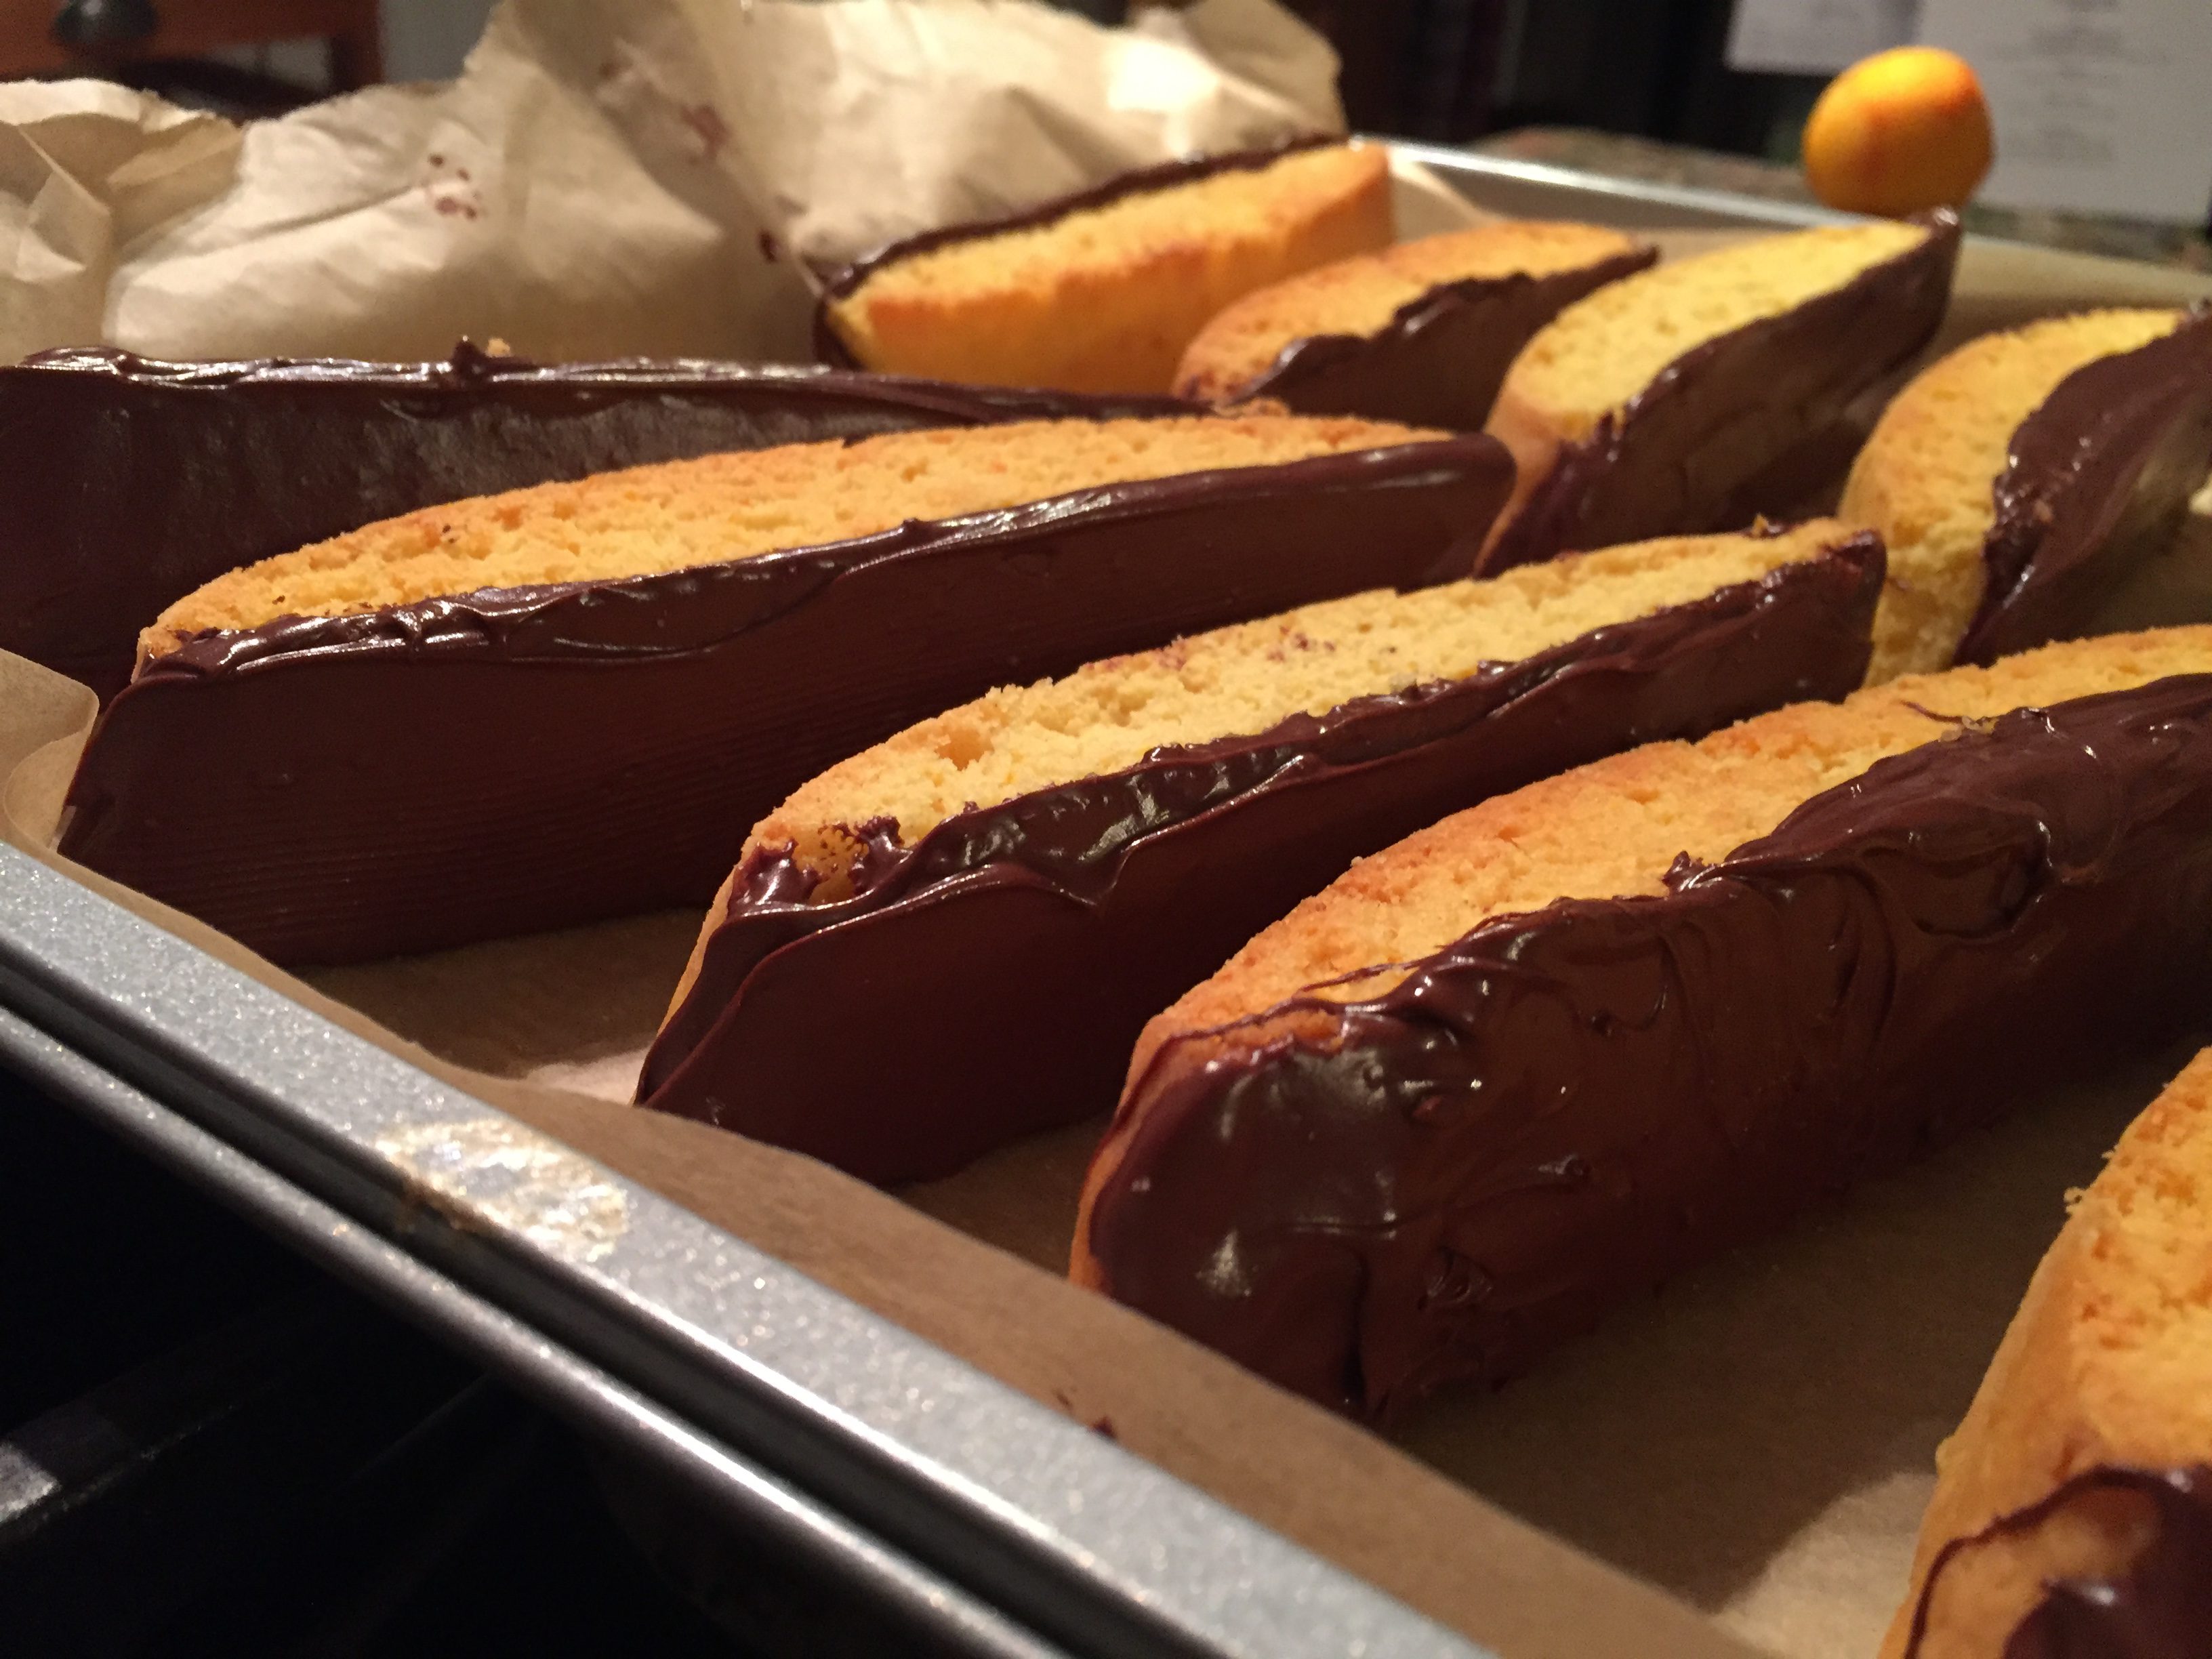
Chocolate Dipped Orange Biscotti and Fear of Doing New Things
December 13, 2017 by chrissy@mythankfultable.com
Chocolate Dipped Orange Biscotti

Chocolate Dipped Orange Biscotti

So…true confession, biscotti has always terrified me as a baker.

I know, that sounds foolish, because terrified is a very strong word for a baking adventure, but there it is. It’s a dough that you divide in two and bake all at once, then slice and REBAKE? As in, risk brown bottoms not once but twice? Yeah…hard pass.

In every cookie swap I join, it’s the biscotti I hide for myself. (Come on, you all hide stuff from your children). If I am having coffee at a pastry shop with a friend, the biscotti winks at me and says, “Hey girl, you know you want me to come along. You can dip me in your coffee and my chocolate will get all melty.”

Orange Zest with a Microplane

Ok, sorry if I just made biscotti sound like porn or a bad meme. But it’s true. It’s the one cookie I love that I have never made.

Until last night.

At my Library Cook Book Club Cookie Swap (I brought the Dark Chocolate Crinkle Cookies), when I confessed my fear of biscotti, I was challenged by my wonderful cooking friends to try my hand at biscotti for the blog. “A blog challenge if you will.” (I just said that in the Project Runway season sixteen “twins” voice in my head). So I began my research. Turns out, there are a lot of biscotti options out there.

Orange Biscotti DoughPleasant surprise, biscotti turns out to be one of the easiest, most beautiful cookies to make, and did I mention easy already? because they are. If you have attempted the Dark Chocolate Sea Salt Caramel Cookies or the Browned Butter Sea Salt Caramel Cookies, you have already superseded the cookie hard to make expectations.

So, here I am with another major life lesson, you don’t know until you try. Easy to dish out as a parent, not so easy to do as a grownup.

Truth be told I am not good with new or uncomfortable. I am not a fan of icebreakers, I do not like to have to get up and be silly unless it is spontaneous or I initiate it.

I am a team player, I have done fun things like swim with dolphins and ride the slide that goes through the shark tank. We’ve had kitchen dance parties. I’ve been known to see how many different beaches we can walk on in a day. Don’t get me wrong. I’m not totally rigid and predictable.Orange Biscotti Dough Ready for the Oven

But new things? No. I have a mantra I made for myself years ago when it came to new jobs or adventures, “You can try anything for two weeks.” (then reevaluate the situation to see if it sticks or I was right in my initial mindset of NO).  Or in this situation, I could try to make biscotti. I couldn’t really judge how difficult it is until I tried, right?

Orange Biscotti DoughSo, I tried. I selected Chocolate Dipped Orange Biscotti, because chocolate and orange are two of my favorite flavors. The original recipe from www.portandfin.com seemed pretty straightforward. I switched out the extract and of course added more orange zest. I also used semisweet chocolate because it is what I had in my pantry.

One bowl mix, one stick of butter, about an hour of my life in the kitchen, very little risk.

The dough comes together quickly, and is turned out onto a lightly floured surface and formed into two long rectangles. Then it is baked. Surprisingly the small rectangles not only get bigger but also puffier, which was very cool. I had intended smaller shaped biscotti and ended up with the “normal” sized biscotti.

Let the bars cool for about ten minutes, take out that big knife and slice on the angle. Then place them back on the cookie sheet sideways (middle side up) and bake a second time.

I used parchment paper, and followed the baking time closely. The great thing about biscotti is it is supposed to be a drier cookie. It is also supposed to be more golden than the average cookie, so the fear of brown bottoms has to go. And by brown bottoms I am talking about slightly darker than the cookie itself, not like a burnt sienna crayon.

Orange BiscottiOnce the cookies are done baking a second time and cool, melt that chocolate and dip away.

SO GOOD.

So here’s the funny thing that happened as soon as I bit into my first baked biscotti. All of these memories of biscotti came flooding into my mind.

Like anisette sponge cookies which I think was the closest I can remember to biscotti as a kid.

Like the first time I had biscotti with my dad with coffee like a real grown up.

Or the many conversations over coffee with my good friend Beth and the variety of biscotti she used to have at my disposal, (thanks friend).

Or that one time George and I ran away from home to Newport and got caught in the rain, and bunkered under the porch at The Coffee Grinder on Bannister’s Wharf and sipped our lattes and shared a biscotti. Which, to this day, is one of my favorite moments. (As documented on the Instagram pic below).

Biscotti in the rain with George

I got to thinking, how many other things am I afraid to do that are actually really easy but I’ve built up in my head to be scary (hello spin class/cross fit/trip to Europe/redoing my bathroom on my own/setting down a patio path) that I might be able to do just as easily as bake these cookies? Ok, some things require a professional, but you get my meaning.

All this to say, make the biscotti. You won’t be sad you did.

Bonus: my son, who is currently wrestling and watching everything he eats, ate one and said, “Mom, so good.” Which, as a momma, is the best compliment. Or at least, to me it is.

I might even go as far as to say my baker pride inched up a notch. Which, is good for the soul. Probably not as good as the spin class that I am afraid of and should take would be for my figure, but hey. I’ll take my romance of the biscotti for now. Baby steps and conquering fear and all that.

As an aside, I will also be posting about the Eggnog Biscotti with Rum Drizzle ASAP, as I couldn’t stop with one type of cookie. Because, baker fear issues. I’m also planning a chocolate peppermint biscotti and I probably won’t stop there. I may be slightly obsessed, just saying. That’s what happens when you find yourself newly in love with something or someone. You just have to know more, and biscotti, I am all heart emoji eyes for you.

I hope you enjoy this recipe, and sit yourself down with one and a warm beverage of choice, because they are a kick your feet up and enjoy yourself cookie if ever there was one.

Chocolate Dipped Orange Biscotti

Chocolate Dipped Orange Biscotti

As always, thank you for coming to the table!!!

Chrissy

Click below for a printable recipe.

Print

Chocolate Dipped Orange Biscotti

Print Recipe

Delicious Orange Biscotti Dipped in Semi Sweet Chocolate. Original recipe found on www.portandfin.com with some minor changes.

  • Author: chrissy@mythankfultable.com

Ingredients

Scale
  • 1/2 Cup (One Stick) of Unsalted Butter
  • 1 Cup Granulated Sugar
  • 2 Eggs
  • 1/2 Teaspoon Orange Extract (If you don’t have this you can use vanilla or almond)
  • 2 Tablespoons of Orange Juice
  • 3 Tablespoons Orange Zest
  • 2 Teaspoons Baking Powder
  • 1/4 Teaspoon Salt
  • 2 1/2 Cups of All Purpose Flour
  • 1 Egg White mixed with 1 Teaspoon of Water (For brushing the dough before first baking)
  • 1/2 Bag of Semi-Sweet or Dark Chocolate morsels.

Instructions

  1. Preheat oven to 325*
  2. using a mixer, combine butter and sugar until fluffy.
  3. Add Orange Zest and combine.
  4. Add Orange Juice, Eggs, and Extract (Orange or Vanilla) and mix until well combined.
  5. Add Baking Powder and Salt.
  6. Slowly incorporate the flour, mixing until just combined. The dough will appear sticky- that’s how you want it.
  7. Turn dough out onto a lightly floured surface and divide into two portions.
  8. Roll each portion to a rectangle approximately 12 inches long by 4-5 inches wide.
  9. Place each rectangle on a parchment lined baking sheet with a few inches in between (dough will spread and rise as it cooks).
  10. Brush tops of both rectangles with Egg White and Water Mixture
  11. Bake for 30 minutes in 325* oven until lightly golden and firm to the touch.
  12. Cool for ten minutes.
  13. Lower oven heat to 300* at this time.
  14. With a chefs knife or other longer knife, slice through the rectangles on an angle to the size preferred. (I made mine about 3/4″ wide and yielded about 20-24 biscotti).
  15. Stand each slice on its side, (cut side up) and bake at 300* for an additional 30 minutes or until dried and lightly browned.
  16. Let cookies cool completely.
  17. Melt chocolate in microwave or in a double boiler, watching the chocolate doesn’t burn.
  18. Dip biscotti in chocolate or using a knife, spread a layer of chocolate on the biscotti.
  19. Allow chocolate to set, this can be done in the refrigerator or in a cool location.
  20. Store in an airtight container in a cool location.

Did you make this recipe?

Share a photo and tag us — we can't wait to see what you've made!

Posted in: Cookies, Dessert, My Story, Recipes Tagged: Biscotti, chocolate, Chocolate Dipped Orange Biscotti, Cookies, dessert, Orange

Cherry Almond Shortbread Cookies with White Chocolate Drizzle

December 12, 2017 by chrissy@mythankfultable.com
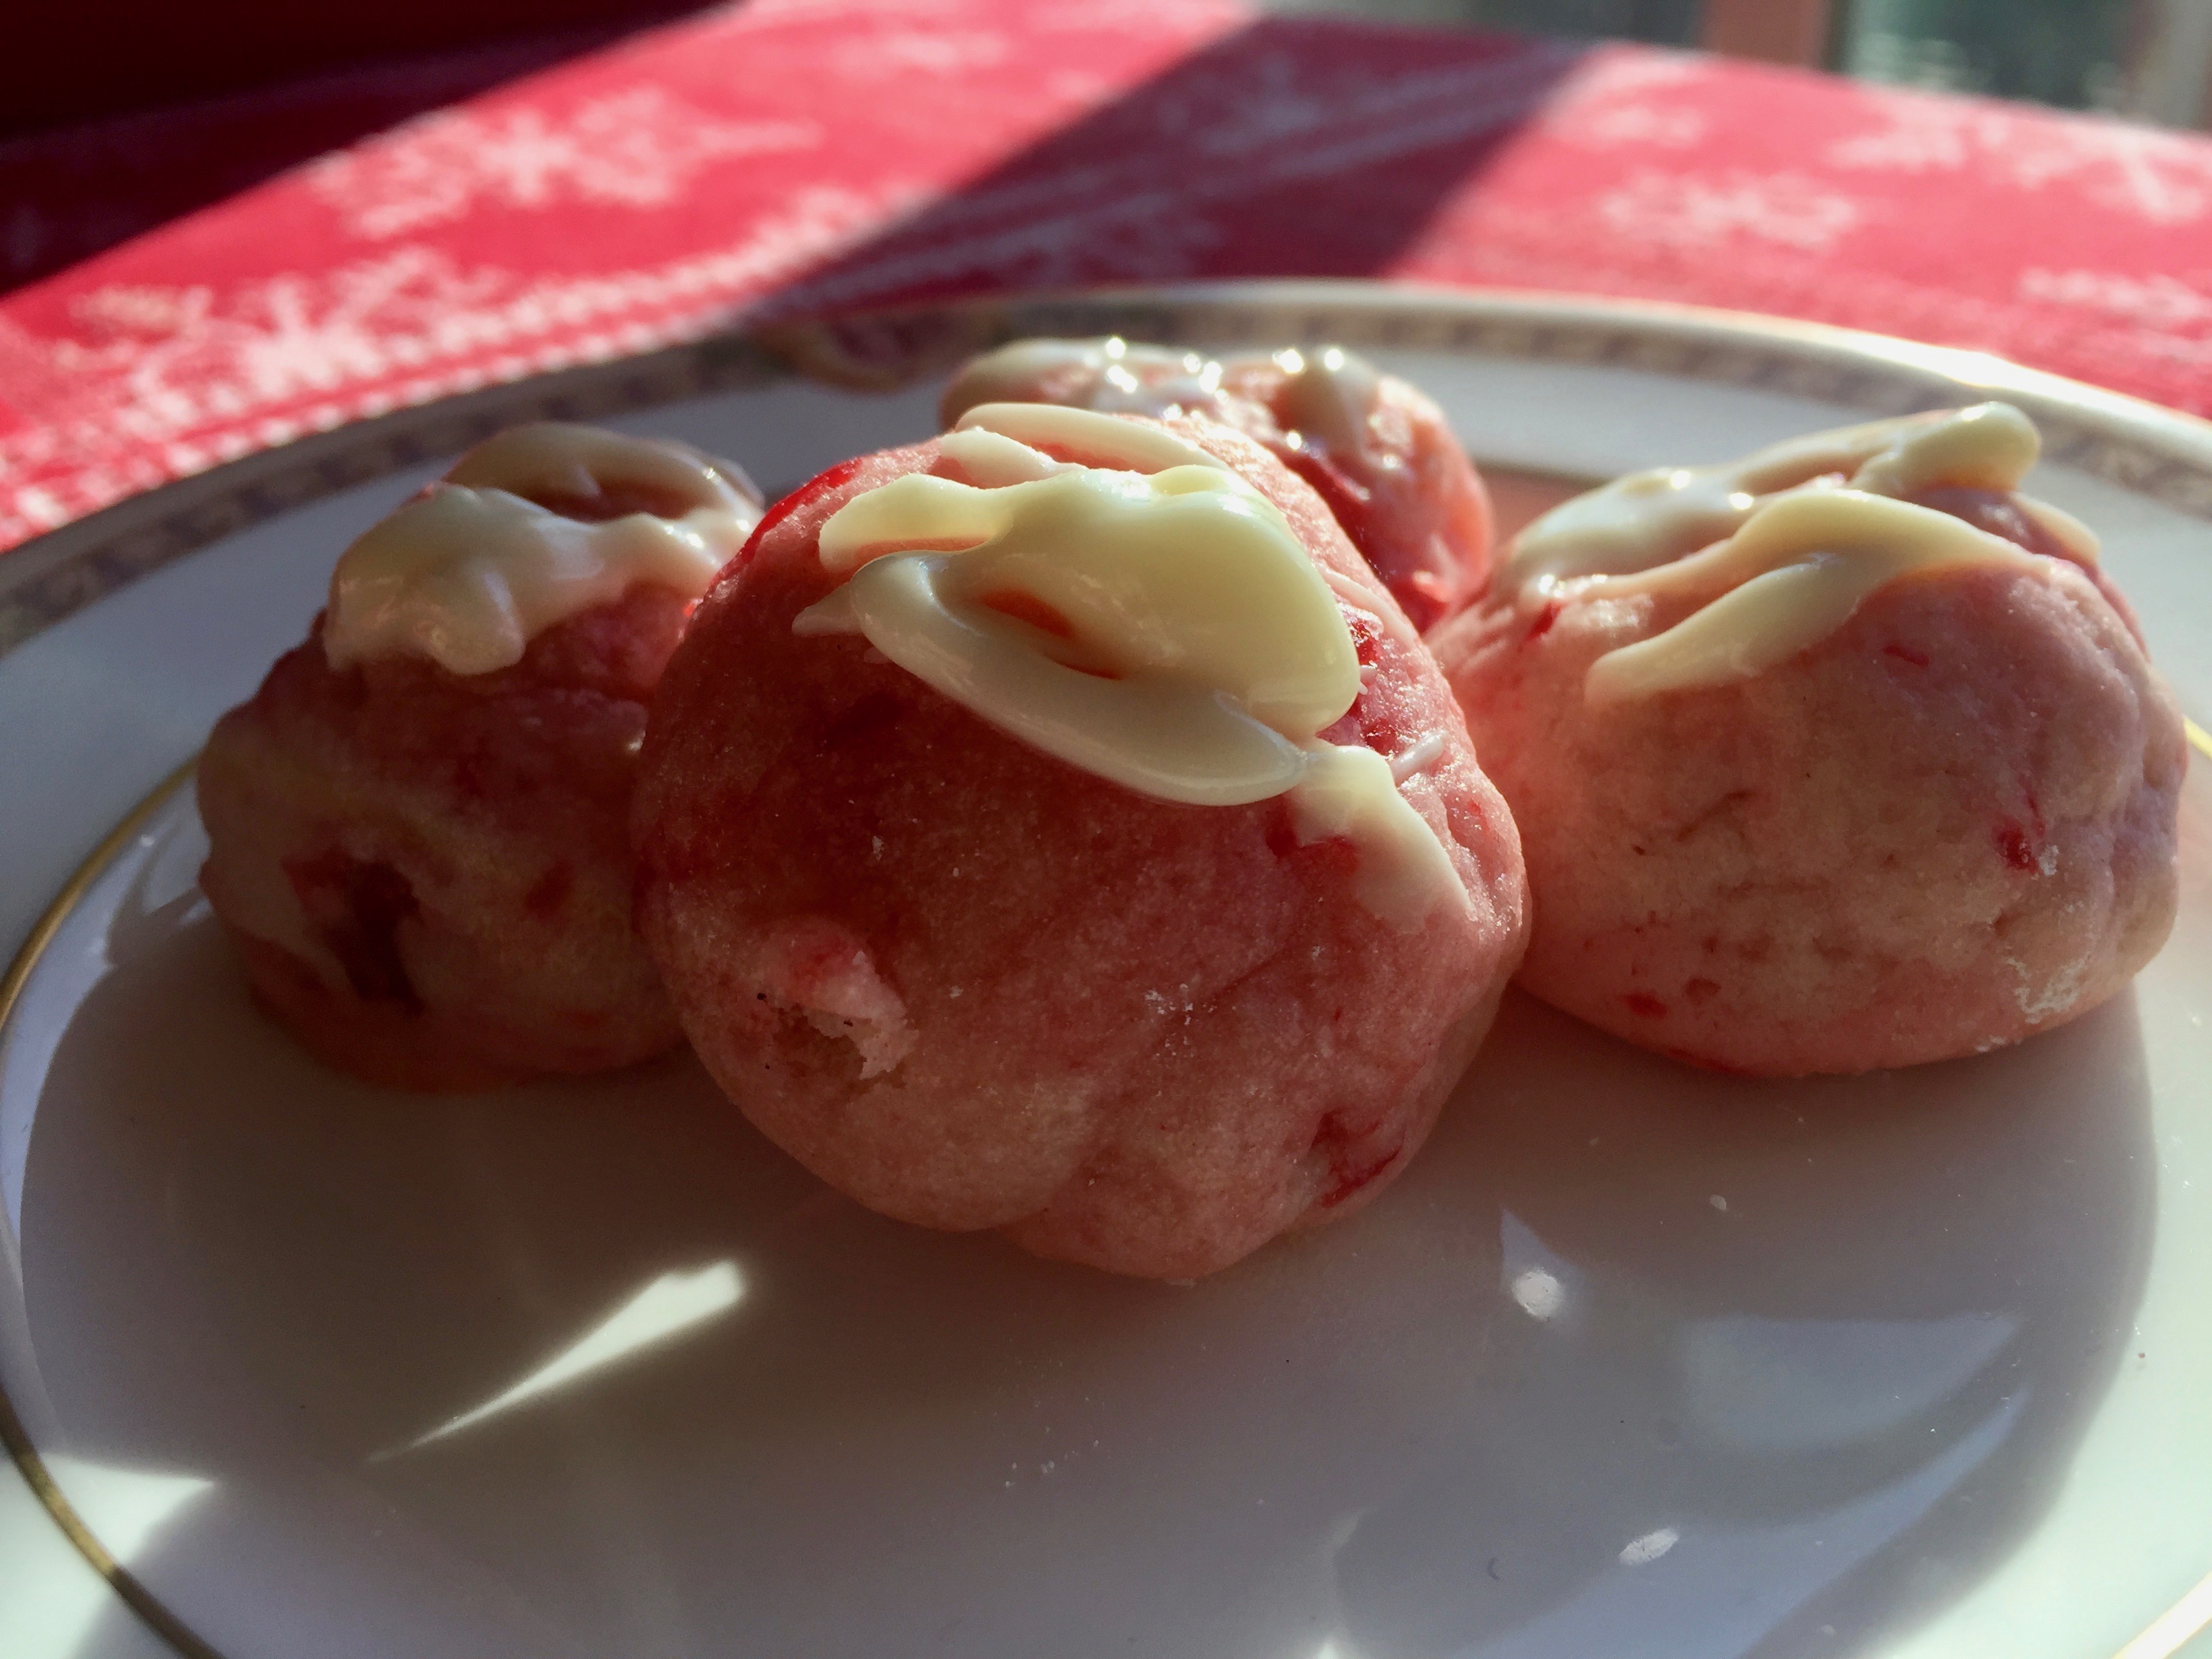
Cherry Almond Shortbreads with White Chocolate Drizzle

Oh the sweet pinkness of these cookies. Tender sweet, bite-sized mouthfuls of cherries and almond. A shortbread cookie that presents itself in a little pink mound with white chocolate icing.

Cherry Almond Shortbreads with White Chocolate Drizzle

Cherry Almond Shortbreads with White Chocolate Drizzle

I love how these are shortbread cookie without being dry and flat. Even with the two main ingredients being flour and butter, the sweetness of the cherry juice and the diced maraschino cherries give these cookies the jewel like quality and color.

Cherry Almond Shortbreads

Cherry Almond Shortbreads

While a pink cookie for me is more decorative and makes the cookie platter so much prettier…I am also impressed with the flavor. A cookie has to bring more to the table than a pretty face.

I also wondered about the white chocolate drizzle. I mean, does a cookie that is pink and filled with cherry bits and almond extract really need an additional white chocolate drizzle? The answer is yes. Yes it does.

Cherry Almond Shortbread Cookies

Cherry Almond Shortbread Cookies

I think the thing about different cookies is that each one really should top the last. Nobody wants a dry or boring cookie. If you are going to put it in your mouth, it should be worth the caloric trade off. And if it is a sweet, especially if it is a sweet, it should definitely be worth it. So, while these little darlings were good without the drizzle, the tiny bit of white chocolate was just what they needed to be front and center.

This cookie is fairly simple in that the hard parts are chopping the cherries, and waiting for the dough to chill.

For this recipe you make and chill the shortbread dough.  Then, when thoroughly chilled, you form small round scoops or roll into balls. Personally, I use a cookie dough scoop, then roll them to make them smooth. These baked up at 325* in about 10-12 minutes. I took the first batch out at ten, and liked the extra minute or two – I don’t like a browned bottom cookie at all- so watch your oven and don’t wander too far while baking.

When you remove them from the oven, they are perfect little pink mounds. They are not fluffy or cloud like- they are a denser cookie- as they are actually a shortbread. But the almond and cherry add a really nice flavor that works with the size and color of these little cookies. I wish my daughter were younger and we still played tea party. This would be the cookie I would serve, for sure.

When the cookies are cool, the white chocolate drizzle is just enough to finish them off. If you are freezing these cookies, hold off on the white chocolate drizzle until ready to serve.

I hope you enjoy this recipe, and as always, thank you for coming to the table!

Chrissy

Click below for a printable recipe.

Print

Cherry Almond Shortbread Cookies with White Chocolate Drizzle

Cherry Almond Shortbreads with White Chocolate Drizzle
Print Recipe

Delicious pink shortbread cookies that pack a cherry and almond punch. Original recipe from www.sallysbakingaddiction.com

  • Author: chrissy@mythankfultable.com

Ingredients

Scale
  • ¾ Cup Unsalted Butter
  • 2/3 Cup Granulated White Sugar
  • 1 ½ Teaspoon Almond Extract
  • 1 Tablespoon Maraschino Cherry Juice
  • 2 Cups All Purpose Flour
  • 20 Maraschino Cherries, drained chopped
  • 4 Ounces White Chocolate

Instructions

  1. Using a mixer, beat the butter at a high speed until light an fluffy.
  2. Add to medium speed, and add sugar, and almond extract.
  3. Scrape down the sides of the bowl, and drizzle in cherry juice.
  4. Turn off mixer and incorporate dry ingredients. A soft dough will form.
  5. Add chopped cherries and mix until they are distributed throughout the dough.
  6. Wrap dough in saran wrap or wax paper and refrigerate.
  7. Preheat oven to 325*
  8. Scoop and shape dough into balls.
  9. Bake for 10-12 minutes on parchment lined baking sheets.
  10. Cool cookies on wire rack.
  11. Melt white chocolate and drizzle over cookies.

Did you make this recipe?

Share a photo and tag us — we can't wait to see what you've made!

Posted in: Cookies, Dessert, Recipes Tagged: Almond, cherry, Cookies, dessert, Shortbread, White Chocolate Drizzle

Orange Cranberry Shortbread Cookies

December 11, 2017 by chrissy@mythankfultable.com
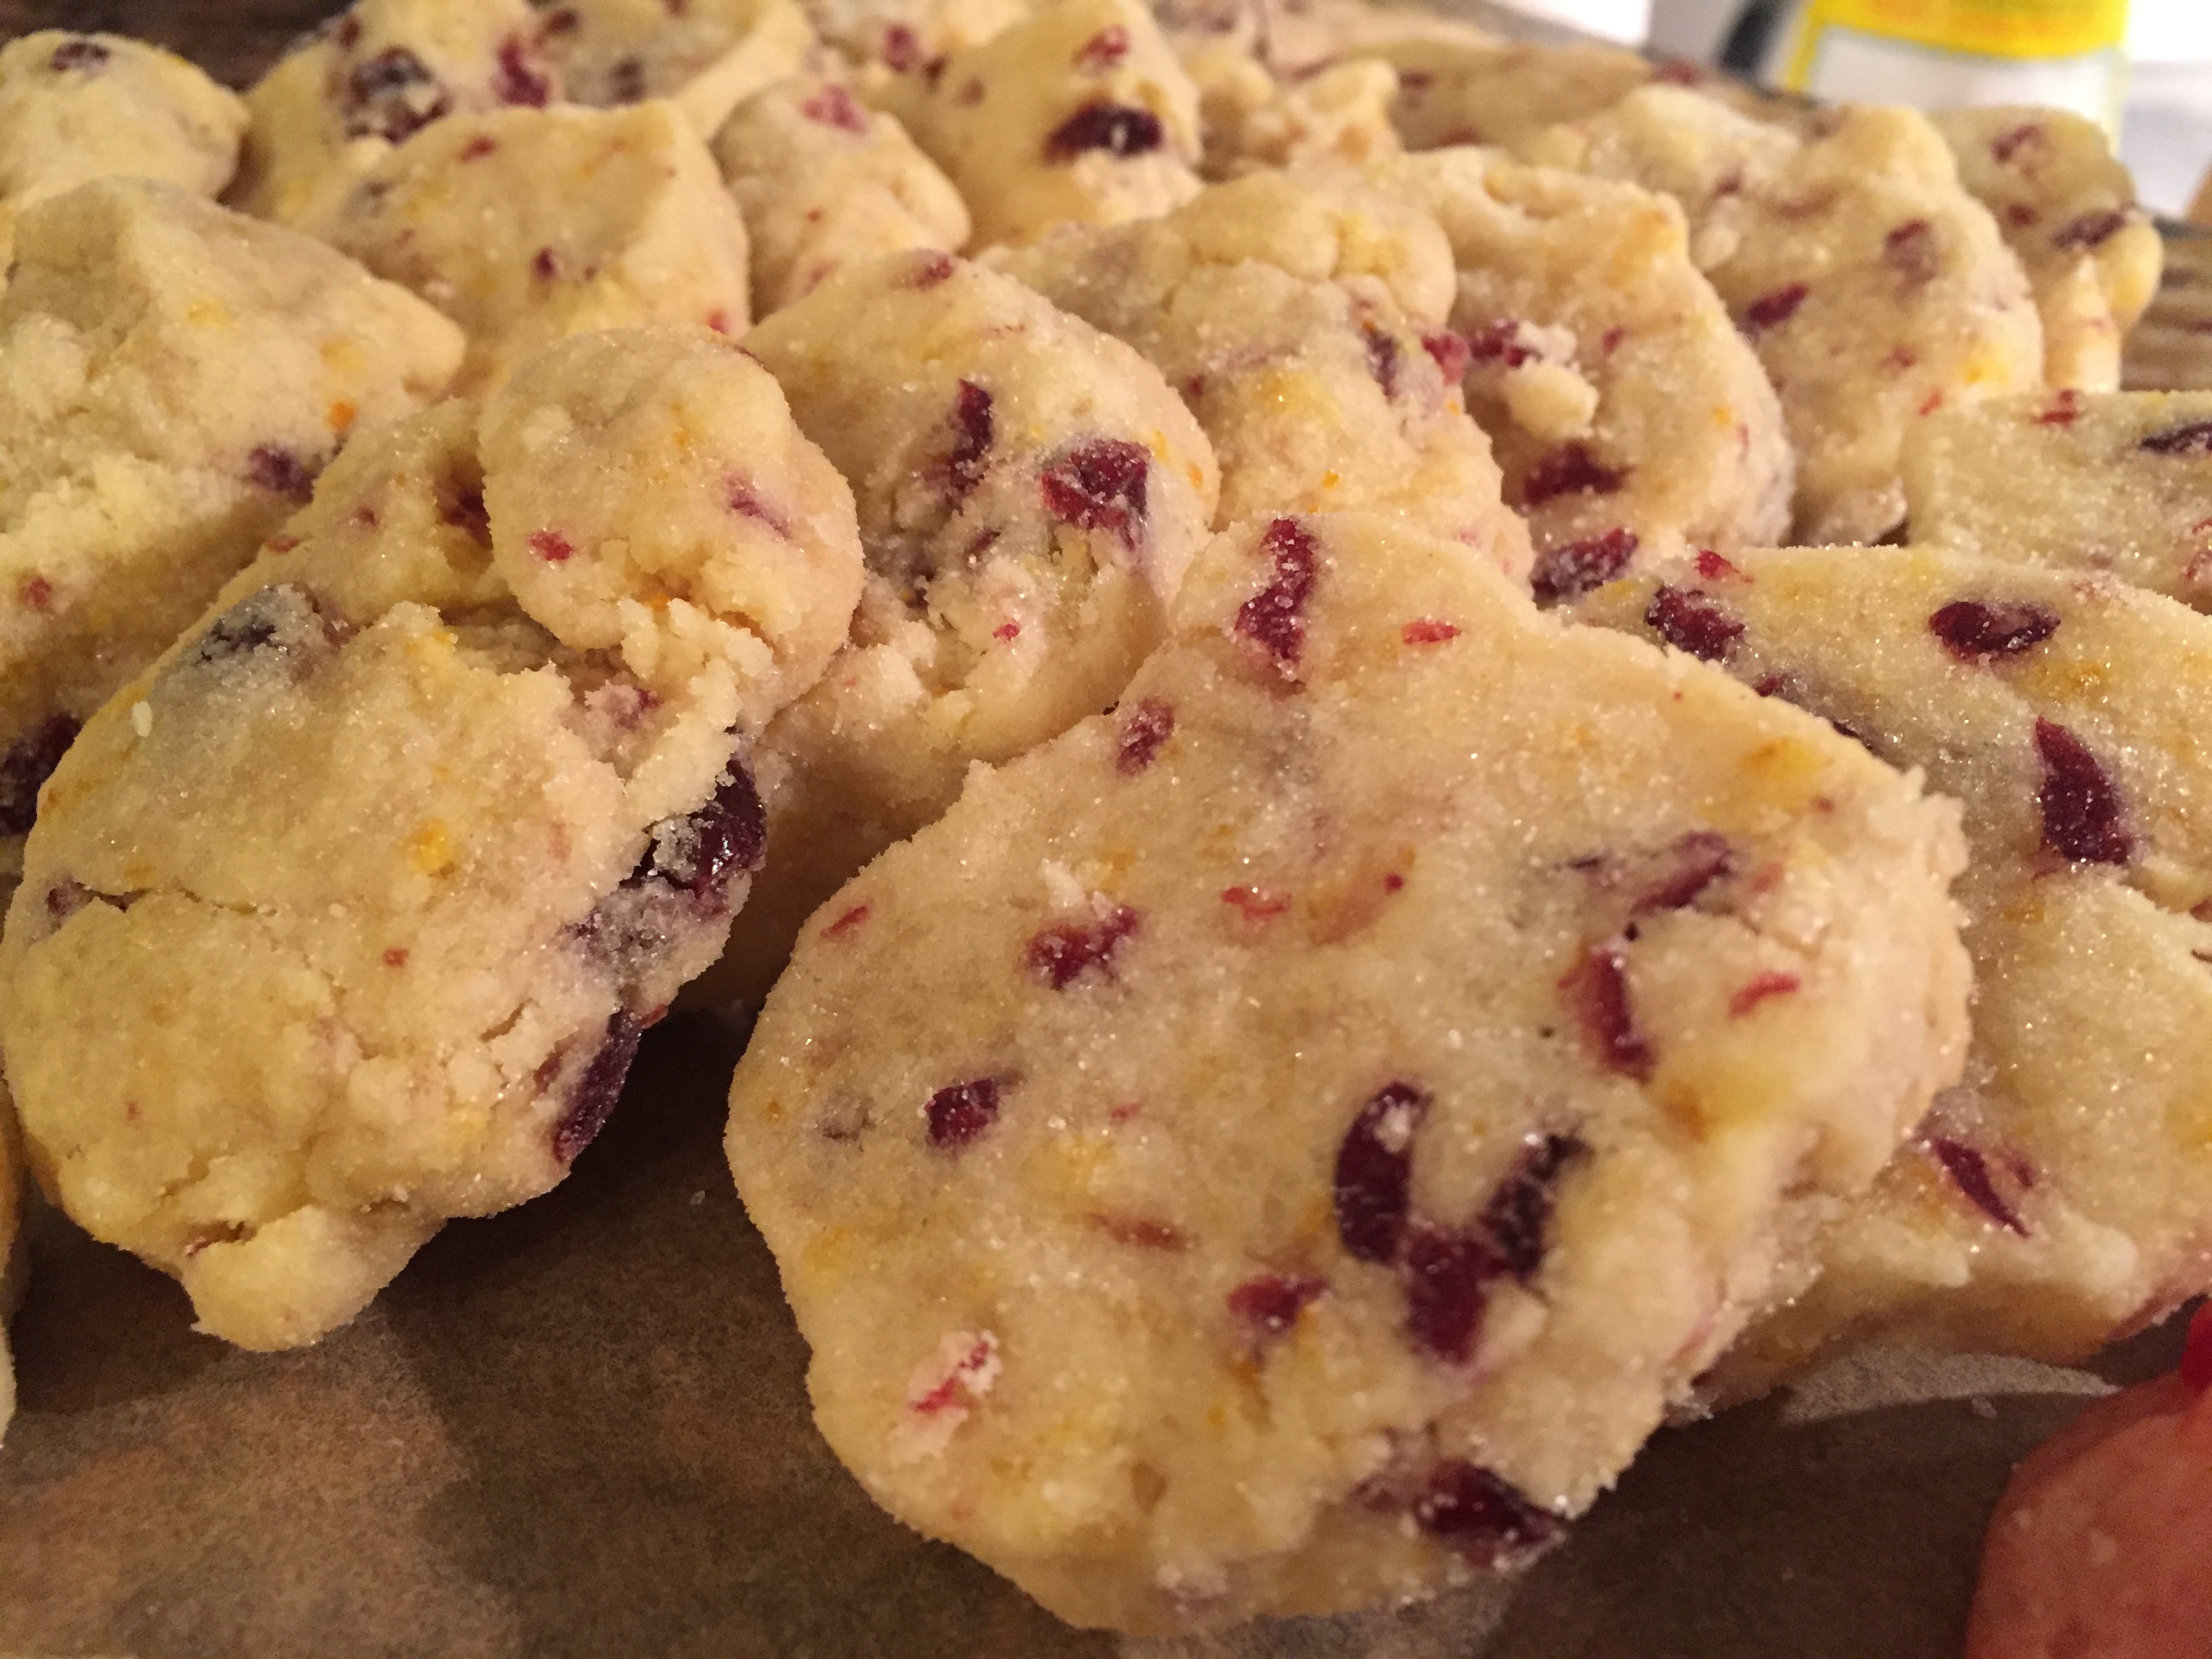
Cranberry Orange Shortbread Cookies

Orange Cranberry Shortbread Cookies

No New England cookie platter would be complete without something cranberry. Or, I should say, my cookie trays need to have cranberry somewhere. I think, to make a pretty cookie presentation there has to be a mix of colors and textures, and where the sweet has a different twist from one offering to another.

While I am more of a chocolate or salted caramel cookie fan, I do think shortbreads have a place in this world. Especially when they are lightly dusted with sugar, and packed with the sweet tangy punch of cranberries and orange zest.

Cubed Chilled Butter on a Cutting Board

Cubed Chilled Butter

The tricky part about shortbread cookies is the perfect consistency. Cutting the cold cubed butter into the flour until the dough has a sandy texture, then adding just enough liquid to bring the dough together without being too moist.

Cranberries and Sugar

Cranberries and Sugar

This recipe has been in my cookie file for a long time, and I do not know where on the internet I found it. I did make some changes, including the amount of orange juice involved. I have in the recipe up to 1/2 Cup of freshly squeezed orange juice (I zested the orange and squeezed it for the juice). I add the juice in tablespoon at a time measurements because it really does depend on the flour and how much liquid the shortbread dough will take to hold together and still be tender. It’s a watch and feel game- you want it to stick together but not be stick-y, ya know?

Shortbread Dough

Shortbread Dough

The cranberries are dried (I used Craisins) and pulsed in a food processor with some sugar and added to the dough. I find the zip of orange and cranberry together add a perky flavor to the otherwise traditionally buttery dough of shortbread.

I’m not going to lie. When it comes to this kind of cookie, I am a believer that more is more. I will always be heavy handed when using zest or something like that. If you find that there is extra zest or an additional 1/4 cup of cranberries, throw them in the dough. The cookies won’t lack for that extra teaspoon of orange zest.

Once the dough comes together, form into logs and refrigerate for a few hours or overnight in parchment or wax paper. The key to this is making sure the wrapper is tightly sealed around the dough. Any open edges, you run the chance of the dough drying out- and this is not the dough to have dry out. (Think play-doh after the lid wasn’t put on correctly).

Once the dough is chilled, slice the logs into 1/4 inch slices (I do not use a ruler for this…no one has time for that). Then coat the disks of dough in sugar, and place on a parchment or silicone mat lined cookie sheet. (Have I mentioned Santa is bringing me new Silpats? Can’t wait!).

These cookies are tender and so when they are baking- you need to be on it. These cookies are essentially butter, flour, and sugar, with your decorative mix ins. While the butter melts into the dough making light little pockets of air-it can also burn or brown quickly, which, is bad. Unless you like browned bottom cookies, in which case we can’t be friends. (Kidding! I’m kidding…sort of).

Once the cookies have cooled, they will freeze nicely for at least a month, or stay fresh in a sealed container for a few days. Shortbreads don’t have that chewy consistency, but these do hold their own, the buttery base kind of melting in your mouth with the chew of the cranberry.

Personally, I love the way these cookies smell and look more than anything. They smell so citrusy, and the sugar glints off the dough in just the right way…they really are pretty little cookies fit for this New England girl’s table.

I hope you enjoy this recipe, and as always, thank you for coming to the table!

Chrissy,

Click below for a printable recipe!

Print

Orange Cranberry Shortbread Cookies

Cranberry Orange Shortbread Cookies
Print Recipe

Delightfully fresh shortbread cookies with the sweet tart of cranberries and orange zest. Dusted with sugar right before baking.

  • Author: chrissy@mythankfultable.com

Ingredients

Scale
  • 1 Cup Dried Cranberries
  • 1 ½ Cup Granulated White Sugar
  • 5 Cups Flour (spooned and leveled- not scooped)
  • 2 Cups Butter, Chilled and Cubed
  • 2 Teaspoons Almond Extract
  • 2 Tablespoons Orange Extract (I used more in my cookies- I love orange zest)
  • 1/4 – 1/2 Cup fresh squeezed orange juice (add by teaspoonful until dough comes together)
  • Additional Sugar to coat cookies before baking

Instructions

  1. Combine cranberries with ½ Cup of sugar in a food processor and pulse just until cranberries are broken down into smaller pieces and combined with the sugar.
  2. Combine flour and remaining sugar in a different bowl.
  3. Using a pastry cutter, cut butter into the flour and sugar mixture until resembles fine crumbs.
  4. Stir in cranberry sugar mixture, extract, and orange juice by teaspoonful and using hands, knead dough into a ball.
  5. Shape dough into a log, and chill in wax paper or parchment paper (four hours to two days).
  6. Preheat oven to 325*
  7. Slice logs of dough into ¼ inch slices. Coat cookie slices with sugar.
  8. Bake cookies on parchment lined cookie sheet for 10-12 minutes or until cookies are set.
  9. Let cookies cool for several minutes on baking sheet before moving to a cooling rack.
  10. Store in airtight container for three days or freeze for up to three months.

Did you make this recipe?

Share a photo and tag us — we can't wait to see what you've made!

Posted in: Cookies, Dessert, Recipes Tagged: Cookies, Cranberry, dessert, Orange, Orange Cranberry Shortbread Cookies, Shortbread

Chocolate Bourbon Pecan Pie

December 2, 2017 by chrissy@mythankfultable.com

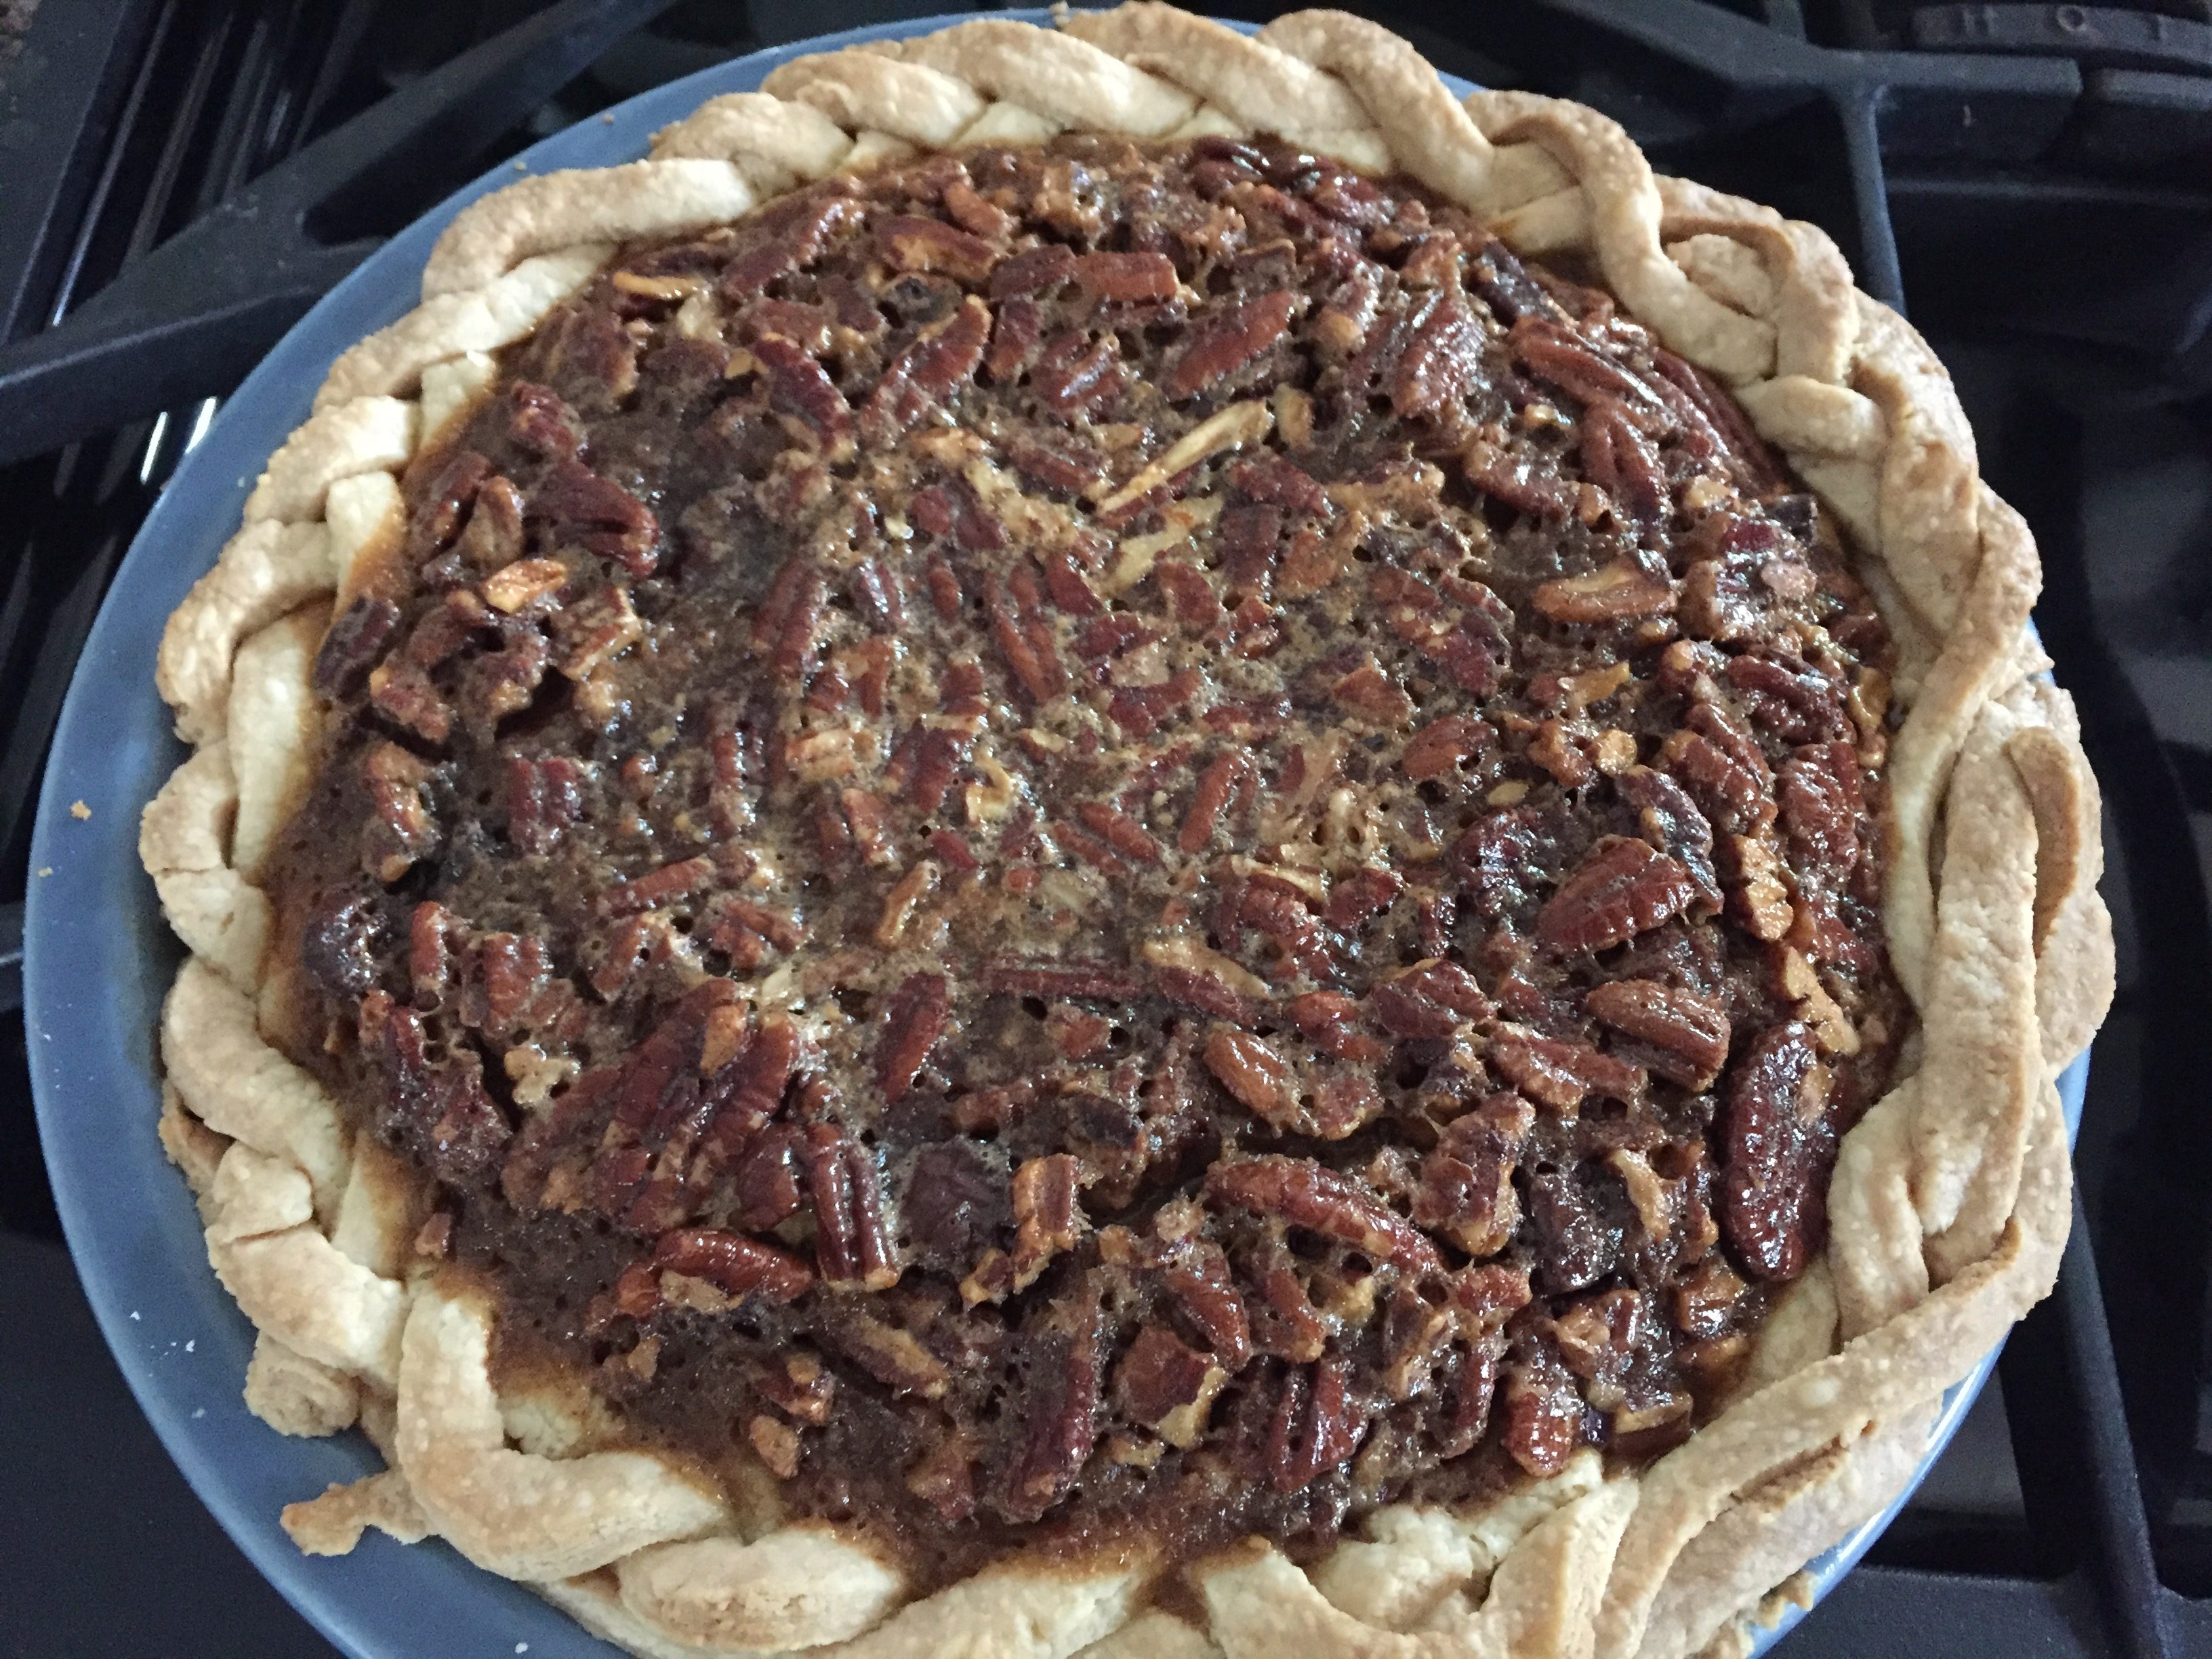
Chocolate Bourbon Pecan Pie

Prepare to wow and amaze your guests, be the star of the dessert table, and enter into a sugar coma that compares to no other. May I present to you, the Chocolate Bourbon Pecan Pie.

This is a staple in my dessert arsenal, it is also the pie that never seems to have a remaining slice left in the pie plate. It’s the top pick of my daughter and I think, mine as well.

This pie comes out twice a year: Thanksgiving and Christmas. So maybe that is why it is so special. Or, it could be that pecan pie meets chocolate chunks and it melts into a flaky pie crust to make the gooey, sticky, wonder that is pecan pie meets chocolate.

I can’t expound on it’s perfection.

Chocolate Bourbon Pecan Pie

Now, if you aren’t a pecan pie lover, and I know you are out there. I understand. It isn’t for everyone.

But for a girl who didn’t try pecan pie until I was an adult, the wonder is still there for me.

This recipe is all over the internet, my original copy was from 2012 and printed from all recipes.com. I have since seen it on several blogs, and the variations are minimal.

Essentially, you combine sugars and corn syrup, butter until melty and beautiful. Combine eggs and bourbon and vanilla in another bowl, and you marry the two. Then add your pecans and chocolate and pour into the pie shell.

Chocolate Bourbon Pecan Pie

What I love about this pie is how beautifully it sets up. I let my pecan pie bake until there is almost no jiggle in the middle. It actually almost puffs up and then settles down as it cools. I have also experimented with chocolate chips and chocolate chunks, and both seem to have the same consistency when it comes to melting into the under-the-pecan layer.

The smell in your kitchen as this bakes is somewhere between pie crust and toasted pecans and brown sugar. Which, in my opinion, is quite lovely.

I am thankful this pie only appears a few times a year, even though my daughter continues to ask when the next pie is being made (she had to share this one with the family), I am reticent to make it only because it is a serious temptation. As in, let the dog out in the middle of the night and grab your fork temptation.

I hope you enjoy this recipe, and as always, thank you for coming to the table!

Chrissy

Click below for a printable recipe.

Print

Chocolate Bourbon Pecan Pie

Print Recipe

A delicious combination of melted chocolate and pecan pie come together in this dessert! Perfect with a dollop of fresh whipped cream.

  • Author: chrissy@mythankfultable.com

Ingredients

Scale
  • 1 Unbaked Pie Shell
  • 1 Cup Chopped Pecans
  • 1 Cup White Granulated Sugar
  • 1 Cup Dark Corn Syrup
  • 1/2 Cup Butter
  • 4 Eggs, beaten
  • 1/4 Cup Bourbon
  • 1 1/2 Teaspoon Vanilla Extract
  • 1/4 Teaspoon Salt
  • 6–8 Ounces Chocolate Chips

Instructions

  1. Preheat oven to 325*
  2. In a saucepan, combine corn syrup, sugar, butter, and cook over medium heat, stirring constantly until butter is melted, sugar is dissolved, and ingredients are combined.
  3. Cool mixture slightly.
  4. In a large bowl, whisk eggs, vanilla extract, bourbon, and salt.
  5. Slowly pour melted sugar and corn syrup mixture into egg mixture, whisking constantly.
  6. When combined, add pecans and chocolate chips.
  7. Pour into pie shell and bake for 45-60 minutes, depending on your oven. You want to check- give the pie a little jiggle and see if the inner part of the pie has set.

Did you make this recipe?

Share a photo and tag us — we can't wait to see what you've made!

Posted in: Dessert, Recipes Tagged: Bourbon, chocolate, chocolate bourbon pecan pie, dessert, pecan, Pecan Pie, pie

Peanut Blossom Cookies

November 20, 2017 by chrissy@mythankfultable.com


Peanut Blossom Cookies

I am a word collector. Quotes, inspirational sayings, prayers, poems, old samples of handwriting, and, you guessed it…recipes. 

This recipe comes from a student’s mom from long ago, and the actual recipe card is a type written paper circa 1998. That’s not an “old” recipe, but it’s old when I consider who I was when it was given to me, newly married, no kids, transplanted from Massachusetts to Pennsylvania. Some things do seem like relics, even if they are under twenty years old.

I am also not always the neatest cook, so occasionally my recipes look like they have seen better days. This recipe, which has served almost two decades of baking, is worse for wear. However, I still use it every time.

Peanut Butter Blossom, Cookies


Back to the quintessential combination of peanut butter and chocolate. I have to say, these are one of my favorite cookies – there is something about the crackle of the cookie and the soft melty Hershey kiss. These also happen to be favorites of two of my favorite men, so that makes it a regular rotation in the baking schedule.

I have seen the recipe two ways, one is where you roll the dough directly in sugar, and this way- where you dip the dough ball in egg white first, then sugar. I do it this way, because I love the crackle the egg white finish gives to the cookie when you smoosh the kiss in. (Smoosh is a word, right?)

No matter the condition of the recipe card, the cookies are delicious and the words remind me of the student who sat in my classroom so many years ago. She’s a momma now, no doubt making these cookies for her little boy too.

In this week of being thankful for so many, I am so happy that this mindset of gratitude is something I embraced so many years ago. We treat each day as a gift. Which is what it is. When I see a post from six years ago, I realize the a gratitude mindset has been the healthiest part of my life. It makes you realize all that you do have, and see the world through a much different lens. So, make these cookies, and be thankful.

I hope you enjoy this recipe, and as always, thank you for coming to the table!
Chrissy

Print

Peanut Blossom Cookies

Print Recipe

Peanut Butter Cookies with a Hershey Kiss Center

  • Author: chrissy@mythankfultable.com

Ingredients

Scale
  • 1/2 Cup Shortening
  • 1/2 Cup Peanut Butter
  • 1/2 Cup Sugar
  • 1/2 Cup Dark Brown Sugar
  • 1 Egg
  • 2 Tablespoons Milk
  • 1 Teaspoon Vanilla
  • 1 3/4 Cups Flour
  • 1 Teaspoon Baking Soda
  • 1/2 Teaspoon Salt
  • Egg White (for rolling before rolling in sugar)
  • 1 Bag of Hershey’s kisses, unwrapped

Instructions

  1. Cream together shortening and peanut butter.
  2. Add in sugars until light and fluffy
  3. Add Egg and vanilla and combine.
  4. Add two teaspoons of milk.
  5. Add dry ingredients and gradually mix.
  6. Dough can be refrigerated or used immediately. If you choose to chill, chill for two hours or overnight.
  7. Shape dough into balls.
  8. Dip dough balls into egg white, then roll in sugar. (You can skip egg white, but it gives the “crackle” finish.
  9. Bake at 325* for 10-12 minutes.
  10. Remove from oven and place Hershey kiss directly in the center, squishing down the middle and causing the cookie to “crackle.”

Did you make this recipe?

Share a photo and tag us — we can't wait to see what you've made!


Posted in: Cookies, Recipes Tagged: Cookie, dessert, Hershey kiss cookies, peanut blossom cookies, peanut butter cookies

Sorry Not Sorry Bars

October 7, 2017 by chrissy@mythankfultable.com
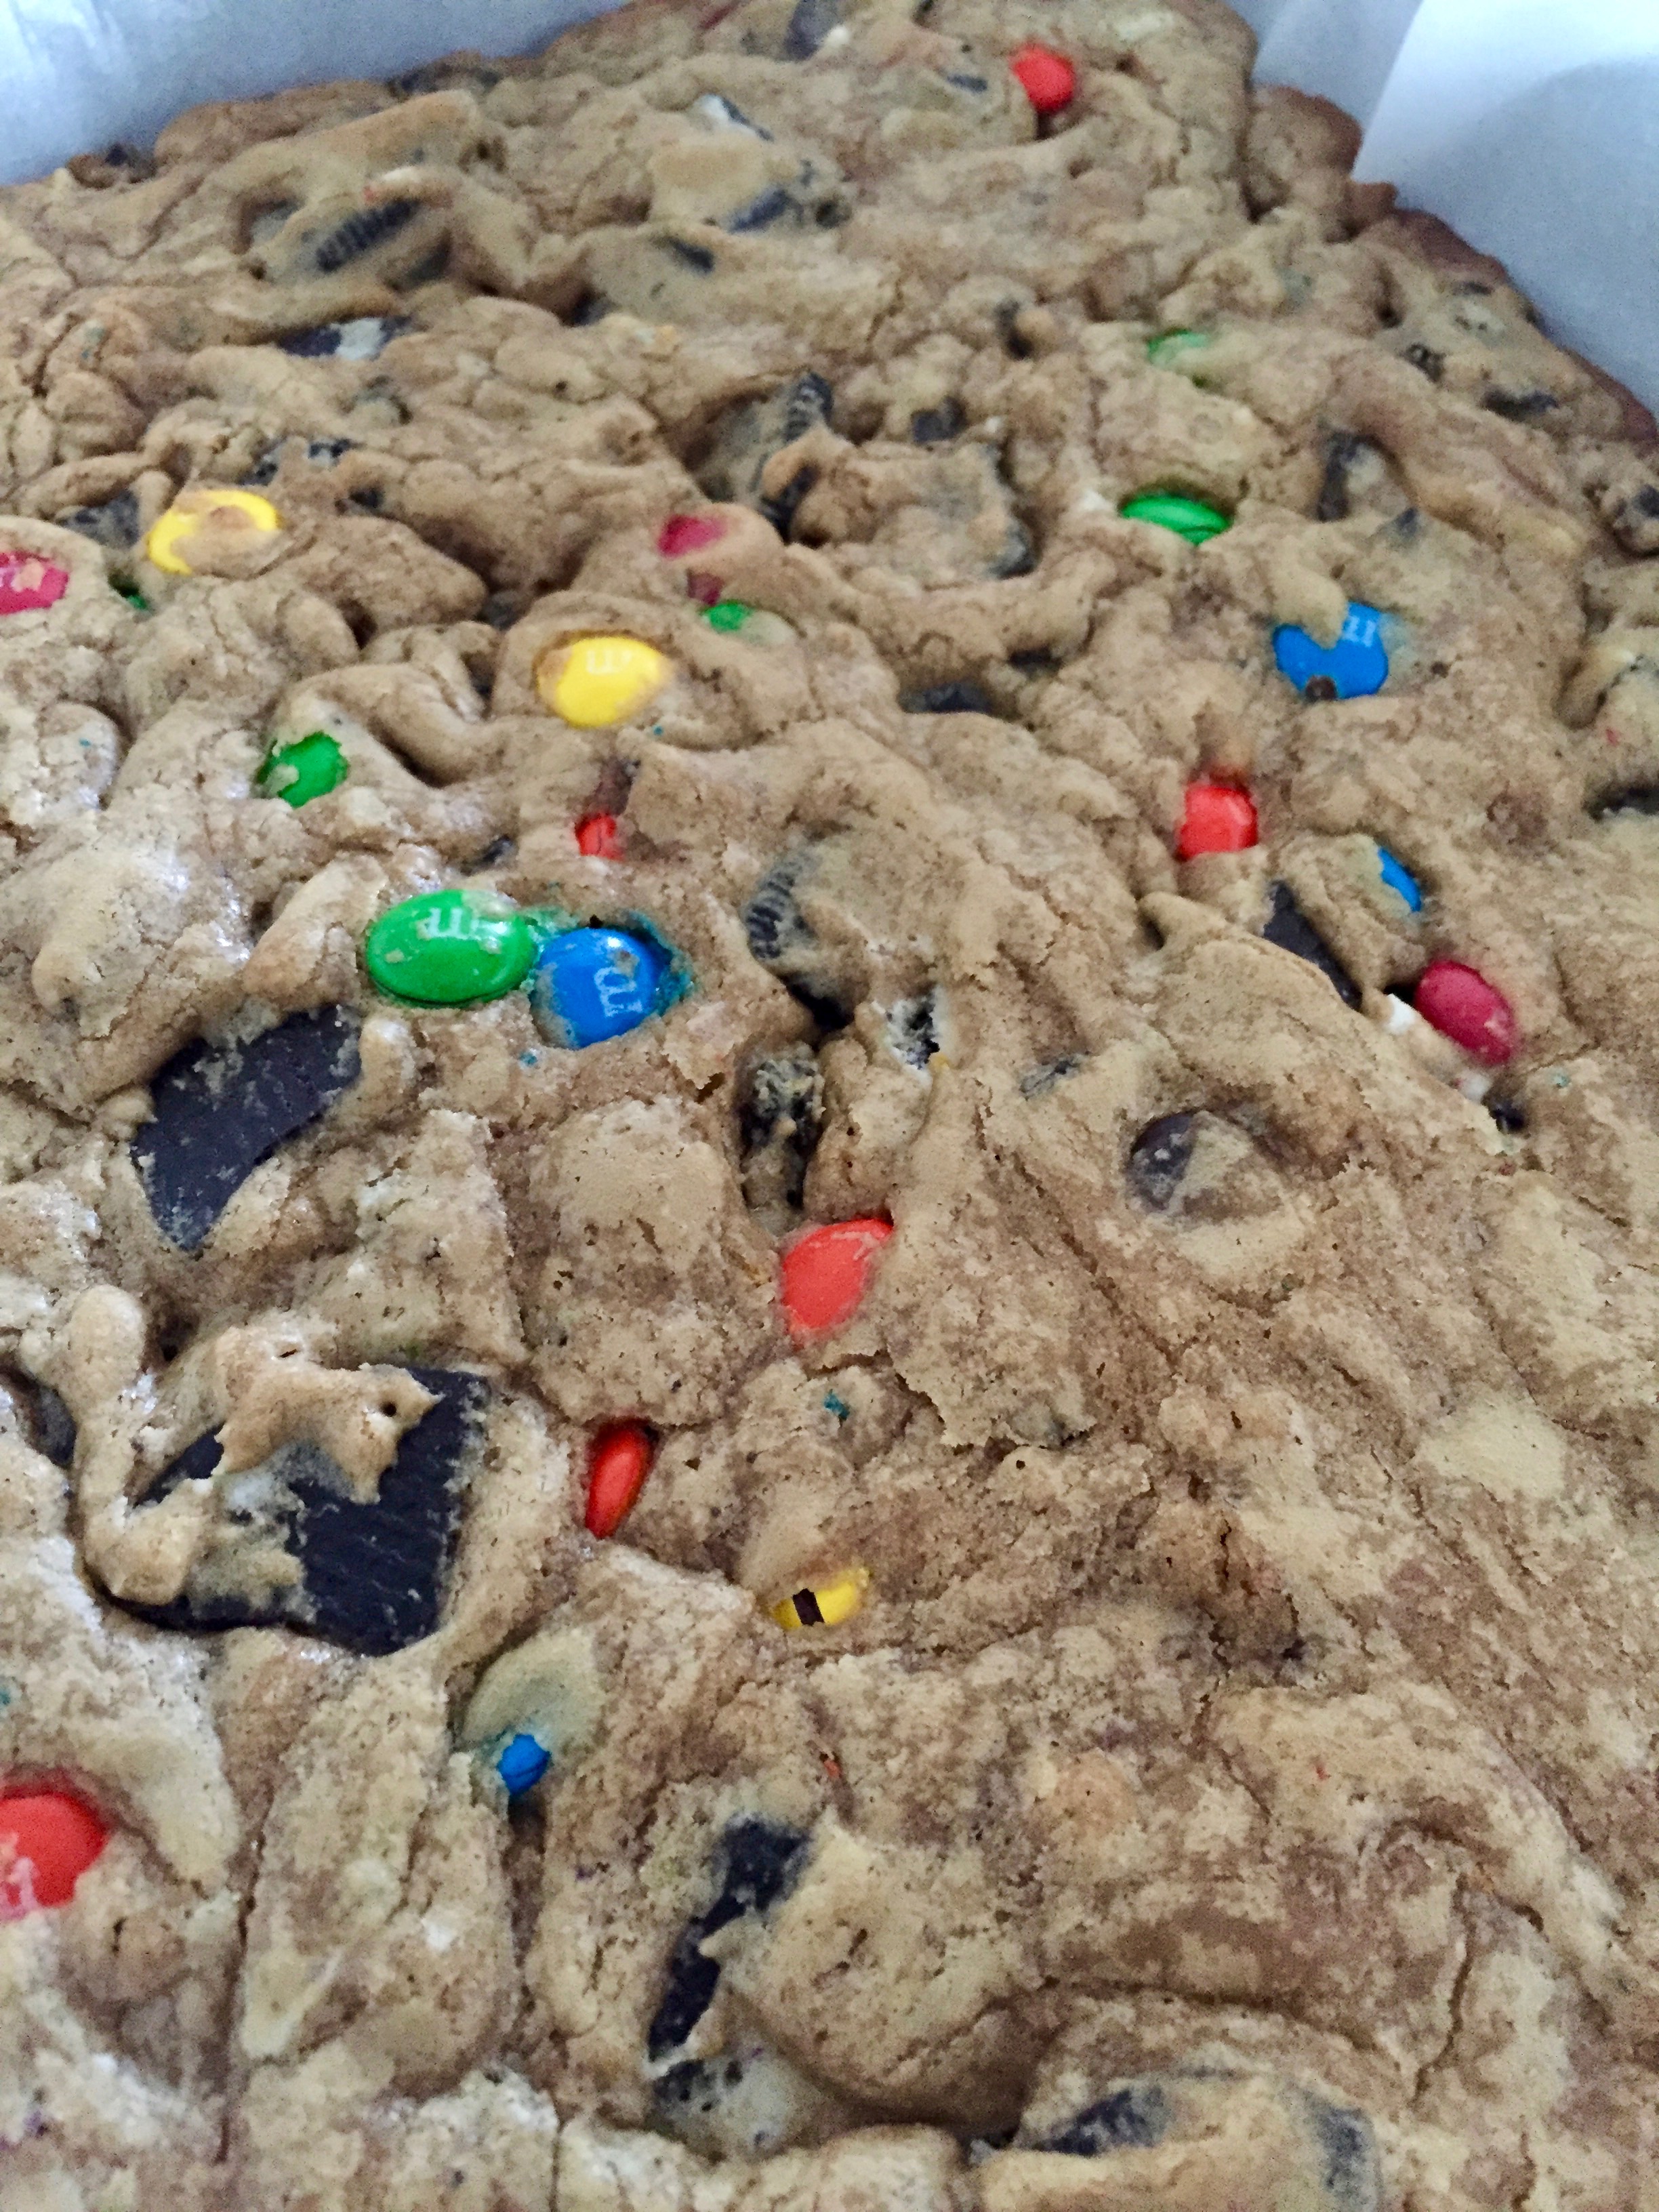
Blondies with crushed Oreos and M&M Candies

Sorry Not Sorry Bars

I have fallen in love with the game of Field Hockey.

Mostly because my daughter has fallen in love with the game of Field Hockey.

I’ve gotten to be a sideline watcher mom, an almost coach mom, a real coach mom (who assisted with the ice packs and hydration and drills- not any real hard core stuff) and now, I am back to watching…and cutting ribbons, supporting boosters, and PACKING THE SNACK BOX.

My inner mom waged war with this idea. A post game snack should be rich in vitamins and nutrients. I KNOW those young bodies need not Oreos and M&Ms. I do. They wear small sizes and burn a lot of calories and CAN eat this treat, but SHOULD they? No.

Crushed Oreos

Crushed Oreos

Peer pressure can be cruel. I fell into the trap to be the cool mom who made the treats that fall on the less than healthy scale. I ply myself with ideas like, they ate these after the game and it was late, and they were bonding over sugar. They ran hard, won the game, and the calories won’t affect them like they would my old self.

Oh well. Sorry, not sorry.

These are a basic blondie with a whole lot of extra thrown in. Crushed Oreos and M&M’s made my cut, only because I couldn’t find a chocolate covered pretzel I liked and I didn’t want to over kill this recipe- but really, you can throw the kitchen sink in here. Whatever floats your boat. I used regular M&M’s but the last time I checked there were at least ten different flavors (Hello Caramel?? Can’t have within reach of my arms) so you could really have at it.

It is NOT a healthy snack. It isn’t even close. So if you make it, go all in. I saw this original recipe on www.averiecooks.com, and made the batch larger to feed my team. The Snack Box is a serious endeavor. I wanted extra. We don’t skimp at our house when it comes to servings. It’s an Italian thing. Or, maybe it’s a foodie thing.

Sorry Not Sorry Bars

This batter mixes up quickly, and bakes quickly as well. There isn’t baking soda or powder in the recipe, and it makes up two rectangular pans, making twenty four good sized squares. Perfect for a team or for a dessert tray at a function.

In any event, the team determined it was a great snack, and the box came back empty, so I consider that a good sign. I’ll take it. I may not be shouting instructions from the sidelines, but I can get my love in through the baked goods I supply. We all have our strengths.

I hope you enjoy this recipe, and as always, thank you for coming to the table!

Click below for a printable recipe!

Print

Sorry Not Sorry Bars

Blondies with crushed Oreos and M&M Candies
Print Recipe

Rich buttery blondie bar filled with Oreos and M&M’s Recipe originally found on www.averiecooks.com

This batch will fill two large rectangular pans- yielding 24 good sized bars. Perfect for the team!

  • Author: chrissy@mythankfultable.com

Ingredients

Scale
  • 1 and 1/2 C Melted Butter (Three Sticks)
  • 3 Cups packed Dark Brown Sugar
  • 3 Eggs
  • 3 Tablespoons Vanilla
  • 1 Package Oreos of Choice – crushed into bite size pieces
  • 1 Share Size Bag (2 Cups) M&M’s of Choice…so many to choose!
  • 3 Cups Flour

You can add any assortment of add-ins at this point. Think Go-Big-Or-Go-Home


Instructions

  1. Pre-Heat oven to 350*
  2. Line and spray/grease two 9×11 Pans with parchment paper.
  3. Melt Butter and combine in a mixer with Dark Brown Sugar until smooth and incorporated.
  4. Add Vanilla, Eggs, and combine.
  5. Add flour slowly to incorporate.
  6. Fold in all the other goodies (M&M’s, Oreos, Chocolate covered Pretzels, etc)
  7. Divide batter between two pans, smoothing out to edges gently.
  8. Bake for 20-25 minutes. These cook up quickly so keep an eye on them!
  9. Allow to cool completely before cutting.

Did you make this recipe?

Share a photo and tag us — we can't wait to see what you've made!


Posted in: Cookies, Dessert, Recipes Tagged: Bar Cookie, Blonde Brownies, Blondies, dessert, M&M's, Mix Ins, Oreos, Team Snack Box Recipes

Apple Blueberry Crisp

October 5, 2017 by chrissy@mythankfultable.com

If Autumn had a smell, it would be a combination of apples and cinnamon. While I save my pumpkin spice love for dessert and coffee, If I had to make a candle of the greatest hits of fall smells, cinnamon wins the prize.

Apple Blueberry Crisp

We are still in the crossroads between summer and fall, with put-your-socks-on-it’s cold mornings, warm sunny afternoons, and “Did you bring your sweatshirt to the game?” evenings.

Yards display a combination of plants ready to pull up, and the marigolds which are nothing short of spectacular color wise. (Though, a marigold will never be a candle of choice in my world. No thank you.)

I am hankering to pick apples this weekend, weather permitting, and yet, I still have blueberries in the freezer. What’s a girl to do?

Last weekend we made stroganoff (recipe to come soon) and in the cool night air after supper, my kids said, “Too bad you didn’t make apple crisp. It’s a good night for it.” Sigh. Missed opportunity, but hey, I made stroganoff. so, there ya go.

Which brings me to this recipe. I have never used Gluten Free Oats, I found these at Trader Joe’s actually for another recipe (coming soon). I wanted to play with them, and here was my opportunity to make that apple crisp. But, with blueberries. I love blueberries, and after being at the Fair, where Apple Crisp is sold in the Vermont Building and Blueberry Pie in the Maine building, it made sense. Let’s mix those two flavors and put an oat crisp topping on it!

A mixture of apples, blueberries, cinnamon and sugar nestled in a ceramic baking dish that has been buttered, cinnamon and sugared, then baked for 25 minutes in the oven, without the topping.

If I were a Rhianna song, I would say my dessert is Nakey-nakey-nakey. But only for half of the baking. I like my apples to be soft but not mush. I always find that if I time the crisp based on the topping, the bottom layer is undercooked.

Apple Blueberry Mixture

That is a personal taste thing. So, I bake the fruit layer first, then add the top crisp layer, and cook for the remaining time. The crisp gets crunchy and brown, the fruit bubbles underneath. Perfection.

The best part of a fruit crisp for me is the combination of the warm spicy compote and the crunchy top layer, complimented with a cold, creamy ice cream topper.

Apple Blueberry Crisp

However, when you finally do bake the crisp and look in the freezer and find…mini ice cream sandwiches, you make due. The fourteen year old wonder that is my daughter took the time to take the chocolate sandwich part off, and place the perfect square of less than perfect vanilla ice cream on top. Well done kid, well done. That’s why you are my favorite (her brother doesn’t read the blog-he knows he’s my favorite too).

While this recipe is definitely is different, it isn’t so out of the box that it I couldn’t share it. I loved the way the oats did not get soggy, and added a nutty flavor to the crisp. Even the next day, the crisp held it’s crunch, and that says something.  Cinnamon, Brown Sugar, Oats, Blueberries, Apples, baked together to make a wonderful fall dessert, even if it was a day late.

I hope you enjoy this recipe, and as always, thank you for coming to the table!

Chrissy

Click below for a printable recipe!

Print

Apple Blueberry Crisp

Print Recipe

A combination of fruit with a gluten free oatmeal crisp topping!

  • Author: chrissy@mythankfultable.com

Ingredients

Scale
  • 3 Granny Smith Apples, peeled and sliced
  • 3 Macoun Apples, peeled and sliced
  • 2 Cups Blueberries – Fresh or Frozen
  • 1/3 Cup Dark Brown Sugar
  • 2 Tablespoons Cinnamon
  • 3 Tablespoons Butter

Oatmeal Crisp Topping

  1.  1 and 1/2 Cups Gluten Free Oats
  2. 4–5 Tablespoons Butter
  3. 1/3 Cup Dark Brown Sugar
  4. 1 Tablespoon Cinnamon

Instructions

  1. Preheat oven to 350*
  2. Prep your baking dish by giving it a coat of butter, then mixing some brown sugar and cinnamon and coat the baking dish. Just like you would with flour only yummier.
  3. Peel and slice apples and combine with blueberries in a bowl.
  4. Add cinnamon and brown sugar for apple mixture.
  5. Place apple and blueberry mixture in baking dish and dot with butter.
  6. Bake for 25 minutes without topping.
  7. In a new bowl, combine oats, brown sugar, cinnamon, and butter, mixing until crumbly.
  8. Remove apple blueberry mixture from oven
  9. Place crisp topping on now hot apple blueberry mixture and return to oven
  10. Continue to bake for another 25 -35 minutes. Depending on how bubbly you want your bottom layer.

Did you make this recipe?

Share a photo and tag us — we can't wait to see what you've made!


Posted in: Dessert, My Story, Recipes Tagged: Apple, Apple Blueberry Crisp, Apple Crisp, blueberry, Crisp, dessert, Fall Dessert, gluten free oats

Salty Chocolate Chip Bars

September 18, 2017 by chrissy@mythankfultable.com

One of the best parts of having athletes for children, especially when you didn’t grow up an athlete, is the whole “team” concept. I am the mother of a Field Hockey  player and a Wrestler. They both do winter sports as well, but overall, those are the dominating sports in our home. Fortunately one ends, I have a few weeks, and the next begins. We are busy, we are on the move, but life is a gift.

Salty Chocolate Chip Bars

I love every minute. From early drop offs to all day sitting on a bench, I am thankful. Thankful for my children, thankful for their teams, thankful for the families we get to know and grow with as our kids train and play. We holler their names out when they succeed, and cheer them on when they need to hear “Good hustle!” or “Great endurance!” We do our parent thing.


Another wonderful part of being on a team is working together, providing snacks, helping out in the concession stand, ribbons for the team, supporting the fundraisers. Tomorrow, the team is helping out a family in need.

Salty Chocolate Chip Bars

Tomorrow the Field Hockey Team is having a fundraiser for a fellow student who was diagnosed with cancer. In addition to charging admission and opening up the concession stand, there will be a Bake Sale. So this week, all of the posts will be about baked goods for a cause. Today, we have Salty Chocolate Chip Bars.


If you ever thought about a big soft cookie with the shape of a brownie, chewy and buttery, with big chunks of chocolate, this is your dessert.

It is a one bowl, one pan mix with the addition of, you guessed it, salty on top.

This recipe can be made with Sea Salt Flakes, or freshly ground sea salt, but we have a sea salt allergy in my building, so when I make these for work, I use regular Kosher Salt. The combination of salt on top with the sweet of the cookie makes this the quintessential snack. In fact, it will be the snack I pack for the team when it is my game to host. They slice up nicely and the chunks of chocolate stay gooey. Who can say no?!

On our first day of Staff Professional Development, a pan of these made their way into the training, still warm from the oven. I took home an empty pan. That, to me, says it all.

Salty Chocolate Chip Bars

When a day spent in my kitchen brings smiles to people’s faces, my heart is happy. When I can add a fundraiser for a great cause to the mix, my heart is filled and overflowing. I’m hoping tomorrow there are no left overs, and a family in need is blessed.

I hope you enjoy this recipe, and as always, thank you for coming to the table!

Chrissy

(click below for printable recipe)


Print

Salty Chocolate Chunk Bars

Print Recipe

Delicious combination of sweet and salty.

  • Author: chrissy@mythankfultable.com

Ingredients

Scale
  • 3/4 C Softened Butter
  • 1/4 C Cream Cheese
  • 1 1/2 Packed Brown Sugar
  • 1/2 Tsp Kosher Salt
  • 1/2 Tsp Baking Soda
  • 1 1/2 Cup Cake Flour
  • 1 1/4 Cup AP Flour
  • 2 Large Eggs
  • 3 Tablespoons Vanilla Extract
  • 1 Package (approx. 2 Cups) Chocolate Chunks
  • Additional Kosher Salt for sprinkling

Instructions

  1. Line and prepare a 9 X 13″ cake pan with foil or parchment.
  2. Preheat oven to 350*
  3. Use either a hand held mixer or a stand mixer with paddle attachment.
  4. Cream together Butter and Cream Cheese, add Brown Sugar.
  5. Add Salt, Baking Soda, and Beat until combined.
  6. Add Eggs and Vanilla.
  7. Add Flour(s) until combined.
  8. Fold in Chocolate Chunks.
  9. Turn mixture out into prepared pan and smooth until flattened and even.
  10. Bake 20 minutes, until tester in center comes out clean.
  11. Sprinkle Kosher salt as soon as bars come out of oven.
  12. Cut into bars. (Wait for a few minutes before you devour them)!

Notes

You can use Sea Salt Flakes in this recipe, but for school we do Sea Salt Free (That’s what you do when your friend is allergic)!

Did you make this recipe?

Share a photo and tag us — we can't wait to see what you've made!

Posted in: Dessert, Recipes Tagged: Chocolate Chip, Cookie Bars, dessert, Salty, Salty Chocolate Chip Bars, Sweet

Peachy Peach Cobbler

August 30, 2017 by chrissy@mythankfultable.com


My love for Farmer’s Markets knows no end. I’m serious. Where some girls love the mall, you will find me with my reusable bag in hand, cash in my wallet, at least one child, and sometimes the dog. Oh, and my phone camera is on, because I am enchanted by bins of melons or stacks of radishes. I will be snapping pics as I go. At one point, I had a Farmer’s Market crush on the bread truck man. It could have been the chewy molasses cookies or the almond croissants he sold. I may be that shallow.

Why is a pile of beets or bags of freshly picked greens so alluring? I love the idea of local farmers and artisans selling directly, the camaraderie of the people shopping, supporting organic produce, and the fact that rain or shine, the sky is overhead and you get to know the people from whom you are purchasing your ingredients.

There are days I make Target runs. I also go to my grocery store, often. I have yet to be romanced by an end cap and florescent lighting like I am the vegetable laden table under a tent.

Anyways…this week one of the farmer’s market in my area (yes, I frequent several) had peaches. Fresh, locally grown peaches. White and Yellow. I needed both. The farmer told me not to eat them the day I purchased them, but within two days they would be perfection. They were. Peaches on salad, peaches in oatmeal, peaches next to my sandwich, and yes. Two desserts. I made a Peach Galette and this Peachy Peach Cobbler. Peachy Peach, because I used both white and yellow peaches combined.

When it comes to cobbler I need two things: The fruit has to be cooked down before the topping is added so it is bubbly and beautiful at the same time the topping is finished – AND – the topping can’t be biscuit like, nor crisp like. (We get enough crisp in the fall with apples).

So my dilemma. Can I make a topping that had the best of both worlds? Light like a biscuit and crunchy like a crisp without being so Crumbly and heavy? I tried!

I started the topping like a dough, cutting in butter. I used a quick cook oats so it would absorb moisture and have density but not heavy crunch. And to make it light? A trick where you add Baking Powder and boiling water right at the end. The boiling water and powder fizz up and give the mixture a little bit of puff without making it like a biscuit.

Also, I used light brown sugar to match the peaches and give the topping a little more caramel feel.

Two baking times, pre topping and post topping resulted in the sweet juicy bottom and the perfect texture top to match. If I could change this again (and I will) I would play with the spices. I kept it simple to not overpower the peaches, but part of me wanted more cinnamon.

Serve this warm with the good vanilla ice cream, (or maybe cinnamon ice cream?) and enjoy. It’s really the perfect dessert for the end of August, and hey, now I have room to go buy more peaches at the next farmer’s market.

I hope you enjoy this recipe, and as always, thank you for coming to the table!

Chrissy

Print

Peachy Peach Cobbler

Print Recipe

Making use of fresh summer peaches with just the right amount of topping. Cobbler topping is right between a biscuit and crisp topping, matching the sweetness of the peaches for a delicious summer dessert!

  • Author: chrissy@mythankfultable.com

Ingredients

Scale

Peachy Peach Cobbler

Chrissy@mythankfultable.com

Filling:

  • 6 Cups Peaches (I used a combination of white and yellow peaches)
  • 1/3 Cup Light Brown Sugar
  • 1 tsp Cinnamon
  • Juice of one lemon


Crumb Topping:

  • 1 Cup AP Flour
  • ½ tsp salt
  • 1 Stick (8 TBSP) Butter (grated on box grater or cut into small cubes)
  • 3 TBSP Light Brown Sugar
  • 1 Tsp Vanilla
  • 1 Cup Quick Oats
  • 2 Tsp Baking Powder
  • 2–3 TBSP Boiling Water

Instructions


Preheat oven to 350*

Combine filling ingredients and place in baking dish. Bake for 30 minutes until peach filling cook and thicken.

Combine flour, salt, brown sugar. Cut in butter into dry ingredients. Add quick oats and baking powder and combine. Add in vanilla. Add boiling water and stir quickly until mixture is moistened and combined.

Sprinkle crumb topping on top of peaches and return to oven. Bake for another 30-35 minutes. Peach filling should bubble up through the crumble topping. Serve warm!

Did you make this recipe?

Share a photo and tag us — we can't wait to see what you've made!

Posted in: Dessert, Recipes Tagged: Cobbler, dessert, peach, Peach Cobbler

Peach Galette

August 26, 2017 by chrissy@mythankfultable.com

Nothing says, “I am an artisanal baker with a creative flair” like a galette. It’s baking snobbery, really. This elitist freeform pie with beautiful fruit filling bubbling to the surface. It’s ragged edges folded up just so. It brings dessert to a whole new level.

Except, if you have ever tried to roll out and fold a pie crust into a pie plate, then repeat the process over your filling…and pray it is enough…and get the top and bottom to match, then crimp edges, poke holes, etc.  you realize, a galette is really just a lazy man’s shortcut in the pie world.

A galette is actually quite brilliant because it makes a complicated process much easier, and makes you look smarter, and hey, who doesn’t want to be a show off when it comes to a fresh summer fruit dessert?

I saw a recipe on a post from smittenkitchen around the fourth of July for Star-shaped Red and Blue Berry Galettes for Independence Day. So pretty, so perfect…and the pastry dough had RICOTTA?! Say no more.

If there is such a thing as a food-spirit animal, or you’ve been asked what one thing would you bring to eat on a desert island if you could only have one food? It would be a hard question, but for me? Ricotta would win out.

Sure it wouldn’t be easy to keep on a desert island, and it doesn’t pack the nutritional value of broccoli. I’m aware. I also have no intention of being deserted on an island, so stay with me.

When you put ricotta into a crust, along with lemon zest, and fresh butter, it’s literally food porn. This dough rolled out so beautifully, and was flaky, pie crust perfection.

Now, I am a New England Girl- so I say Ga-Lette. Like Gi-llette stadium-yay Pats). I know this is wrong. But if you hear my voice when I am typing it, that’s how I am saying it. (It’s Ga-Lay in real life)

The beauty of a galette (is, you roll out the dough, place on a parchment lined baking sheet, scoop your beautiful filling on top in the center, and carefully fold up the edges.

This is not as difficult as you would think. Two reasons: 1. pinch with your fingers to make the dough go where you want it. You are the boss here.

2. “Bubbly fruit spillage is gross,” said no one ever.

Even if your perfect galette has one corner where the filling has bubbled over and made a fruity mess on the parchment, it kind of adds to the whole “I planned it to make my dessert look more free and artsy.” No one needs to know it was not on purpose.

My other go-to rule is I always pre-cook my filling. I hate HATE runny fruit filling. Such a disappointment. Sad little peaches and a puddle of peachy water. No thanks. It has to have a density to it before it goes in to the dough for me. It can only get better as it bakes. I’ve never pre-cooked my filling and ended up with a jam pie. It just hasn’t happened. So, take the extra step to make sure it turns out to be a hearty filling you can sink your teeth into.

Now, there are two schools on egg wash. Egg wash at the beginning or egg wash at the end. I’m an end times girl. I don’t want a dark brown pie crust and so my egg wash goes on right at the finish line of baking. Maybe 7-10 minutes before your end cooking time, pull the galette out of the oven, brush with egg wash, sprinkle with some sugar, and pop it back in to the oven.

I am going to say this…when you pull this amazing dessert out of the oven, bubbly, peachy, beautiful, you will want to break off just an edge piece to taste. I know. It’s just out there. But remember this, bubbly fruit filling is the same consistency of hot lava. It will burn you. Not that I know this from personal, ahem, experience. Just let it cool for a few.

On this day before I move up to a new age group check box (I hate those), I couldn’t think of a better way to celebrate than to share this beautiful summer dessert with you. After all, on my almost birthday, I can be a baking snob elitist, right?

I hope you enjoy this recipe, and as always, thank you for coming to the table!

Chrissy

Print

Peach Galette

Print Recipe

Make this beautiful free form tart using the summer’s fresh peaches! No one needs to know this perfect summer dessert is easier than pie!

  • Author: chrissy@mythankfultable.com
  • Method: Baking
  • Cuisine: Dessert

Ingredients

Scale


Crust:

  • 2 C AP Flour
  • ½ C Cake Flour
  • 1 tsp Salt
  • 4 TBSP Granulated Sugar
  • Zest of 1 Lemon
  • 16 TBSP Cold Butter, Grated
  • 1/2 C Ricotta
  • 3 – 4 TBSP Ice Water


Filling:

  • 4 Cups fresh, diced peaches (I used white and yellow)
  • 4 Tbsp Granulated sugar
  • 3 Tbsp Corn Starch
  • ½ tsp cinnamon
  • ½ Lemon (juiced)
  • pinch of salt


Egg Wash:

  • One egg, 1 TBSP water – blend


Instructions


For Crust, combine flours, salt, sugar, and zest together. Cut in butter, until mixture resembles sand. Add Ricotta, blend. Add ice water as needed until crust comes together. Wrap in plastic wrap and refrigerate at least 4 hours or overnight.


When ready to assemble galette, preheat oven to 400*


Place filling ingredients into a non-reactive pan and simmer on medium heat until thickened. Set aside.


Roll out crust on floured surface, place on parchment lined baking sheet. Place filling in center of crust dough, then carefully bring up sides of crust over the filling, leaving an open center for the filling to show.


Bake for 30 minutes at 400* until golden. I add the egg wash right before the galette is finished, for the final 7 minutes or so, then sprinkle additional sugar on top. You can do egg wash right at the beginning if you desire!

Did you make this recipe?

Share a photo and tag us — we can't wait to see what you've made!

Posted in: Dessert, Recipes Tagged: dessert, galette, peach, peach dessert, peach galette, ricotta pie crust dough
« Previous 1 2 3 4 Next »

Recipe Search

Recent Posts

  • Fluffernutter Cookies…You Heard Me April 12, 2024
  • On Nests July 30, 2023
  • Lemon Rosemary Shortbread Cookies April 24, 2022
  • Praline Sweet Potato Pie March 22, 2022
  • Italian Ricotta Cake March 13, 2022

Recent Comments

  • Cathy Carroll on To My Daughter On Her 18th Birthday
  • Maureen / Mimi on To My Daughter On Her 18th Birthday
  • Kathy G on To My Daughter On Her 18th Birthday
  • chrissy@mythankfultable.com on Cherry Crescent Moon Cookies and Finding the Joy
  • chrissy@mythankfultable.com on Cherry Crescent Moon Cookies and Finding the Joy

Archives

Categories

  • appetizer
  • bread
  • breakfast
  • Cookies
  • crockpot
  • crockpot
  • Dessert
  • Fruit
  • My Story
  • One Pan
  • Recipes
  • side dish
  • Side Dishes
  • soup
  • Vegan

Copyright © 2025 mythankfultable.com.

Lifestyle WordPress Theme by themehit.com