mythankfultable.com

Feeding the Heart, Body, and Family

  • My Pics
  • My Story
  • The Puppies
  • Contact Us
Feeding the Heart, Body, and Family

Recipes

Here is the recipe!

Easy Roasted Tomato Soup

August 12, 2017 by chrissy@mythankfultable.com

All year-long I wait for tomato season. Late in May I put my new baby tomato plants into the earth, with my crazy old-country rules like adding fish emulsion in the hole first, and tuck them in amongst marigolds and basil.  Faith to me is found in a garden. It takes a lot of faith and attentiveness to see the final product several weeks later, sun-kissed and glorious  on the vine.

Have I romanticized tomatoes a bit? No. My love for summer time tomatoes runs deep. They taste like sunshine feels. I plant as many varieties as I can, which means I end up with a medley of heirloom, Roma, beefsteak, and cherry tomatoes on hand. Therefore, any recipe I make is not tomato variety specific. They all work together in my kitchen.

Is there a better comfort food than a bowl of tomato soup and a grilled cheese sandwich? Any time of year, I find that a bowl of roasted tomato soup soothes the soul. It is healthy, and easy to make, and with the abundance of tomatoes, makes good use of fresh ingredients. It also freezes! So make a batch and save it for a rainy day. In New England, it’s cold from September to May, so there’s plenty of “soup” days.

Now, when I say making this soup is easy, I don’t mean pop off the lid of the can or even remove the tab off the container and pour easy, but as far as soup is concerned, this is fairly simple. You slice your tomatoes, peel some garlic, arrange on a sheet pan, drizzle with olive oil, sea salt, and pepper. Roast. Blend with broth. Add your extras (heavy cream, cheese, etc.) if you want – but you won’t need them, and enjoy. The finished product is so much better than anything you could imagine, and if you have the tomatoes…

For this recipe, I use whatever tomatoes I have in my garden. But, this could be made with just one type of tomato. If you have to commit I say go with Roma, because they are just beautiful and fleshy. The beauty of the flavor for this recipe is in the roasting. I filled two parchment lined cookie sheets with tomato halves, and placed them cut side down. I also used a whole head of garlic which was peeled (you can usually purchase garlic pre peeled in your produce section if this is too time consuming). and interspersed the garlic with the tomatoes. Drizzle with olive oil. Now, spices you can embellish, I go for simple. Then roast. 350* for as long as it takes for the skin to brown and bubble. I love the carmelization

that takes place. So. Good. At this point you could just eat the tomatoes as is on top of ricotta toast, on a salad, with quinoa.  But these are for soup! So transfer those beauties into the blending device of your choice.

Oven Roasted Tomatoes with Olive Oil, Sea Salt, and Cracked Pepper

I add chicken stock, but if you want to keep this vegetarian or vegan, vegetable stock will work as well. I used one container of good chicken stock I purchased did not make myself. If you have a container of home-made stock on hand, have at it. You can add fresh basil or any other spice you like at this point as well.

Using an immersion blender, food processor, or even a blender, combine tomatoes and stock until well blended. When I am done blending there are no visible seeds or huge chunks of tomato, I just puree it until it is smooth.

At this point, your soup is ready to go. If you want to get fancy you an add cream or milk, or grated cheese. Croutons or grilled cheese sandwiches are also welcome. For this batch, I had purchased cheese curds from a local dairy farm, and they were sprinkled on top with some fresh basil to finish the dish.

We are so fortunate at this time of year to enjoy the abundance of our local farmers, this soup really celebrates the beauty of fresh tomatoes that you can!

I hope you enjoy this recipe, and as always, thank you for coming to the table!

Chrissy

Printable Recipe

Easy Roasted Tomato Soup

Easy Roasted Tomato Soup

By Chrissy@mythankfultable.com

Ingredients:

Fresh tomatoes (I use enough to fill two large cookie sheets when halved)

One head of garlic

Olive oil, to drizzle

Sea salt

Pepper

One large container of stock of your choice (chicken or vegetable)


Directions:

Slice tomatoes in half, and place, cut side down, onto parchment lined cookie sheet

Peel garlic and place amongst tomatoes

Drizzle with olive oil, sea salt, and fresh cracked pepper


Bake at 350* for 50 minutes or more, until tomatoes are roasted and caramelized.

Place roasted tomatoes and garlic in food processor or in stock pot with stock of choice, and blend (I use the immersion blender)

Blend until smooth.


Add milk, cream, cheese, additional herbs to taste if desired.
Posted in: Recipes, soup Tagged: easy supper, roasted tomatoes, soup, tomato, tomato soup

Triple Chocolate Chunk Bread Pudding

August 12, 2017 by chrissy@mythankfultable.com

Coastal Maine is my happy place. For so many reasons, Maine holds my heart. This year we rented a house in Wells, and reveled in all of the goodness that comes with a quiet week near the ocean.

One of the “Bucket List” items for us is stopping at the When Pigs Fly Bakery in Kittery. They have large beautiful displays of artisan breads as well as classic breads, olive oils, baked goods, and pizza. For us, we always end up with at least two loaves: Orange, Toasted Walnut, and Cranberry Bread, and of course, Chocolate Bread. Oh yes, it’s a thing. If you ever get the chance, you need to go. If you don’t think Maine is in your future- not to worry…they have an online store and ship their products!  www.sendbread.com

Bread is an indulgence for me. Chocolate Bread? You get the picture. So, when we are left with almost a whole loaf, it’s not going stale, it’s going to be transformed into something next level.

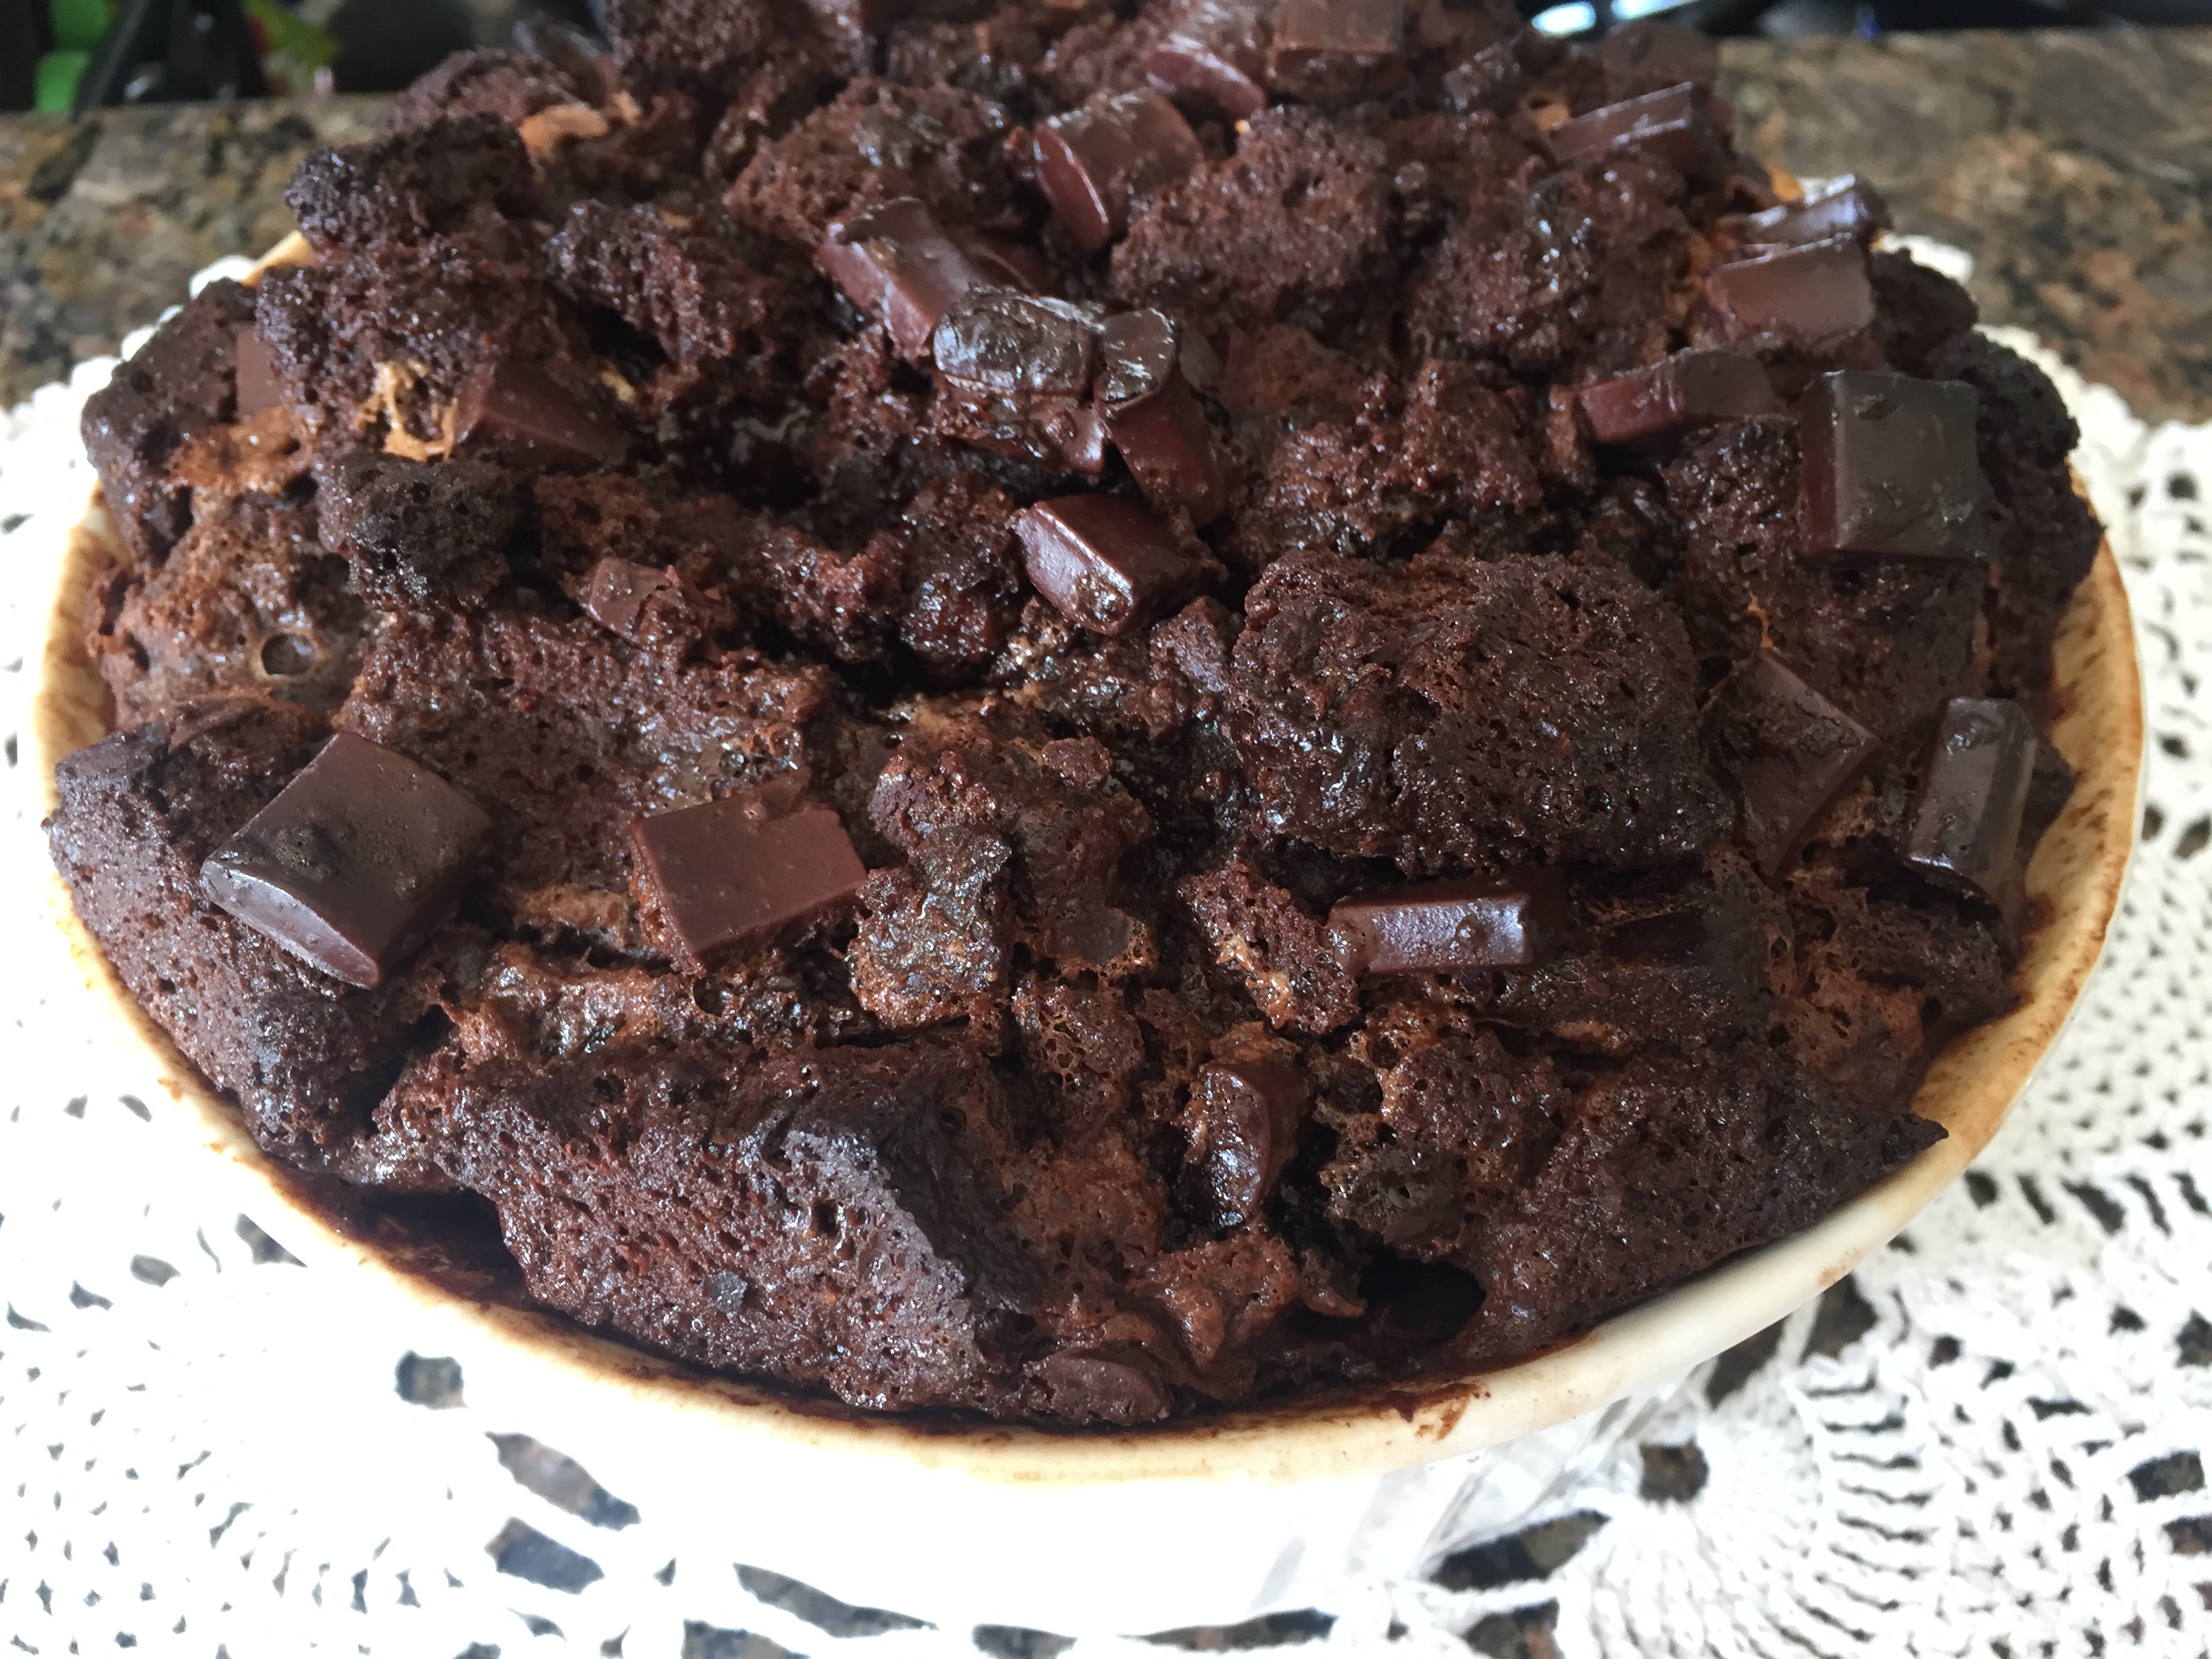
This Triple Chocolate Chunk Bread Pudding is a chocolate bread, with a chocolate custard, and chocolate chunks for good measure. Yep, that’ll do.

To make this bread pudding I did three things that I think impacted the end product:

  1. I let the cubed bread dry out overnight.
  2. I let the bread cubes sit in the custard to soak it up really well for 30 minutes before baking.
  3. I cooked it for a base time and then added increments of ten minutes until it was set.

All three things made a perfect storm for the perfect dessert. Another thing I tried and loved was in the prep of the casserole dish. Instead of adding cinnamon to the actual recipe, I used a combination of cocoa and cinnamon to coat the inside of the dish after buttering it. It was just enough.

You can eat this right out of the oven (or wait a while). It’s even good the next day if it lasts that long. Top it with fresh whipped cream (or even the kind from the can…I won’t tell).

Thank you for coming to the table!

Chrissy


Print

Triple Chocolate Chunk Bread Pudding

Print Recipe

Decadent chocolate bread pudding made with three layers of chocolate. Chocolate bread, chocolate custard, and chocolate chunks! Served warm with fresh whipped cream or the next day cold, it’s indulgent and delicious.

  • Author: chrissy@mythankfultable.com
  • Cook Time: 45-60 Minutes
  • Total Time: 13 minute
  • Method: Baking
  • Cuisine: Dessert

Ingredients

Scale

One loaf Chocolate Bread, cubed and dried out

5 Eggs

2 Cups Heavy Cream

1 TBSP Vanilla

1/3 C Dutch Processed Cocoa

2/3 C Light Brown Sugar

1 Cup Chocolate Chunks

1 TBSP Butter (softened) to coat Casserole Dish

2 TBSP Cinnamon and Cocoa to dust casserole dish after buttering

Instructions

Cut up bread into cubes and set out to dry.

Combine eggs, cream, vanilla, cocoa, and light brown sugar together until combined.

Toss bread into the mixture and coat. Let sit together for a minimum of thirty minutes so the bread gets saturated. Add the chocolate chunks (of your choice) to the mix and get ready to bake this chocolate goodness.

Use 1 TBSP butter (softened) to coat the inside of your casserole dish. I use a French White medium round dish for this recipe. Then dust the buttered dish with cinnamon and cocoa. Tap out remainder of powder and set aside.

When the bread and egg mixture are thoroughly combined, put into prepared casserole dish.

Bake at 350*

I baked this dessert for a base time of 45 minutes. However, when I checked on it, I decided to let it go another 10 minutes. Checked on it again and went another 10 minutes for 65 minutes total baking time. The thing about bread pudding is you want it cooked thoroughly. So take the time to test the center and make sure it is done. You don’t want it over cooked- so you need to find the sweet spot with this, pun intended.

Notes


I baked this dessert for a base time of 45 minutes. However, when I checked on it, I decided to let it go another 10 minutes. Checked on it again and went another 10 minutes for 65 minutes total baking time. The thing about bread pudding is you want it cooked thoroughly. So take the time to test the center and make sure it is done. You don’t want it over cooked- so you need to find the sweet spot with this, pun intended.

Did you make this recipe?

Share a photo and tag us — we can't wait to see what you've made!

Posted in: Recipes Tagged: bread pudding, chocolate, chocolate bread, chocolate chunk, dessert

Sweet and Spicy Peach Carnitas

August 10, 2017 by chrissy@mythankfultable.com

The beauty of the crockpot is one can throw everything in and walk away for hours, and have a meal ready to go. During the school year, when sports have us running from one practice to another, the crock pot enables us to have a healthy, warm supper in the midst of the busy.

Enter carnitas, a sweet and spicy pulled pork that has potential as is, in a tortilla, on top of a salad. Tender, hitting all of your palette, and versatile.

Something else that works about carnitas is the fact that you can pull it out of the crockpot, refrigerate it or freeze it, and when you are ready for it, place it on a sheet pan in the oven at 350* until it has those crispy edges. This would be a meal I crockpot on Sunday, then serve later on in the week when my creativity has waned.

Sweet and Spicy Peach Carnitas

For this recipe I am using boneless pork butt roast. I am not a fan of trimming or touching raw meat- but for the sake of this recipe, I did try to trim the excess fat off of the roast first, then tried it another time just putting the roast into the crock pot as it was…and essentially I did not notice a change in flavor or consistency. SO, for this gal, from now on the roast will be going in as is.

I made a nest in the bottom of the crock pot of fresh onions, red pepper, a few pepperoncini, and here’s the summer specialness… a local farm fresh diced peach. You can add more if it suits you, the peach texture gets soft and lost into the juices but the flavor adds just that right amount of sweetness.

Place the roast on top of the fresh peach and vegetables, add your spices, and turn that crock pot on. I take the low and slow road with crockpots. So it will cook for at least six hours. When the roast falls apart and is easy to shred, it is done.

At this point, you can either throw the shredded pork into the oven to roast, or refrigerate. I save the peppers and onions to roast along with the meat in the oven, but again, that’s a personal choice.

Now to serve! I love mine with a salad and a fresh cabbage coleslaw to lighten the meal, and my daughter loves hers on a tortilla, with fresh avocado and sour cream. I don’t serve this meal like I would for a taco bar night, the toppings are simple. If I was being really good, I would make a fresh peach salsa to go with this meal.

With Fall closing in (August is like one long Sunday for teachers), I’m thankful for recipes like this, where simple and easy doesn’t mean drive-through or less than stellar suppers.

I hope you enjoy this recipe, and as always, thank you for coming to the table!

Chrissy

Printable Recipe

Sweet and Spicy Peach Carnitas

Sweet and Spicy Peach Carnitas

chrissy@mythankfultable.com

Ingredients:

4 Lb. Boneless Pork Butt Roast

1 Onion, sliced

1 Large, ripe peach

1 Red pepper, diced

1 tsp black pepper

1 ½ TBSP Ancho Chili powder

1 Tbsp. Adobo seasoning

Optional:

¼ C Barbecue Sauce of choice

2-3 dashes of hot sauce of choice


Directions:


Dice red pepper, peach, and slice onion, place in the bottom of the crock pot.

Add Boneless Pork Butt Roast

Cover with spices

Cook on high 4-5 hours and low 6-8 hours or until pork is cooked through and tender

Take roast out of crock pot and shred, using two forks or method of choice.

Refrigerate or freeze

When ready to serve, place shredded pork on cookie sheet and roast in the oven at 350* until warmed through and crispy on edges.

Posted in: crockpot, Recipes Tagged: boneless pork shoulder, carnitas, crock pot, peach, spicy

Coconut Chocolate Chunk Zucchini Bread

August 9, 2017 by chrissy@mythankfultable.com
www.mythankfultable.com

Coconut Chocolate Chunk Zucchini Bread

Have you ever had one of those recipes you can locate at anytime within a matter of seconds? You know, the tried and true and you almost don’t need the recipe but you keep an extra copy of it at arms reach just as a reference? For me, this is that recipe.

This started with an abundance of zuchinni more than a decade ago. We had a fantastic garden in Pennsylvania, as well as access to an amazing farmer’s market. While up to this point I was a zucchini evader (bring on the yellow squash all day…) I found myself growing and then harvesting, especially around this time of summer, an abundance of this green squash.

I am a veggie lover. I prefer “zoodles” to pasta at this point. We had created all sorts of healthy casseroles and zucchini lasagna, and yet…even after donating them to any who would take them, we still had more.

Here is where my life as a zucchini fan changed forever. A family recipe surfaced that included INSTANT PISTACHIO PUDDING, wait, and SHREDDED COCONUT? Squash drop. Sign me up.

Of course I added chocolate chunks. Because, hello? Chocolate chunks and steamy, beautiful bread work. If you are not a fan of coconut, I have to add that you really don’t notice it. I add coconut extract because I love coconut, but you can substitute it for vanilla extract as well. It doesn’t come across as one of those coconut cakes you see around Easter (which, I love, by the way). There is so much texture to the bread already, so I say, just try it. Worst case, you can give it away, and people WILL ask you for the recipe. Because, its that good.

This is a simple one bowl recipe the mixes quickly and easily. However, I must advise if for any reason you are a pre-measurer and want to get stuff done ahead, leave the pudding mix out until you are ready to go. Once upon a time I made zucchini bread with alien green chunks (apparently instant pudding will become pudding if say, there is any moisture at all present). It was good, but not as good.

The pistachio pudding makes the bread a little greener, but it also adds moisture and a nice flavor. I don’t always add additional walnuts to my bread, so the pistachio pudding gives it that nutty kick as well. You can substitute this flavor for vanilla or even chocolate if you feel festive. The bread mixture is versatile.

As for the zucchini, here’s where I do my thing. I like to use a fine grater for this. You can have your big chunkies of squash if you like it, but for me, a fine grate, and squeeze the moisture out. It just makes for me a more aesthetically pleasing bread.

Coconut Chocolate Chunk Zucchini Bread Mixture

You can make this recipe into two loaf pans, or as I do, in many smaller pans (then you have more to share). Either way, the recipe does take almost a full hour to bake, and trust me, you will want to slice into it as soon as it comes out of the oven. And hey, we need to taste the product before we give it away, am I right?

This bread freezes beautifully, so you can make a bunch of these breads and enjoy them later on, when the zucchinis in the super market are skinny and sad, and look road-travel weary. Some vegetables just taste better in the summer when they are fresh and local. Take advantage.

I hope you enjoy this recipe, and as always, thank you for coming to the table!

Chrissy

Coconut Chocolate Chunk Zuchinni Bread Finished Product

Print

Coconut Chocolate Chunk Zucchini Bread

Print Recipe

Deliciously moist zucchini bread with coconut and chocolate chunks! So fantastically

  • Author: chrissy@mythankfultable.com
  • Prep Time: 10 minutes
  • Cook Time: 50-60 minutes
  • Total Time: 23 minute
  • Yield: 2 loaves 1x
  • Category: Bread
  • Method: Baking

Ingredients

Scale
  • 3 Eggs
  • 1 C Oil
  • 2 C Sugar

Add:

  • 2 C Finely Grated Zucchini
  • 1 Tbsp Coconut Extract
  • 1 tsp Baking Soda
  • ¼ tsp Baking Powder
  • 1 tsp Salt
  • 3 C Flour
  • 1 Box instant Pistachio Pudding
  • ½ C Shredded Coconut
  • ½ C Chopped Walnuts
  • ½ – 1 C Chocolate Chunks


Instructions

Prepare two loaf pans, combine first three ingredients. Add remaining ingredients until combined. Pour batter into pans.

Bake at 350* for 50-60 minutes

Did you make this recipe?

Share a photo and tag us — we can't wait to see what you've made!


Posted in: My Story, Recipes Tagged: breakfast, chocolate chunk, coconut, coffee cake, zucchini bread, zuchinni

Lemon Zinger Blueberry Pie

August 8, 2017 by chrissy@mythankfultable.com

Lemon Zinger Blueberry Pie

For many years I was not a fan of pie. I am not sure how or why this is, but for most of my life, I would only eat pie on Thanksgiving.  You know, the holiday where eating pie for breakfast is perfectly acceptable? Then, there is the whole transition to fruit filled pie…I mean, Chocolate Bourbon Pecan or Pumpkin, I could sink my teeth into, but fruit? Meh.

Fast forward two decades and I have gotten in touch with my inner pie child.  It could be my first read of Martha Stewart’s Pies and Tarts Cookbook, could be the fact that I became the host of Thanksgiving, or that in the summer we have access to fresh berries, peaches, and then apples…anyway, game on. I’m converted.

But here’s the catch..Blueberry pie can disappoint. The filling can be gelatinous and have the consistency of “canned” filling…it also can be watery and soupy with berries hanging around in blue water. There is nothing worse than cutting into blueberry pie and the filling runs out; with the bottom crust left behind, pale and swimming in the pan. Its just bad. So bad.

This pie is the end result of my many bad blueberry pies before it…and I think this one finds the perfect consistency, or as close as I can get with my Jedi pie skills. This filling requires you to cook most of the berries with cornstarch and sugar, creating a thicker pie filling. Then, fresh uncooked berries are added to the mixture before placing into the pie shell. It seems like work, but essentially, you are putting ingredients into a pan and giving it a stir until it bubbles and looks delicious. I’m a multi-tasker but nature, so this is when I am doing something else in the kitchen. There is always something else to do in the kitchen, so take this extra step to cook the filling.

But, is it sweet?

I like my blueberry pie to taste like blueberries. So, this pie doesn’t have a lot of sugar in the recipe. There is 1/2 C of sugar for the whole pie. Like your pie sweeter? Easily fixed, add more sugar. I’ve seen pie recipes with 1 and 1/2 C sugar in them, so you have some fairly good room to wiggle here. This recipe also calls for lemon zest and lemon juice. The lemon compliments and enhances the tartness of the blueberries. Again, this influences the sweetness, so if you like a sweeter pie, by all means, add more sugar. The berries used in this pie were picked at the peak of the season, and were sweet enough on their own.

Lastly, the crust. So, true confession…for this pie I used refrigerated dough purchased at the grocery store. Don’t judge. When I make multiple pies or for a holiday, I bang out handmade crusts from Noni’s sacred recipe like nobody’s business. When I am throwing together a pie for my people on the fly, trust me, they are happy to have pie and just like instant mashed potatoes…sometimes nobody needs to know. When you take the time to freehand cut stars out of the pie crust, people aren’t thinking, “Man, I hope that didn’t come from the refrigerator section.” If you do have those kind of people in your life, rethink who you are sharing your blueberry pie with.

When it comes to baking time? Here’s something you will find with my recipes. YOU CAN’T RUSH STUFF. When it is done, you know. You may like your crust browner. Personally, when I can smell the filling, and it looks like it is bubbling and thick, coming up through the top layer of crust, I take it out of the oven. Disclaimer: You also can’t WALK AWAY AND FORGET! This is a fruit pie people. If you have ever let fruit filling bubble over onto the bottom of the oven, trust me, you’ll remember next time. For good measure, I place the biggest cookie sheet I own under the pie. Pie goes on the top rack, cookie sheet goes in the rack below. Drips caught, smoky kitchen averted.

This pie is perfect warm with a scoop of ice cream. Or with your coffee the next morning for breakfast. Hey, it has fruit, right?

Thank you so much for coming to the table!

Chrissy

Printable Recipe

Lemon Zinger Blueberry Pie

Lemon Zinger Blueberry Pie

Chrissy@mythankfultable.com

Ingredients:

4 C fresh blueberries

2 additional C blueberries

½ C Sugar

¼ C Cornstarch

1-2 Tbsp Lemon juice

Zest of one Lemon

Directions:

Combine in a non-reactive pan over medium heat until blueberries are bubbling and mixture thickens. Remove from heat. Let cool slightly.

Add additional 2 C of blueberries to the mixture and pour into prepared pie crust.

Add top layer pie crust – I free handed stars on the top crust.

Bake at 350* for 50 minutes. I ended up baking an additional 10 minutes, waiting for the crust to be golden brown and the mixture bubbling.

Posted in: Recipes Tagged: blueberry, blueberry pie, dessert, lemon, pie

Tomato Summer Salad

August 6, 2017 by chrissy@mythankfultable.com

Tomato Summer Salad

“Knowledge is knowing a tomato is a fruit. Wisdom is not putting it in a fruit salad.”  – Miles Kingston

Typically, this may be true. But THIS salad is not your traditional fruit salad. SO…color me wiser than wise.

In our part of New England, there is this fantastic cafe named Auntie Cathie’s Kitchen. She serves gluten-free pancakes the size of a platter…either filled with fresh blueberries and served with lemon glaze or chocolate chips or peaches…(and if you can eat the whole stack you get a groovy t-shirt). When she makes an omelette, it is light and fluffy and filled with fresh local ingredients. Have I mentioned the cupcakes??? So basically, if I can pick a place to have breakfast, I am there. If you live in western mass, you need to check it out. www.auntiecathies.com

This recipe is loosely based on a recipe she made, I have changed it to suit what is growing in my garden and what I have in my pantry, but essentially it is a summer fruit and vegetable salad that goes well with everything. It’s fantastic as it is for a main dish (It is a standard lunch around here). It is great served over quinoa, or fresh greens, as a side dish, you get the picture. It’s easy, it doesn’t require you to use the oven, and its healthy!!!

Would I have thought to mix peaches and tomatoes together normally? No, but at this time of year, when the tomatoes taste like the sunshine and fresh peaches are available locally, you would not believe how amazing this combination is. Throw in some cucumber slices, blueberries, and some fresh feta, drizzle with a vinaigrette of your choice, you are good to go. I personally love Lemon and Thyme Marinated Feta from Whole Foods, but any Feta will do! Don’t want to add cheese? You do your thing. Like Pete the Cat says, “It’s All Good.”

Thanks so much for coming to the table!

Chrissy

Tomato Summer Salad

Ingredients:

Tomatoes (you can use any beautiful tomato(es) you get your hands on)

1 Cucumber

1 Fresh Peach

1/2-1 C Blueberries

1/2 C Feta cheese

Vinaigrette Dressing:

White Balsamic Vinegar (I use Grapefruit White Balsamic Vinegar from Mainly Drizzle)

Olive Oil

Pink Himalayan Sea Salt – to taste

Fresh Ground Pepper – to taste


Directions:

Slice tomatoes and Cucumbers. Cube peach into small chunks. Combine with blueberries and feta cheese. Combine vinaigrette ingredients (I don’t actually measure- I just do two of the vinegar to one oil) Toss and serve!

Printable Recipes

Tomato Summer Salad


Posted in: Recipes Tagged: balsamic, blueberry, cucumber, feta, peach, summer salad, tomato

Pesto with Kale and Avocado Oil

August 3, 2017 by chrissy@mythankfultable.com

Pesto with Kale and Avocado Oil

This has been a bumper year for basil in my garden. I can’t explain it, because we have had a lot of rain, and days when we are wearing sweatshirts in July, but I am literally on my fourth or fifth batch of Pesto and there is more basil out there waiting to be picked…

Pesto is a beautiful sauce that I use on cheese tortellini, zuchinni “zoodles”, on top of salmon, even on an egg sandwich, you name it…if you are a fan of Pesto you can just about use it in ANYTHING. It is also an amazing way to hide some additional greens, such as spinach or kale.

So here’s where my typically hard core rule follower mindset goes off the path…when I make Pesto, I almost NEVER measure. I pick basil until I have “enough,” I use the leftover baby spinach I picked up at the market and used some for a salad…I drizzle in the oil until it “looks right.” UGH. Why did I choose this recipe to kick off my blog? Because I love it. Because it is versatile and both of my children eat it. Because it reminds me of my Dad, and he would be so proud to see me do this. So, I am making my best effort to give the quantities as I do them…and you too will amend it to suit your style.

Traditionally, I make this with a good olive oil, fresh garlic, Pignoli nuts, and Romano cheese. I choose Romano over Parmesean – it’s a personal choice. But here is the beauty of Pesto…If you want to substitute walnuts instead of pine nuts, avocado oil instead of olive oil…it changes-and yet, it doesn’t. Pesto is still this amazing vibrant green bold sauce whether my My mom makes it with no nuts and one garlic clove, or I throw in the whole head of garlic.

Have I mentioned it freezes? Oh yes, throw that miracle sauce into a container and pop it in the freezer. That Christmas party you need to make a side dish for? Just get yourself some frozen cheese tortellini, thaw that pesto, and yeah, you will impress. (Important to note- after freezing and heating up, the pesto does tend to lose the vibrancy, but not the flavor).

For this batch I switched out the oil and added frozen kale to the mix, and no one was the wiser. Here is a trick regarding Pesto I stick to- I don’t add the grated cheese until the entire sauce is combined and I am finished with the food processor. The cheese gets mixed in by hand at the end. I find this way, the heat of the processor doesn’t melt the cheese and make the sauce too oily.

Thank you for coming to the table!

Chrissy

Print

Pesto with Kale and Avocado Oil

Print Recipe

The perfect way to capture fresh basil and sneak in a few healthy ingredients!

  • Author: chrissy@mythankfultable.com

Ingredients

Scale


  • 4 Cups of Basil
  • 2 Cups frozen Kale
  • 1/2 – 3/4 C Pine (Pignoli) Nuts (depending on personal taste – my mom doesn’t
  • even use nuts in hers…)
  • 3 cloves of peeled Garlic (again, feel free to add more or less depending on taste)
  • 1/2 –1 Cup Avocado Oil, slowly drizzled until the right consistency
  • 2 C shredded Romano Cheese (Truth: I usually add more right before I serve it…don’t judge)


Instructions

Place basil, kale, garlic, and nuts into food processor (your food processor will be full), pulse and slowly drizzle oil into the mixture until all of the ingredients are combined.

I tend to like my pesto thicker- as it thins out when warmed up – but this recipe is all about what works for you.

Once the whole mixture is blended into a beautiful bright green sauce, empty out of the food processor and into a bowl. Using a rubber spatula, fold in the cheese until it is well combined. You want less cheese? More cheese? It is all good.

Serve over your favorite pasta, zoodle, use on top of salmon, or as a base for a fantastic pizza…the possibilities are endless.

Did you make this recipe?

Share a photo and tag us — we can't wait to see what you've made!


Posted in: Recipes Tagged: garlic, kale, pesto, romano, sauce
« Previous 1 2 3 4 5 … 8 9 10 11 12

Recipe Search

Recent Posts

  • Fluffernutter Cookies…You Heard Me April 12, 2024
  • On Nests July 30, 2023
  • Lemon Rosemary Shortbread Cookies April 24, 2022
  • Praline Sweet Potato Pie March 22, 2022
  • Italian Ricotta Cake March 13, 2022

Recent Comments

  • Cathy Carroll on To My Daughter On Her 18th Birthday
  • Maureen / Mimi on To My Daughter On Her 18th Birthday
  • Kathy G on To My Daughter On Her 18th Birthday
  • chrissy@mythankfultable.com on Cherry Crescent Moon Cookies and Finding the Joy
  • chrissy@mythankfultable.com on Cherry Crescent Moon Cookies and Finding the Joy

Archives

Categories

  • appetizer
  • bread
  • breakfast
  • Cookies
  • crockpot
  • crockpot
  • Dessert
  • Fruit
  • My Story
  • One Pan
  • Recipes
  • side dish
  • Side Dishes
  • soup
  • Vegan

Copyright © 2025 mythankfultable.com.

Lifestyle WordPress Theme by themehit.com