
Apple Picking
Apple picking. I’m a big fan of apple picking day in this #newenglandgirl’s life.
My family? They aren’t in love with it as much as I am.
That’s ok. I call it mandatory fun. I got that term from my PA friend, and it seems the perfect descriptor. You are required to go on this adventure. You are required to be present and subject yourself to your mother’s awkward selfies.

What awkward selfie?
My children do two things for me every year without complaint (OK, there may be complaining but they do it). They pose for photographs for our Christmas card (they love our photographer), and they go pick apples with their momma. They may have really loved it at one point, and now, they are just really good sports.

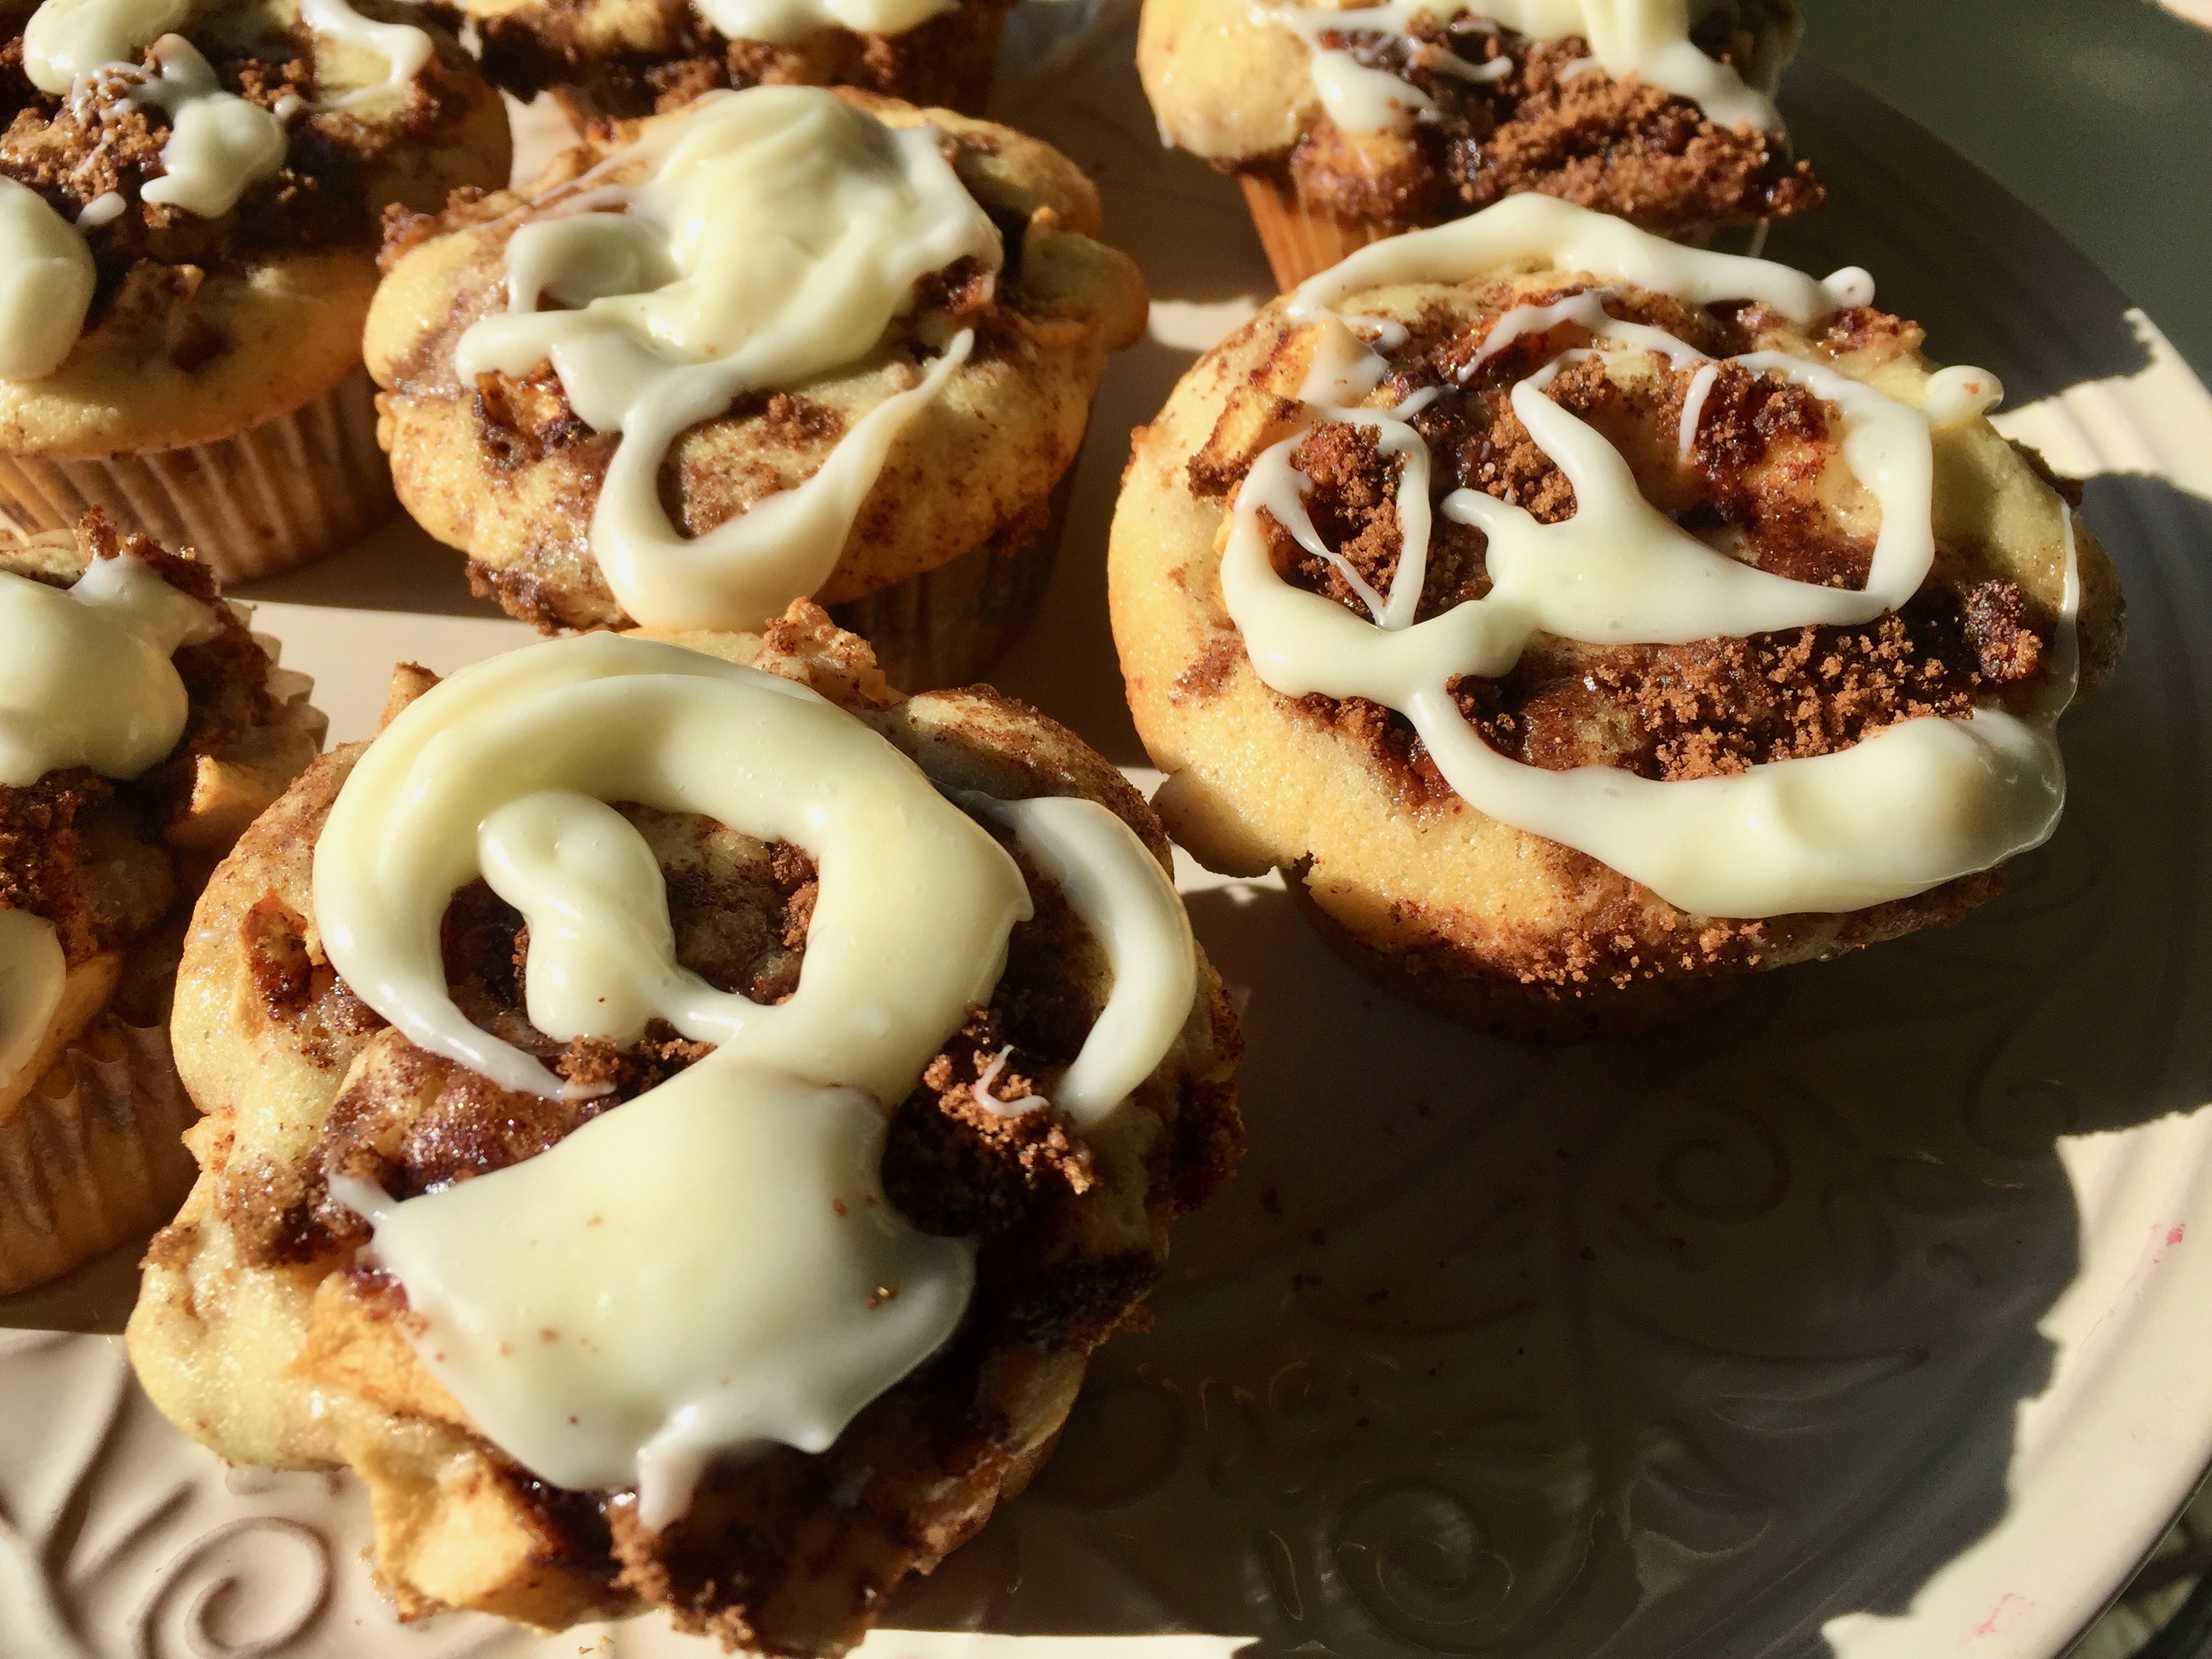
Cinnamon Apple Rolls with Cream Cheese Glaze
The bottom line is, this is one of the things I remember my mom and dad doing with my brother and I as children, and continued this tradition with their grandchildren. So we go.
My dad always said to pick the apples near the top. He said they were sweeter. So every year, I reach for the higher fruit and say “This one’s the sweetest, Dad!”
He should be there with us. It would be better if he was, but we go…and carry him in our hearts. He helps me spot the highest apples.
All that to say I am knee deep in apples and ever so happy. I am so glad I waited until October to post apple recipes. I kind of chafed at the bit waiting to do this recipe, but it is so worth the delayed gratification.

Cinnamon Filling
Cinnamon Apple Rolls. Oh. Yes. This is a bit of delayed gratification right here.
How?
Because technically, you start them the night before.
I know, I know, sounds like a lot of work.
It is more work than popping open that delicious dairy aisle can of cinnamon rolls, which have their place in this world.
However, it is done in simple steps, broken down between two days, and you can do this. The force is strong with you.
This starts with a yeast dough. A couple of packets of dry active yeast, some water, and some sugar will start the bloom. It is an amazing process, and I love the smell.

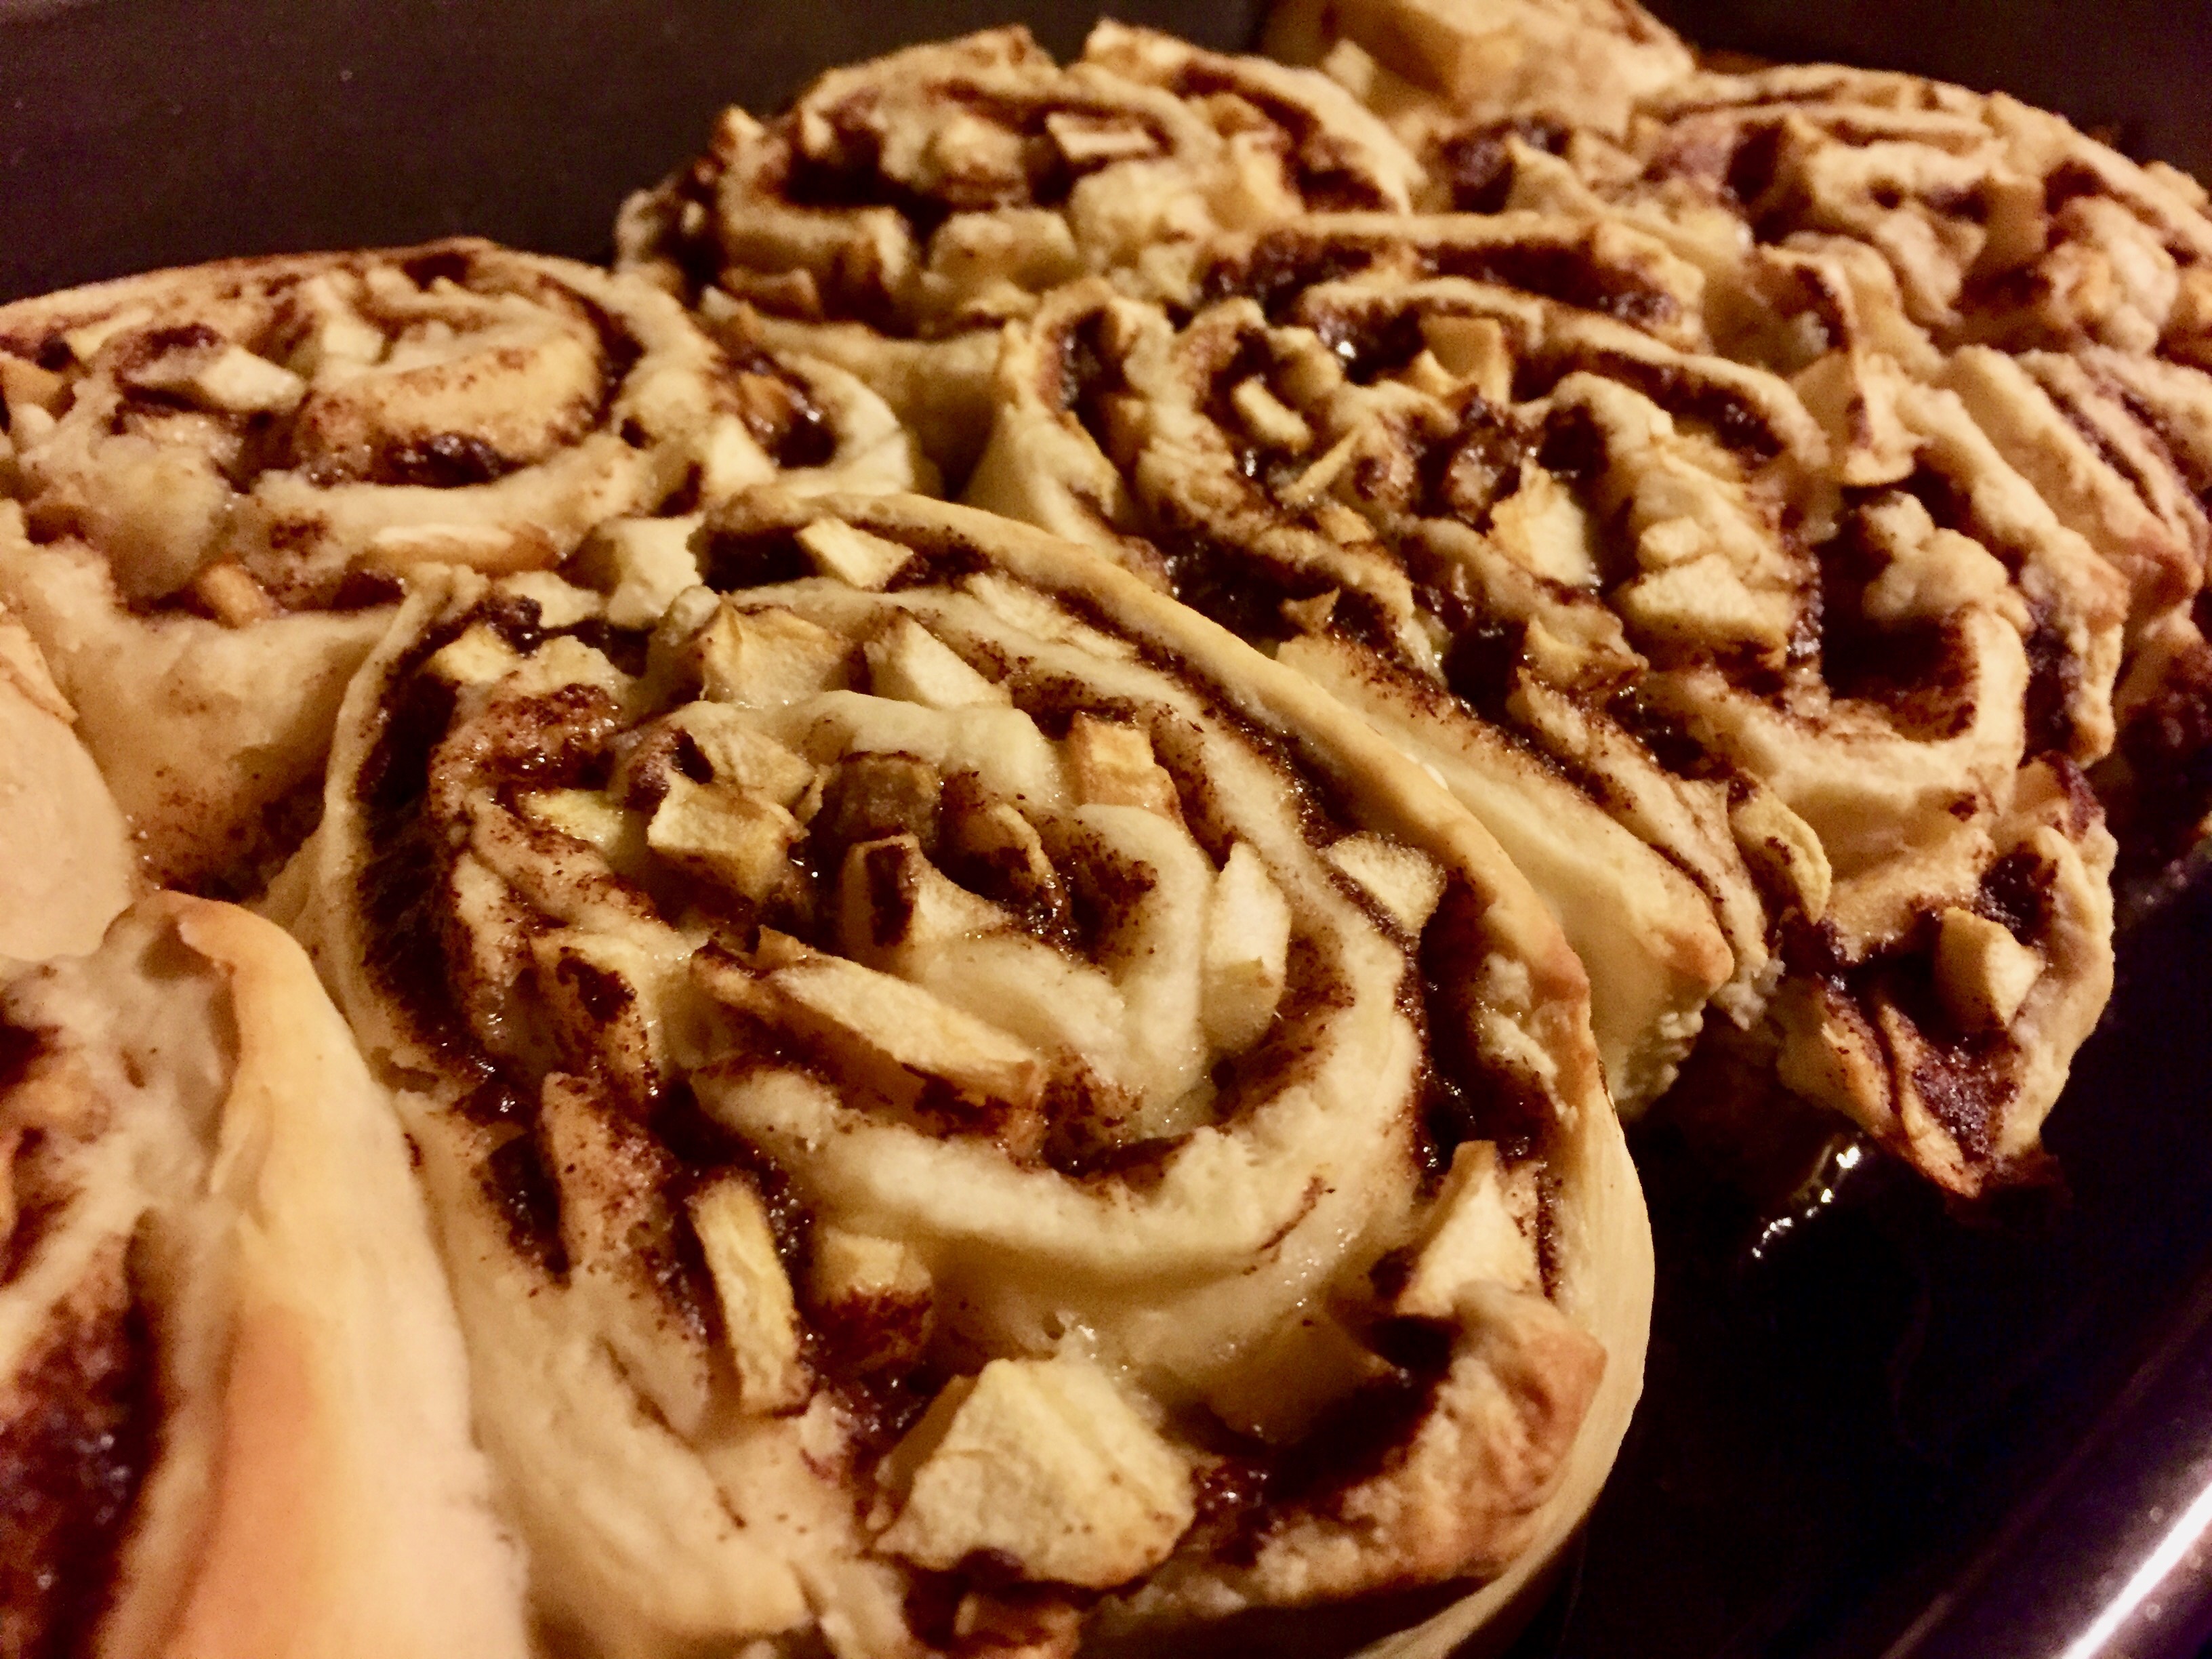
Apples and Cinnamon ready to be rolled!
I know, call me weird.
You mix your dough and let it rise in a warm place. Here is where you assess your home and think…Do I need weather stripping around the kitchen door? Is that a draft? Where is a warm place in my home in almost November?
In a separate bowl, make your buttery cinnamon and brown sugar mixture. Walk away.
Come back and roll the dough out. Spread your mixture on top and then wait….the apples. Oh this finely chopped special addition to this recipe…It is like a little bit chewy and a little bit tart and a little bit sweet. You can chop your apples at any point – I wait until right before I spread them the finely chop them up. Think – smaller than an apple pie chunk. Bigger than a dice of onion. Find your perfect apple size and move forward.

Apple Cinnamon Rolls Ready to Rest
Roll your dough, cut into slices or “rolls,” place in your baking pan and cover in the refrigerator to rest overnight.
Story time:
Once upon a lifetime ago when I was very pregnant with my son, I was traveling with a friend on a road trip. In the rest stop there was a cinnamon bun place. I hauled my large bellied body over to the counter. In addition to picking out the specific roll I wanted from the pan, I also had the audacity to ask the lovely woman behind the counter to scoop the extra glaze into the box. I had no shame. Fortunately for me, the server was gracious to the pregnant lady with a serious craving. I still can see that sugary box as perfect as it was today.
That friends, is the power of a cinnamon roll.
Ok, back to baking. That was essentially the hard part. The next morning you let them rise again, then finally, finish them off in a 350* oven.
I love the idea of waking up early, letting them rise, coming back in an hour, and then baking these up. You have to be present enough to turn your oven on. It is essentially the same thing as turning your coffee pot on. While you start your day, cinnamon roll magic is afoot.

Cinnamon Apple Rolls Waiting for Icing
The smell of Apple Cinnamon Rolls baking is nothing short of spectacular. It should be more than a candle scent. It should be what they pump into vents at schools to calm small children. Choirs should sing about it.
If it were perfume, I’d have a following of cinnamon roll lovers trailing behind me carrying their mugs of coffee like the cinnamon rolled pied piper.
But, I’ve gone off on a tangent, haven’t I?
While these darlings are baking, mix up your glaze, then get your schmear-er ready.
Then, fresh out of the oven, get-a-glazing. Watch that sexy frosting melt, and get out your plate, knife, and fork.
I would like to say these lasted. I would like to tell you they went untouched and that I wasn’t forced to bring them to school by my own conscience that made me because I can’t be trusted.
But, I can’t. I brought them to school. My school peeps need all the baked love I can bring them.
Closer to my heart was the fact that my son had eaten one while I was driving my daughter to school. I missed seeing him drive off, but I did catch the plate and fork he left in the sink. To me, that says, “Well done, momma.” It also says, “We need to have a talk about putting our first rinsed dishes into the dishwasher.”

Cinnamon Apple Rolls with Cream Cheese Glaze
I don’t make cinnamon rolls daily, or weekly, or even monthly. It is a special treat for a special day, and it is indulgent.
But on the morning after you pick a more than a bushel of apples…
And you have been thinking about how you’ve done this every year for as long as you can remember…
And how next year you aren’t promised another opportunity, because life is like that?
You make the apple cinnamon rolls.
Apple picking in and of itself is a gift of a day, isn’t it? It needs to be celebrated.
I hope you enjoy this recipe, and as always, thank you for coming to the table!
Chrissy
Click below for a printable recipe!
Print
Cinnamon Apple Rolls with Cream Cheese Glaze
Delicious overnight cinnamon rolls with a delicious addition of apples.
- Author: chrissy@mythankfultable.com
For the Yeast Dough:
- 2 Packets Dry Active Yeast (4.5 Teaspoons)
- 3–4 Tablespoons of warm water
- 2 Tablespoons of Sugar
- 1 Cup warmed milk
- 1/3 Cup Sugar
- 1 Beaten Egg
- 3 to 3 and 1/2 Cups of Flour
- 1/4 Teaspoon Salt
- 6 Tablespoons Melted and Cooled Butter
For the Cinnamon Apple Filling:
- 1/2 Cup Dark Brown Sugar
- 1/2 Cup Softened Unsalted Butter
- 3 Tablespoons Ground Cinnamon
- Three Apples Chopped finely (You may want to increase this based on your personal taste)
Cream Cheese Glaze:
- 8 Ounces of Softened Cream Cheese
- 4 Tablespoons/ 1/2 A Stick of Butter
- 2 Cups Confectioner’s Sugar
- 1/4 Cup Heavy Cream or Half-and-Half
- Make sure your water and milk are warm but not hot. Too hot will destroy the yeast.
- In your dough making bowl, place yeast, warm water, and sugar and combine. Allow the yeast to “bloom” making a layer of bubbles and dissolving.
- Add warmed milk, sugar, and beaten egg. Mix. Add melted Butter and combine.
- Add initially 2 to 2 1/2 flour and salt, mixing by hand, then gradually add remaining flour until the dough pulls away from the side of the bowl and forms a ball – but still feels slightly sticky to the touch.
- Find a warm place in for dough to rise, covered with a clean damp cloth.
- Allow the dough to rest and rise for approximately 2 hours.
- While you are waiting for dough to rise, combine butter, brown sugar, and cinnamon in a separate bowl and set aside.
- Chop apples into bite sized chunks.
- When dough has sufficiently risen, turn out onto a floured surface and roll out into a large rectangle. If the edges aren’t perfectly straight it is ok, you can either trip before or after you roll the dough up into cinnamon rolls.
- Smear your butter and brown sugar mixture over the surface of your rolled out dough.
- Add a fine layer of chopped apples covering the surface of the dough.
- Gently, starting at one of the longer sides of the rectangle, roll your dough into one long log. This will give you more “rolls.” If you want to go with bigger but less “rolls” you can roll from the shorter end of the rectangle.
- Slice your log in half, and then slice the halves in half, making equal sized roll slices. If you want to be extremely controlled, you can pre-measure with a ruler of sorts as well. (I don’t).
- Place each roll into a prepared (greased) baking dish so you see the side of the roll – (The cinnamon and apple goodness should be spiraling out and showing its glory).
- Cover and refrigerate baking dish over night.
- The next morning, remove baking dish and allow to rise in a warm spot for about an hour. (I usually start my oven and allow the bread to sit on top of your stove or set the oven at the lowest setting it can go and let the rolls rest inside).
- Preheat oven to 350*
- Bake for 25-30 minutes until dough has baked into a lovely golden color but not over cooked.
- In a mixer place cream cheese, butter and combine.
- Slowly incorporate confectioner’s sugar.
- Add heavy cream or half and half to thin mixture into a glaze.
- When Apple Cinnamon Rolls are fresh from the oven, spread glaze on top.


 In my house, the rule is, we eat the ugly cookies first. I’m serious. So, you can guess where the cookies that had caramel spillage went before the photos were taken.


 I actually cooked these a little longer because I wanted to make sure the topping set. In doing so, I think the color of the base layer was more brown and caramelish than intended.